Creating an onboarding group
Creating an onboarding group enables you to create several employees' files simultaneously.
To create futurs employees' files at the same time, they must share the same group start date and template. This function can be useful if your company employs several people at once for whom the same information is required, for example, seasonal workers.
You can create an onboarding group by either:
Manually entering all the information
Importing information
Please check:
that the group start date of all the futurs employees to ensure that it is the same;
that the template to apply to the group is the same for all employees.
To create an onboarding group from manual input, from the Core HR module:
From the sidebar, click
 Create an onboarding group.
Select the template you wish to apply to employee files and click on Select.
On some templates, the indication
 can be displayed: by hovering this indicator, you will see complementaries information added by your administrator to guide you on the template selection.
Fill in the arrival date in the field Start date.
To add a first employee, click on
 Add new row.
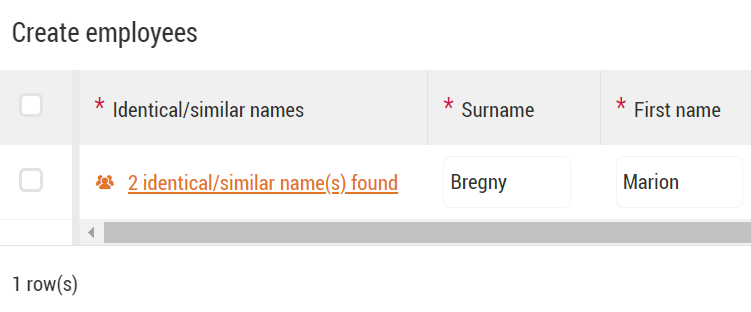
Enter the Surname and First name of the employee and click outside the inserts to start the search for identical names.
If identical names have been found, click on identical/similar name(s) found on the left to display the list of employees concerned: in blue the employees with a file, in grey the employees saved in draft mode.
If an identical name matches the employee you want to create, click on the line of the employee in the tab and click on Confirm to update your employee's information with the onboarding group: you can also delete the line by clicking on Delete on the right.
If identical names don't match, click on Dismiss to continue your employees' creation.
If no identical name has been found, the indication No identical/similar names appears on the left.
Fill in all mandatory fields.
Do the same steps to add all of your employees' information.
On the top of the page, you can either:
Click on Save draft when the option is available. Employees files in draft mode appear in the dashboard Onboarding groups with the indication of how many files are in the group: you can finalise the hiring at a later time.
Click on Create employees and then on Confirm on the pop up that appears.
It is possible, by selecting the concerned employees, to create only some employees and leave the other in a draft mode.
In this case, the number of employee file to create for the onboarding group changes in the dashboard Onboarding groups.
Please check:
that the group start date of all the futurs employees to ensure that it is the same;
that the template to apply to the group is the same for all employees.
that your file format is .xlsx, .xls or .csv and the values in your columns match the field values in the Create employees table.
To create a hiring group by importing a file, the Surname, First name and Date of birth fields are mandatory.
It is possible to also add fields Gender, Population type, Contract type and Contract end date (format DD/MM/YYYY).
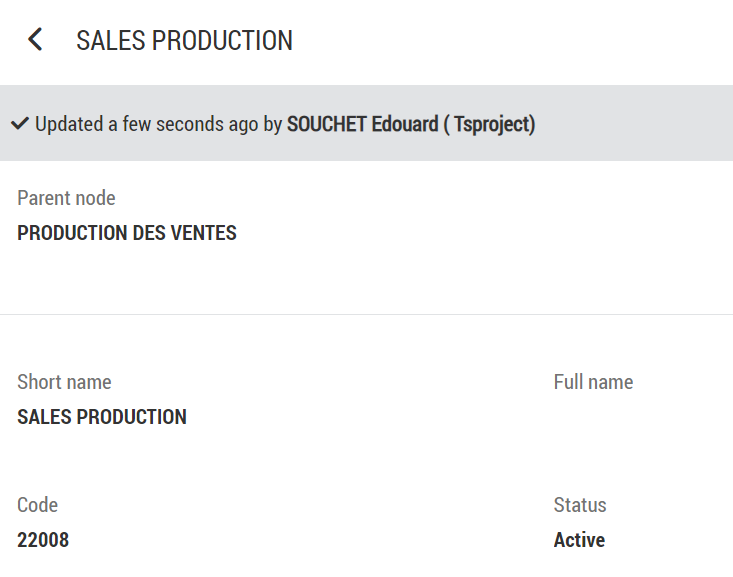
But for fields with values from the librairies, the code of the node must be fill in and not the name of the node. This is for fields Job, Organisational structure, Legal structure and Line manager.
In the example below, to get the field value Sales production, the value in the file must be the one in the field Code, namely 22008.
 |
Once your file is ready, from the Core HR module:
From the sidebar, click
Create an onboarding group.Select the template you wish to apply to employee files and click on Select.
On some templates, the indication
can be displayed: by hovering this indicator, you will see complementaries information added by your administrator to guide you on the template selection.Fill in the arrival date in the field Start date.
Drop your file in the insert in the middle of the page or click on Click here to select one, above the insert.
The pop up that appears allow you to map data in your file with Core HR fields:
If the name of your file's columns matches exactly the name of a field, the mapping is done automatically.
Otherwise, select the field in which you wish to add the data of your file with the dropdown lists Table column.
As long as a your data is not mapped with a Core HR field, the indication Ignore imported column is display in the dropdown list and your data will not be imported.
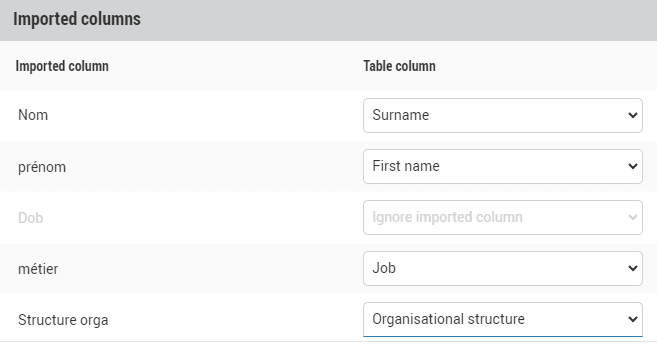
Once the mapping is done, click on Validate to add your file's data in the Create employees tab.
Then actions are the same as steps 5 to 8 to create an onboarding group manually: click on Create employees when all informations are filled in.
If your administrator has activated the corresponding right for your role, you can save an event form in draft mode.
This mode is available as soon as a certain number of mandatory fields have been filled in. Simply click on Save draft at the top right of the event form page.
If an event form is in draft mode, the employee file is locked and cannot be modified. In the same way, no other employee event can be started or ended from a dashboard until the draft is validated.
When an event form has been saved in draft mode, this is indicated at the top of the employee file.
To unlock the employee file:
If you are responsible for the draft mode of an event form, the form must be re-saved in draft mode, validated or deleted.
If you are not responsible for draft mode, you must wait for the person responsible to take one of the three actions listed above.
In some cases, your administrator may assign you the right to override this block, in which case you can act as the person responsible for the draft.