The Employee file Documents tab
The Documents tab contains a dashboard summarising the employee's documents, and an action button lets you generate or add a document from this page.
Documents can be previewed, downloaded and deleted from the Actions column in the
dashboard, by clicking respectively on  > Preview, Download or Delete.
 |
Caution:
preview is only available for the following format: PDF, JPG, JPEG, PNG, GIF;
deleting a document is an irreversible action.
These are the column headings of the table in the Documents tab.
Document type: name of document/country of issue (if applicable)/document ID number (if applicable).
Start date: start of document validity period (if applicable).
End date: end of document validity period (if applicable).
File number per record: file upload number. When several files are uploaded to the same record, the information in each column is identical apart from this number.
Other information: information on the status of the document, such as uploaded, generated, signed, electronically signed and the language.
File name: source file name.
Actions: options to sign, download or delete.
From the employee file, go to the Documents tab
Click on Upload a document on the top right.
Select the type of document you want to add and click on Select.
For Certifications, Contracts and Government-issued ID type, the key of the document is asked. This key is respectively the certification, the contract number and the country of issue.
Click on the insert in the middle of the page and select a file from your computer.
Select then the validity dates, indicate if the document needs to be marked as signed and change the name of the document if needed.
These dates are for reference only, they have no impact on the availability of the document.
Click on Confirm on the top right of the page to add your document.
The added document is visible in the Documents tab, with the information uploaded in the Other information column.
From the employee file, you can use a single document template to generate a document at a precise date in order to select the data to display in this document.
Using this option, you can generate different types of documents for an employee.
Once the document is active and the option activated for document generation:
From an employee file, go to the Documents tab, then click Generate a document in the top right;
Select the type of document and click Select;
In the Document properties step, you can:
Select the Document key for the Contracts (Addendum) and Certification type documents;
This key allows you to select the specific contract or certification linked to the generated document.
Specify a Validity start date and an Expiry date;
These dates are for reference only, they have no impact on the availability of the document or the data contained.
Edit the File name.
By default, the structure is employeesurname_typeofdocument_version. You can edit this name, with a limit of 150 alphanumerical characters, without spaces. The special characters are included.
In the Data selection step, you can:
Select the document generation date;
This date determines the data included in the document: only the data sections active on the generation date will be included in the generated document.
All contracts available on the generation date specified are displayed at the bottom of the page.
Choose whether or not to include all contracts on the generation date;
This point is detailed in the section below.
Choose whether or not to include all compensation histories;
This point is detailed in the section below.
Select the contract for the generation of the document if several contracts are available on the generation date entered.
If you choose to include all contracts, the contract selected at the bottom of the page will be considered the main contract.
This includes the data sections Situation, Probationary periods, Internal probationary periods and Leaves of absence linked to the contract.
In the Generation properties step, you can:
Select the template and the language of the document: the available options depend on your Sketch configuration;
Select the file type: Word or PDF.
Click Generate a document once all the information has been entered;
The document appears in the Documents dashboard of the Documents tab: clicking on the row of the document on
, you can download it, sign it electronically or delete it.
When generating the document, two options are available to define the data contained in the document:
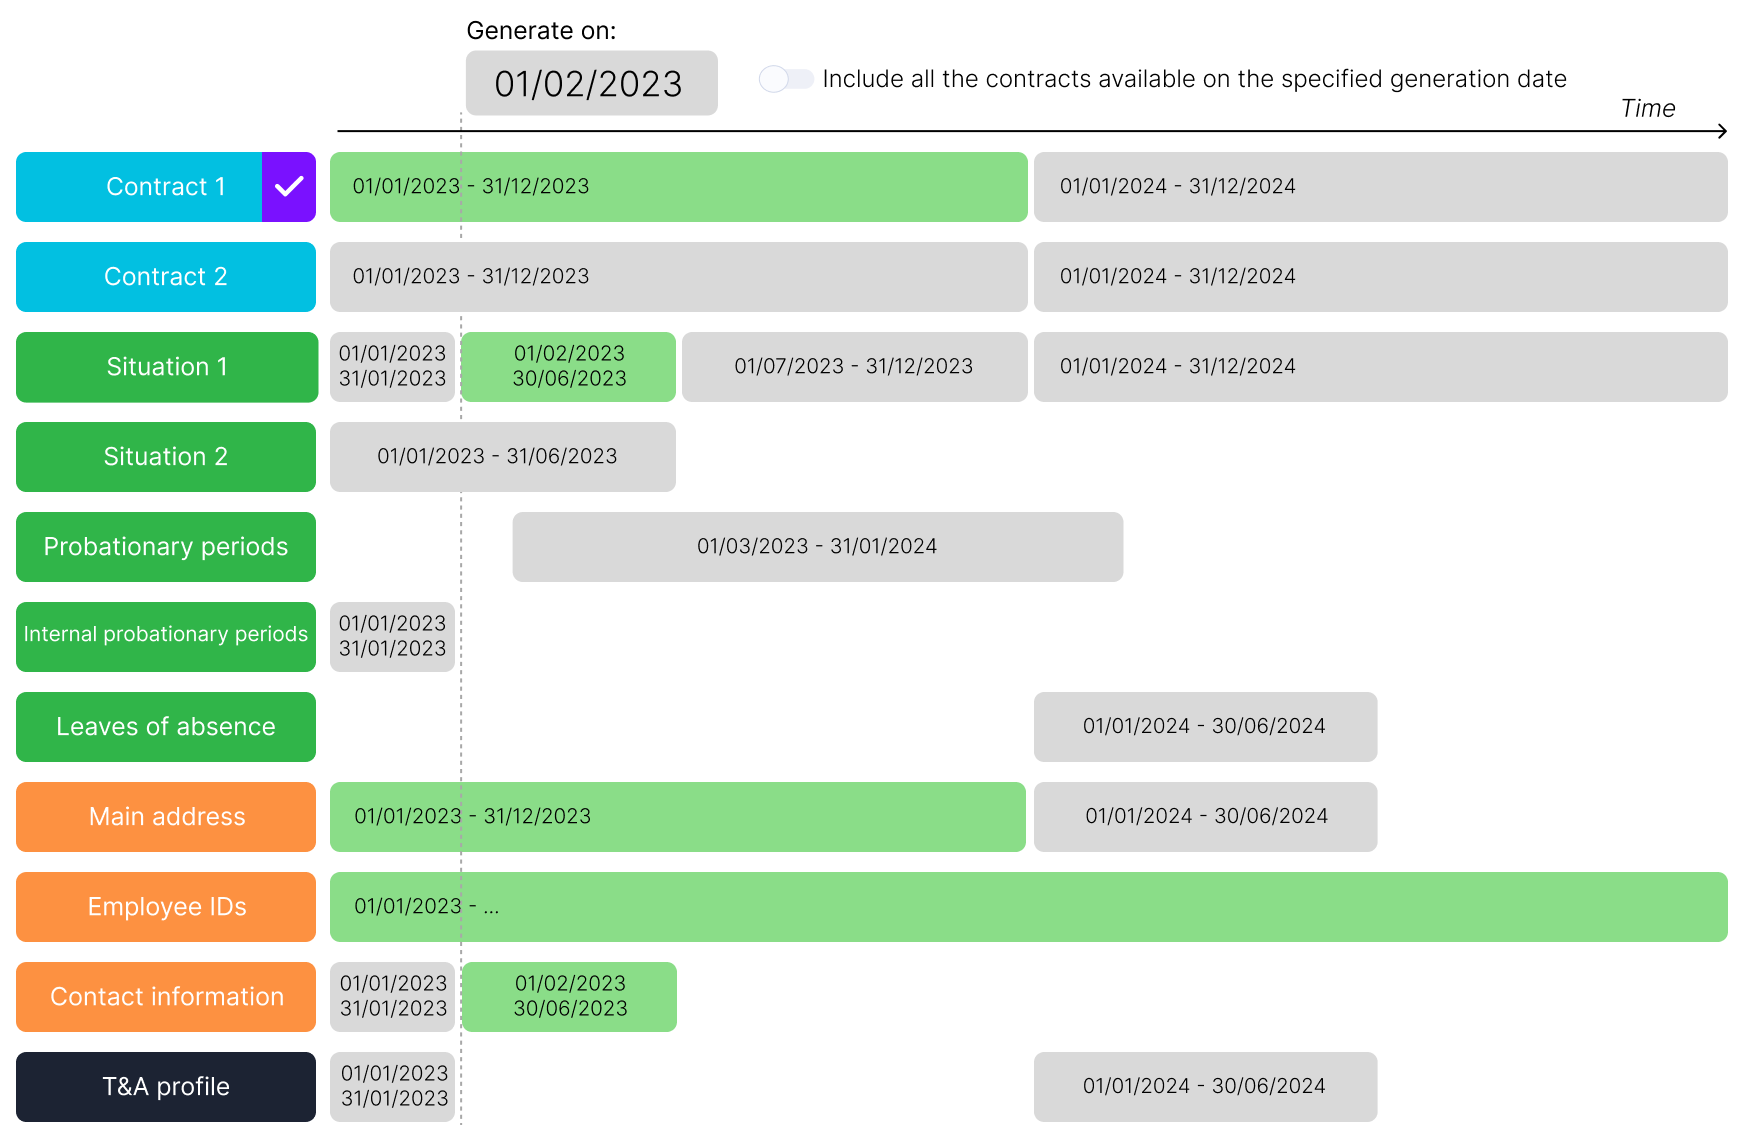
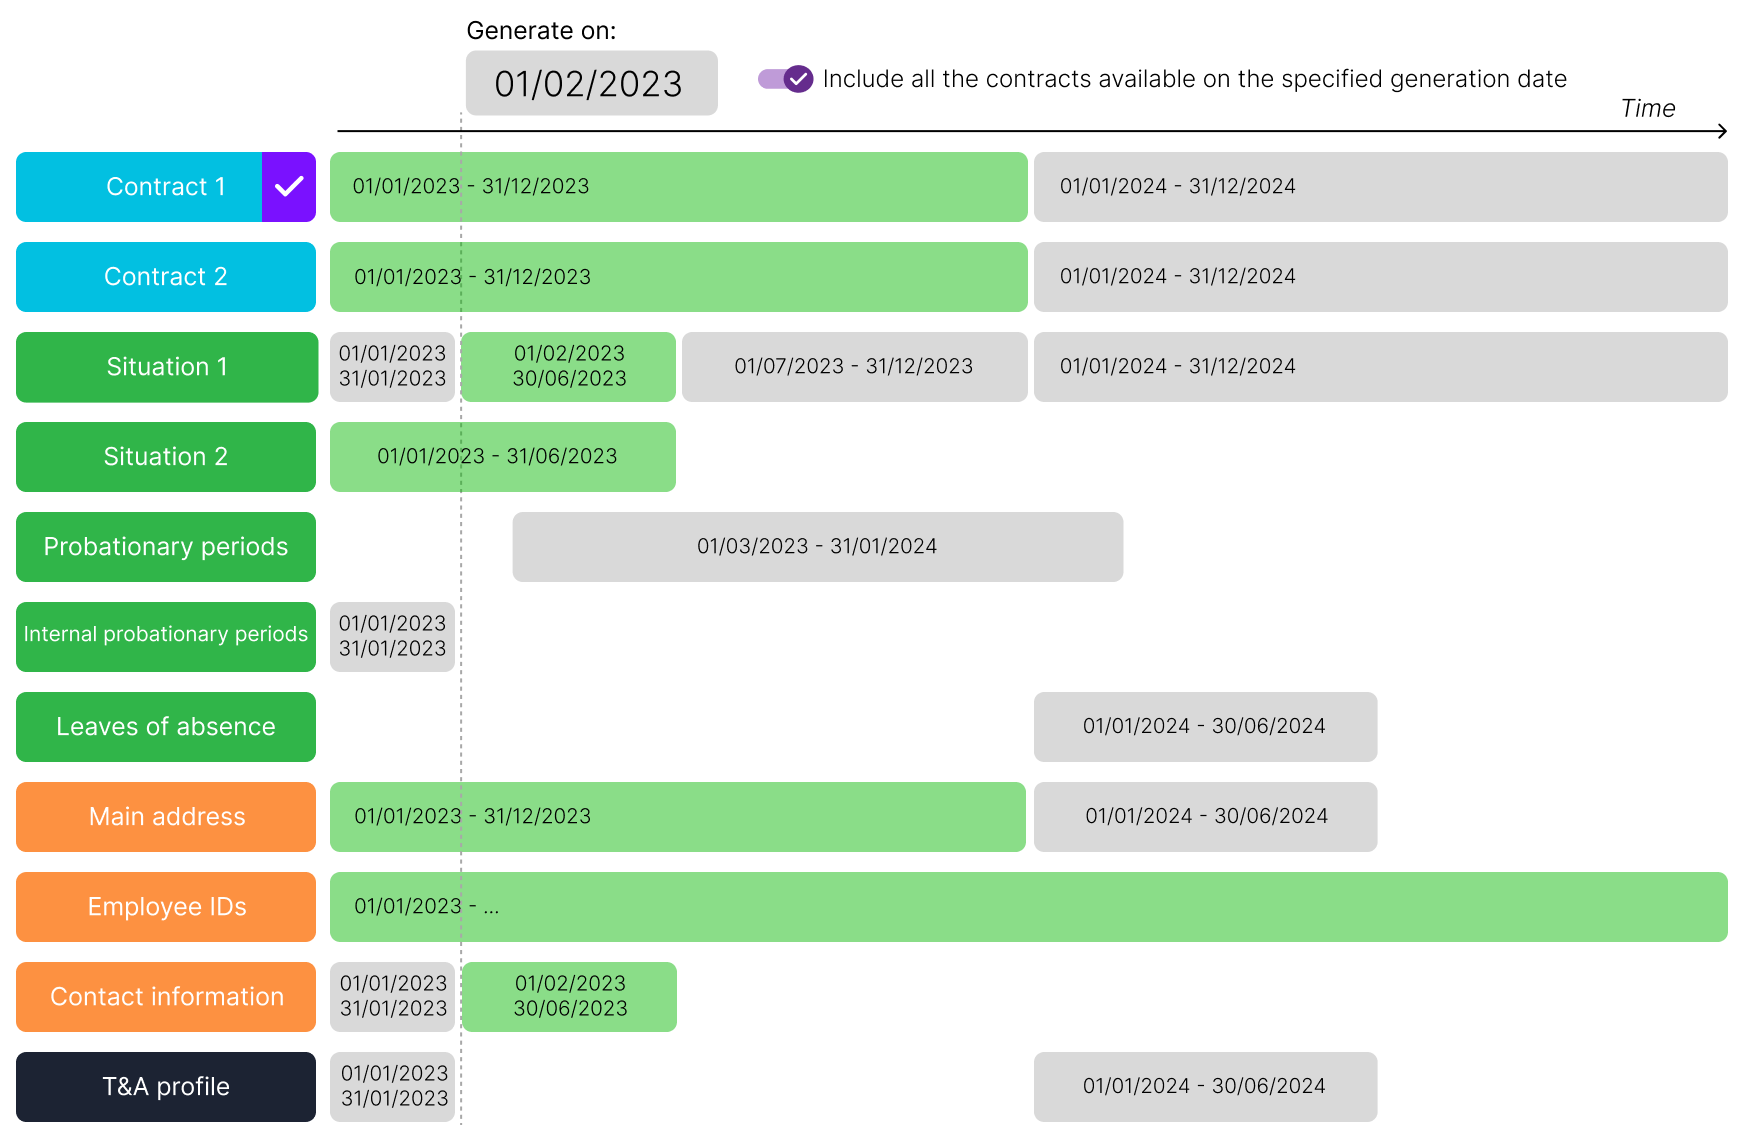
option 1: Include all the contracts whose generation dates match the specified generation date
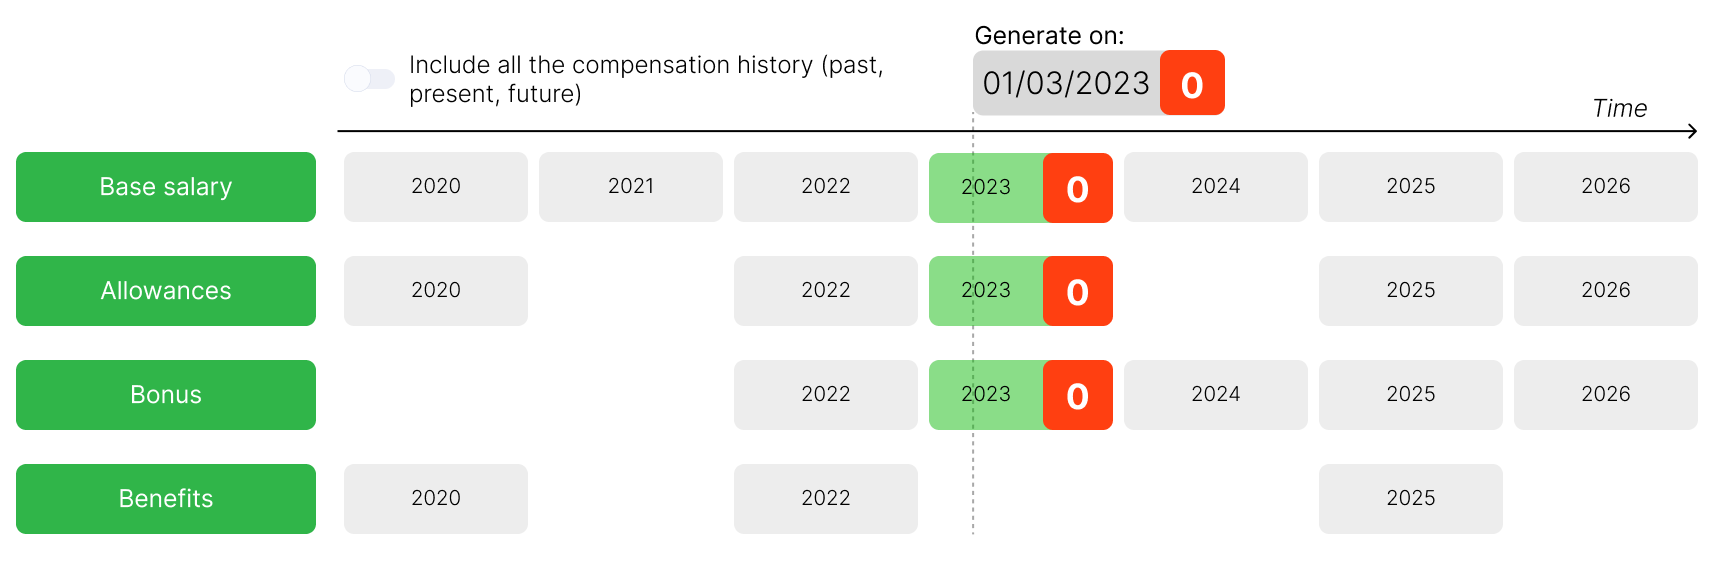
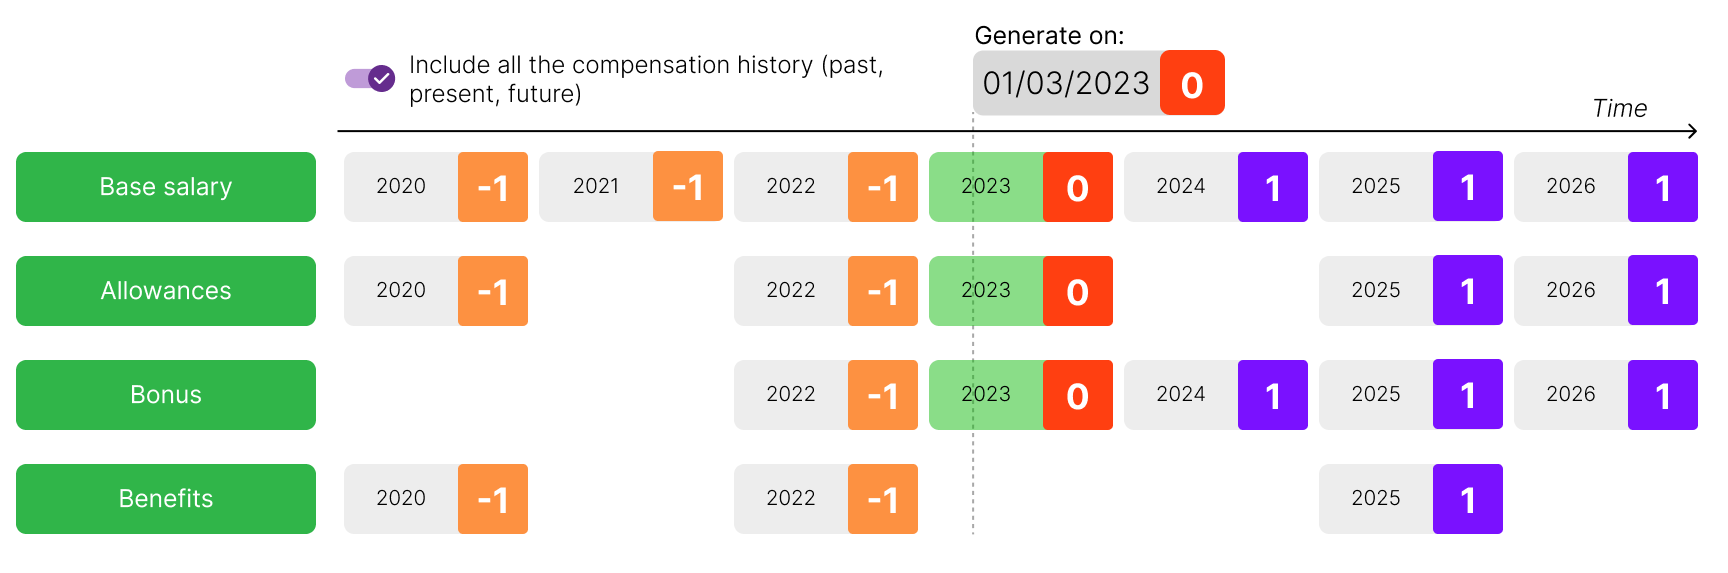
option 2: Include all the compensation history (past, present, future)
Example of use: if one of your employees has two part-time contracts in your company, you can decide to generate their employment contract with just one part-time contract.
You will therefore keep option 1 deactivated and select the required part-time contract at the bottom of the page.
With option 1 deactivated:
the contract selected in the Data selection step and its related data sources (Situation, Probationary periods, Internal probationary periods and Leaves of absence) are used when generating the document;
the generation date filters the rest of the data: only the data active on the generation date is included in the document;
this operation is compatible with previous templates.
In other words, in the scenario below, with a document generation date of 01/02/2023 and contract 1 selected:
situation 1 linked to contract 1 is included;
three records are included, since they are active on the document generation date.
Example of use: if one of your employees has two part-time contracts in your company, you can decide to generate their employment contract mentioning both part-time contracts, and specifying the main contract.
You will therefore activate option 1 and select the employee’s main part-time contract at the bottom of the page.
With option 1 activated:
the contract selected in the Data selection step and its related data sources (Situation, Probationary periods, Internal probationary periods and Leaves of absence) are used when generating the document;
on Sketch, for the isselected category, this contract is marked with the value true.
the other contracts active on the generation date are also included;
the generation date filters the other data: only the data active on the generation date is included in the document.
In other words, in the scenario below, with a document generation date of 01/02/2023 and contract 1 selected:
situation 1 linked to contract 1 is included;
contract 2 and its situation 2 are included;
three records are included, since they are active on the document generation date.
You want to generate the employment contract for your employee, displaying only the current compensation information of the permanent contract.
You will therefore keep option 2 deactivated.
With option 2 deactivated:
only the compensation elements active on the generation date are included in the document;
on Sketch, for the HistoricalOrderIndex category, these elements are marked with the value 0.
this operation is compatible with previous templates.
In other words, in the scenario below, with a document generation date of 01/03/2023:
only the elements from the year 2023 are included, with the value 0
You want to generate the employment contract for your employee, displaying all the compensation information since they joined the company.
With option 2 activated:
all versions of the compensation elements are included in the document;
on Sketch, for the HistoricalOrderIndex category, the elements are marked with the value:
-1 for past elements;
0 for elements on the generation date;
1 for future elements.
In other words, in the scenario below, with a document generation date of 01/03/2023:
all records are included, with a different HistoricalOrderIndex value.
When a document is added or generated for an employee, it can be signed.
There are two types of signatures:
a simple signature for documents added to the employee file;
an electronic signature for documents generated using the Document generation option.
When a document has been added using the Add a document button from the Documents tab of the employee file, this appears in the dashboard with the Added tag in the Additional information column.
To sign a document, from the Documents tab of the employee file:
On the row of the document, click on the
button in the Actions column;Click on Mark as signed;
The indication Signed then appears in the Additional information column.
Prerequisite:
you must have subscribed to the Electronic signature option with the partner Connective;
you must have the necessary rights on the Administration module: Electronically sign documents and View follow-up: E-signatures.
When a document has been generated using the Generate a document button from the Documents tab of the employee file, this appears in the dashboard with the indication Generated in the Additional information column.
You can then proceed with the electronic signature of the document, in one of four different ways:
email code: the signer receives a code by mail to be entered on signing;
handwritten: the signer enters their surname and first name and chooses a font to sign;
manual signature: the signer manually signs in an insert;
one time SMS code: the signer receives a code by SMS to be entered on signing.
To start the electronic signature procedure for a document, from the Documents tab of the employee file:
On the row of the document, click on the
button in the Actions column;Click on Sign document;
In the Signer column, select an employee;
In the Email column, enter the employee’s email;
This field is mandatory, whatever the method used.
Choose an option in the Signing method column;
If the signature option is the one time SMS code, the phone number is mandatory in the Mobile column, in format + country code.
In the Language column, select the language in which the recipient should receive the email and see the signature settings;
If several people have to sign the document, click on the
 Add new row button in the top right and enter the information for each signer.
You can add a maximum of nine signers;
The order can have an impact depending on your configuration, contact your administrator for more information;
You can delete a signer by clicking on the
button of the Actions column, then on  Delete.
Once all the information is entered, click on Invite to start the electronic signature procedure.
The indication Pending signature then appears in the dashboard, in the Additional information column.
Once the signature procedure is launched from the Core HR back office, an email is sent to the signer with a link to access the online signature tool.
From this link:
The signer must read the document in full and check the box at the bottom (acceptance of the conditions of use, the privacy policy and the cookie policy) then click on Sign.
Depending on the signature method:
Email code: the signer enters their complete email address. A code is sent to them at this address, which they must enter in order to sign the document.
If the email does not match the one entered when starting the procedure, the signer cannot move on to the next step.
Handwritten: the signer chooses a font and if necessary edits the name used for the signature to sign the document.
Manual: the signer signs in the insert provided for signing the document.
One time SMS code: the signer enters the last four digits of their phone number. A code is sent to them, which they must enter in order to sign the document.
If the phone number does not match the one entered when starting the procedure, the signer cannot move on to the next step.
Once the information has been entered, a message indicates that the document is correctly signed and the signature appears at the bottom of the document.
The indication Electronically signed then appears in the Documents dashboard, in the Additional information column.
If there are several signers, this indication only appears once they have all signed.
To find out which signer has already signed the document, from the Documents dashboard, click on the
button in the Actions column, then on View signature status. Signed appears in the Status column for those people who have already signed the document. The others have the indication Pending signature.
Specific case: if a signer refuses to sign the document, they can click on the Refuse button when reading and explain their refusal in the pop-up which appears. The signature procedure is stopped completely, for all signers.
For this signer, from the Documents dashboard, clicking on the button in the Actions column, then on View signature status, Refused appears in the Status column with the reason for rejection in the next column.
On the row of the document, Signature rejected is specified in the Additional information column.
Once the signature has been rejected by a signer, the whole process must be cancelled from the signature status pop-up, and restarted.