Template configuration
There are two types of template:
the Master template that provides a ready-made template for all other templates. It is generally not used to create employees, but it is a common base for all templates.
child templates, usually created from a copy of the Master template.
You can create a new template from scratch: this template, even if it is not duplicated from the Master template, will inherit of its configuration when it's created. You can then decide whether you wish to keep this configuration or not.
To create a new template, from the Core HR module:
Click on the menu
 Settings on the left side panel.
From the Template tab, click on
 on the top right or on Create at the bottom of the page.
In the Details tab:
Fill in the required fields Template name and Code, that must be uniques.
Select a Status for this template:
Draft: the template can't be selected by users, but it can be updated on the Settings menu;
Active: the template is finalised and can be selected by used, it can be updated as well;
Inactive: this option must be selected only if the template is used on employees' files but should not be used anymore.
Optionally: enter Comments that will appear below the name of the template in the Templates tab.
These comments are visible by users when they hover the
 icon next to the template.
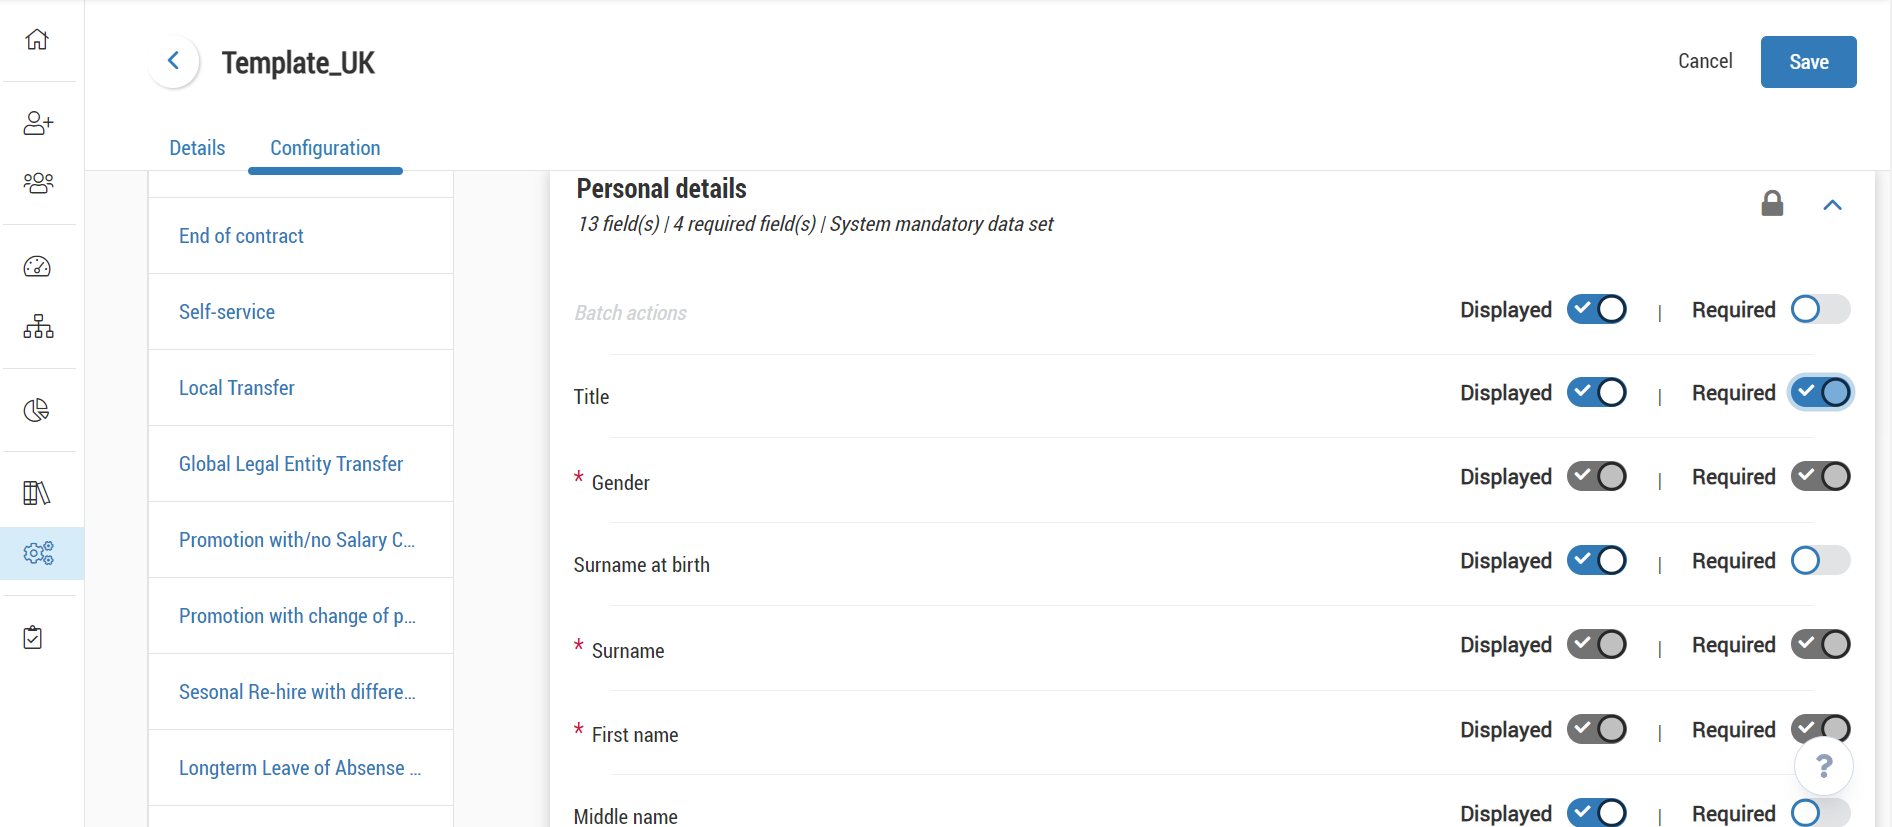
On the Configuration tab, start by configuring the Employee file by selecting it on the left:
Choose the data sets to activate:
Deactivated data sets are on the bottom of the page: click on the icon
 on the line of a data set to activate it, you can find it after on the top of the page.
Data sets inherited from the Master template are already activated: you can delete it by clicking on the icon
 .
.System data sets cannot be deleted, it is indicated with the icon
 .
.
Configure fields by data set:
Click on the icon
 to expand the data set.
If the field must be visible, activate the option Displayed.
If the field must be filled in, activate the option Required.
A Required field is automatically Displayed.
These two actions can be done on all fields of the data sets at once, from the line Batch actions.
Optionally: at the top of the Activated data sets, click on
 if you wish to either:
Activate all to activate all data sets possible in an event.
Deactivate all to deactivate all data sets that have been added to the Activated data sets. Please note that this action does not deactivate data sets labelled System mandatory data set.
Expand all to expand all data set accordions and view all fields.
Collapse all to reduce all data set accordions and hide all fields.
Do the same actions to configure all events linked to this template, as well as the Self-service.
Click Save to create your template.
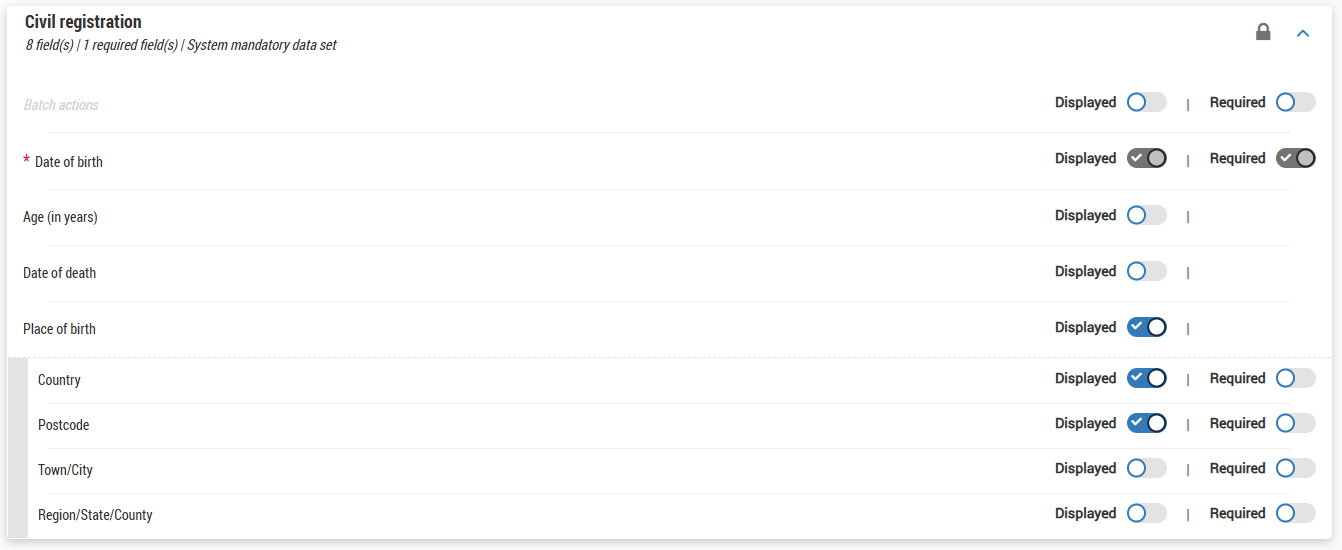
In the Civil registration data set, there is a block called Place of birth, with four fields.
From the configuration of a template, if you want to activate the Visible option of a field in this block, it is imperative to activate manually the same option for the block itself.
The activation of the block is not automatic: without this action, and despite the activation of one or more fields, the block will not be displayed.
 |
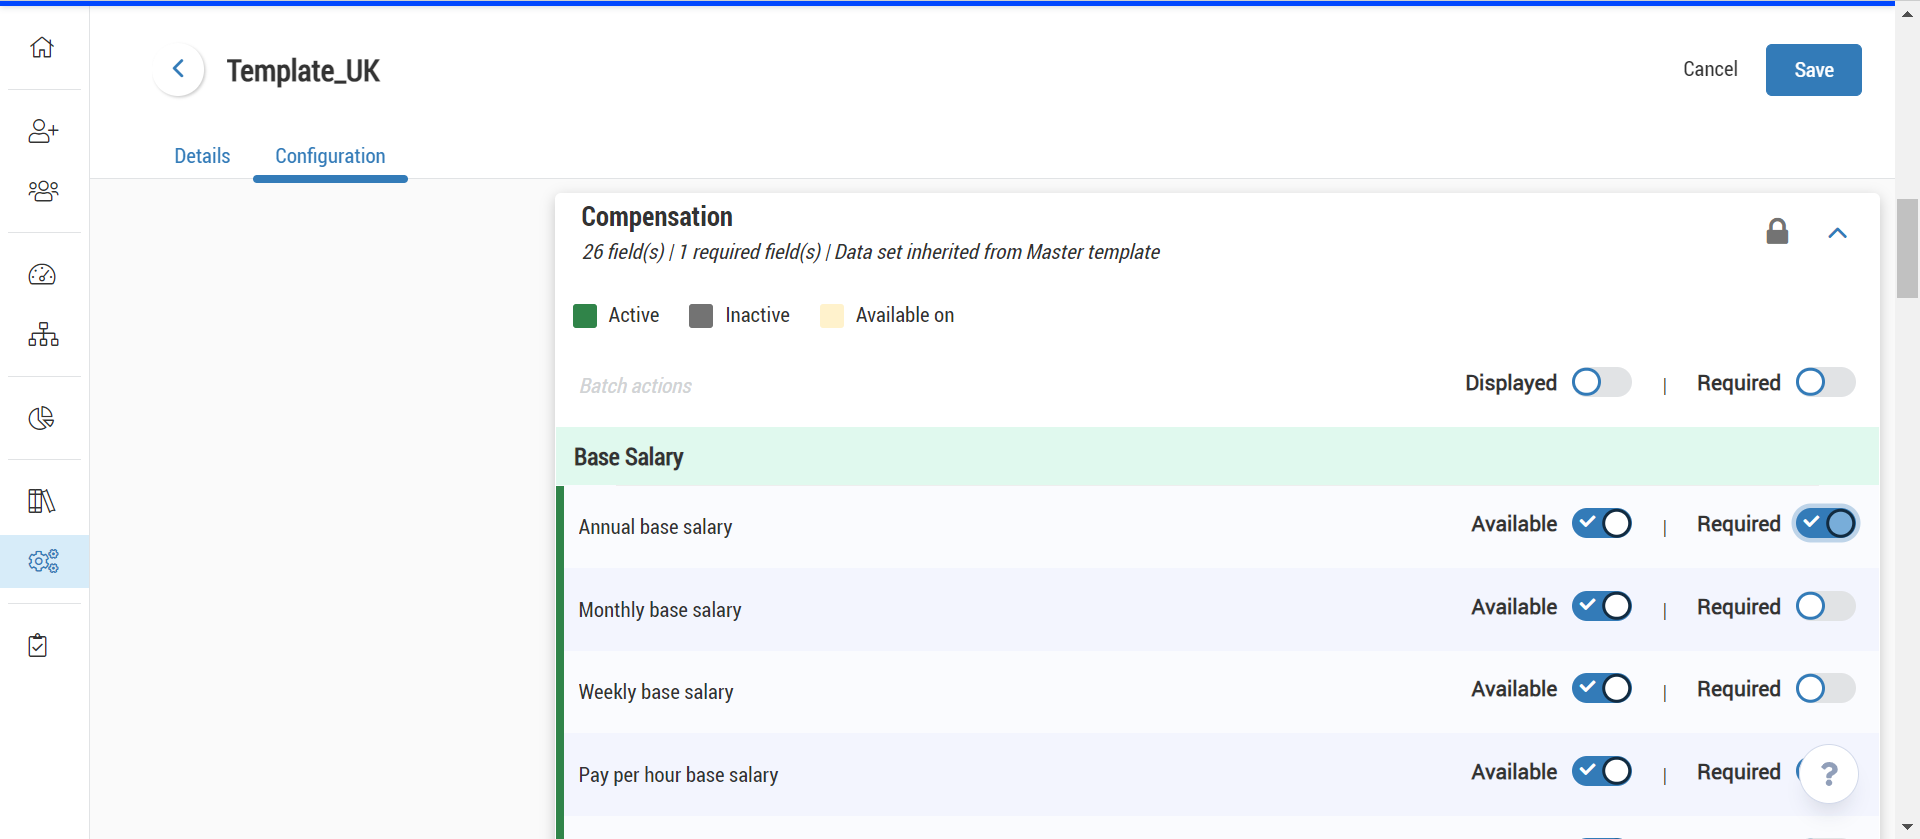
Fields displayed on the Compensation data sets come from the compensation structure on the menu Settings > Compensation.
The Displayed and Required options are identical to other data sets.
Data might have been configured with availability start and end dates. You can always activate the option Displayed and Required, no matter the availability dates: fields will appear or disappear from employees' files depending on these dates.
An event is an administrative process carried out by HR staff in relation to an employee, which may have an impact on data in the employee file.
Events are configured per templated: once a template is applied to an employee file, when an event will be started for this employee, what is displayed will depend on the event configuration on the template.
On a template configuration, an event:
has at least one system data set activated by default (except for Self-service): this means that the data set is necessary to complete the event;
is configured in the same way as the Employee file, please check steps 4 and 5 of a template creation above for more information;
must have its data set activated on the Employee file configuration to end the event for an employee. This is to end events:
Medical check-up: data sets Medical check-ups and Fitness to work must be activated.
Probationary period: the data set Probationary periods must be activated.
Internal probationary period: the data set Internal probationary periods must be activated.
Leave of absence: the data set Leaves of absence must be activated.
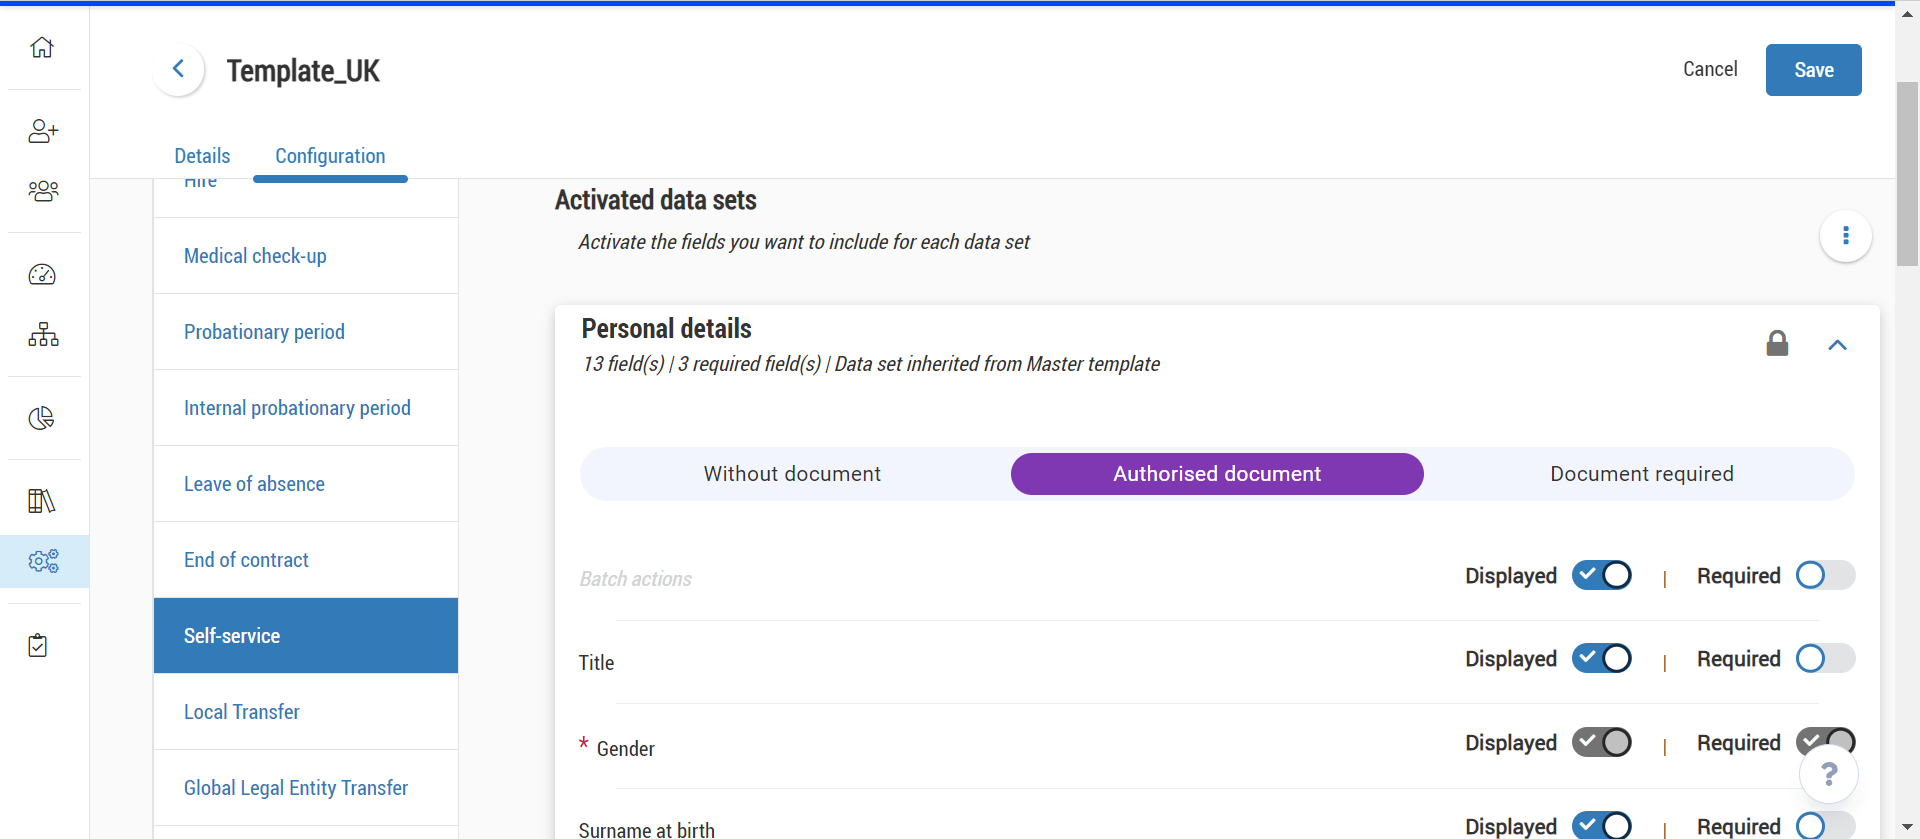
Self-service event specific case
This part allows you to configure data sets to which employees have access in their space, through the Employee Self-Service.
The particularity of the Self-Service is that you can decide if the employee can add documents.
There are two methods to allow employees to add documents on data sets from their personal space:
by editing the data set;
In this case, all Self-Service data sets can have a document, except: Civil registration, Contact information, German regulation and Administrative points of contact.
To configure this adding type, expand the data set by clicking on
and select one of the three following options to add a document for this data set:Without document: employees don't have the option of adding a document.
Authorised document: employees can add a document if they wish.
Document required: employees must add a document if they make a change to their data for this section.
On the user side, when a document is authorised or required on a data set, when the data set will be edited on the personal space, an insert on the bottom of the data set allows the upload.
without editing the data set.
In this case, only three data sets can have a document: Bank details, Government-issued ID, Qualifications.
To authorise this adding type, it is necessary to activate three rights for employees from the Administration module: Upload documents for Qualifications, Upload documents for Government-issued IDs, Upload documents for Bank details.
In this case, users have to click on the icon
of one of the three sections to upload a document.
We advise you to activate the first method and deactivate the second one, to leave more options to users.
The template duplication option can save you some time if two templates have a common base of information but some data changes. You can duplicate the Master template or a child template.
To duplicate a template, from the Core HR module:
Click on the menu
Settings on the left side panel.From the Templates tab, click on Duplicate on the line of the template to duplicate.
Change the Template name and Code fields, and change the Status field if needed.
Optionally: enter Comments that will appear below the name of the template in the Templates tab.
These comments are visible by users when they hover the
icon next to the template.If your new template has some differences with the one it is duplicated from, update the necessary information in the Configuration tab, based on the steps 4 and 5 of the template creation above.
Click on Save to save your new template.
Editing a template is identical to the creation and duplication process of a template.
On the other hand, its impacts are more significant, especially for Employees files:
if you deactivate a data set, it will be deactivated on employees files to which this template is applied to;
On the employee file, the data set is locked, the icon
and the message This data set is deactivated in the applied template are displayed.Information contained in that data set is not lost: users can't access it as long as the data set is not activated in the template applied to the employee file.
if you activate a data set, it will be activated in employees files to which the template is applied to;
On the employee file, the message This data set is empty is displayed for the data set.
if a field is activated and is coming from a library, make sure that the library exists and has data;
if you deactivate a field by switching off the option Displayed, it will no longer be visible on employees files to which the template is applied to;
Information contained in that field is not lost: users can't access it as long as the field is not displayed in the template applied to the employee file.
if you activate or deactivate the status Required on a field in an active data set, there is no impact on employees file to which the template is applied to;
if you edit the Master template, changes will automatically apply to child templates.
If you have any doubts on potential impacts, we advise you to duplicate a template to create a new one, and make necessary changes on the new one.
To edit a template, from the Core HR module:
Click on the menu
Settings on the left side panel.From the Templates tab, click on Edit on the line of the template to edit.
Update the necessary information based on the step 4 and 5 of a template creation above.
Click Save to update your changes.
A template can be deleted when it has never been applied to any employee file (except the Master template). If you try to delete an already used template, an error message is displayed.
To delete a template, from the Core HR module:
Click on the menu
Settings on the left side panel.From the Templates tab, click on Delete on the line of the template to delete.
Click on OK on the appearing pop up to confirm the suppression.
The Master template determines the minimum data sets activated in all other templates. The other templates are called child templates and "inherit" their configuration from the Master.
It cannot be deleted.
There are two types of data sets:
system data sets added by Cegid HR: they are mandatories, can't be deleted and are with the indication System mandatory data set and the icon
on templates;data sets added when the Master template is configured. For these sections:
they can be deleted from the child template during the creation or the duplication from the Master template;
once the child template is saved once, they can't be deleted and have the indication Data set inherited from master template with the icon
;if they are deleted from the Master template, they are not deleted for child templates, but are no longer locked.
Even if data sets can't be deleted, the user can choose the fields Displayed and/or Required per data set, even if it's different from the Master template.
As soon as the Master template is updated, the modification is applied to child templates, whether they are duplicated or not from the Master template. On the other hand, a modification on a child template has no impact on other templates.
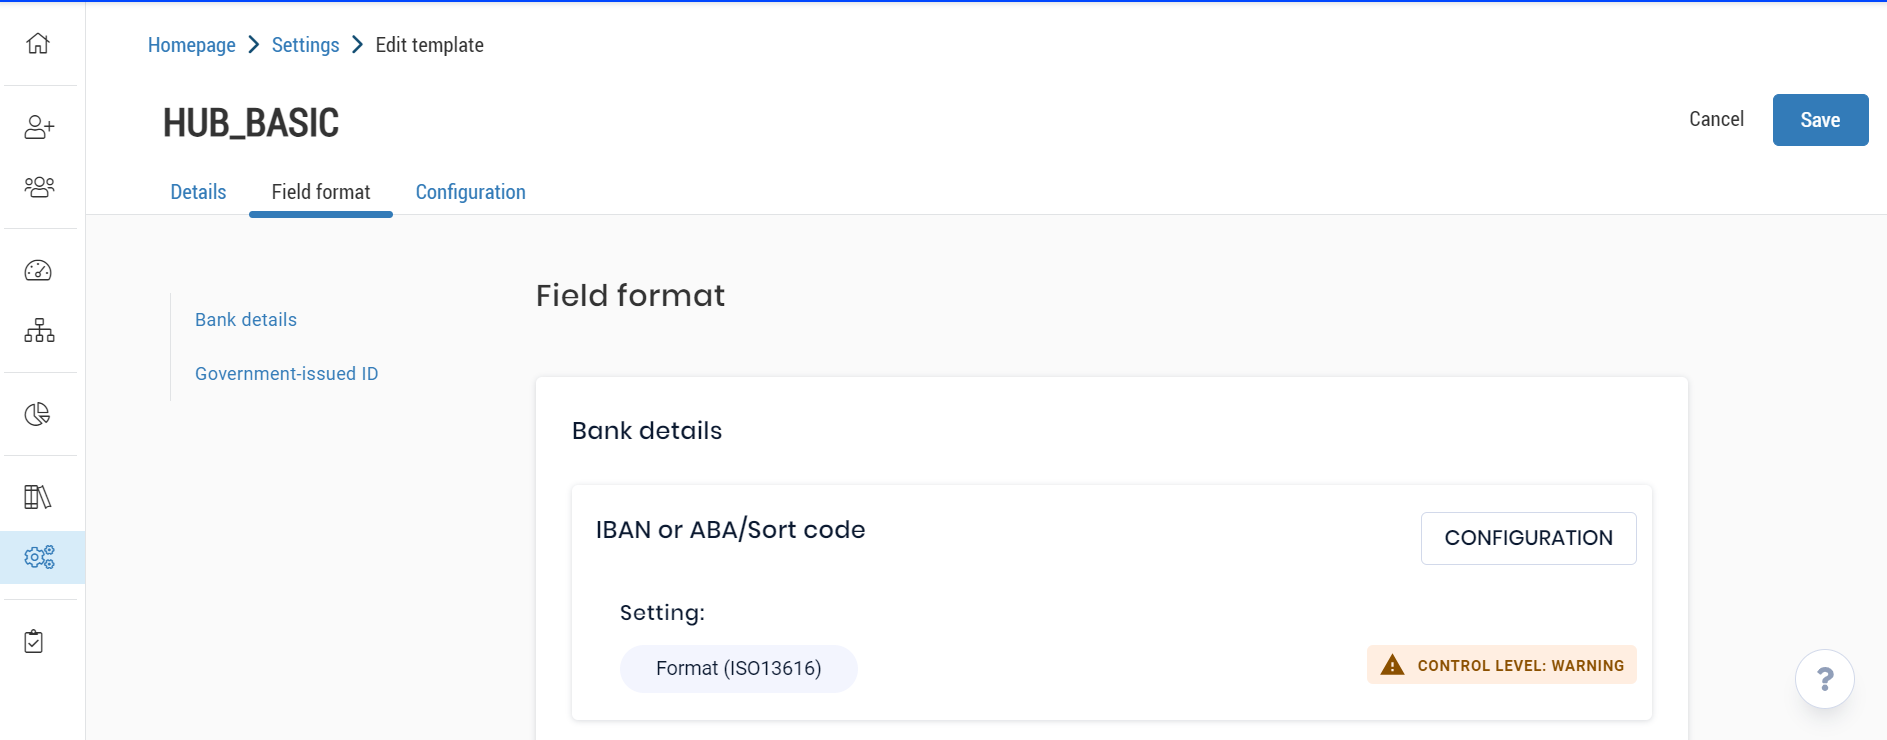
Two fields have been configured to have a specific format:
IBAN or ABA/Sort code of the Bank details data set;
ID number of the Government-issued ID data set.
This field is not configurable, its format must respect the ISO 13 616 standard which is: country code (2 letters which must correspond to the country selected) + control key (2 digits) + basic bank account number (from 2 to 30 alphanumeric characters)
If the data entered is too short, too long, or does not respect the format, the message is displayed under the input insert: The IBAN format is invalid, please enter a valid number.
Warning:
this verification does not work if the Country is Canada or United States of America, as they don't use the IBAN.
You can define, for the input of a format that doesn't respect the ISO 13616 standard, the control level:
Warning: the warning message is displayed, but the field can be saved;
Blocking: the field can't be saved as long as it doesn't respect the requested format.
To configure the control level, from the Core HR module:
Click on the menu
Settings on the left side panel.From the Template tab, click on Edit on the line of the Master template.
Click on the Field format tab.
In the Bank details insert, the format with the ISO standard is already displayed for the IBAN or ABA/Sort code. Click on Configuration to choose the control level.
Select Warning or Blocking on the right side panel.
Click on Save.
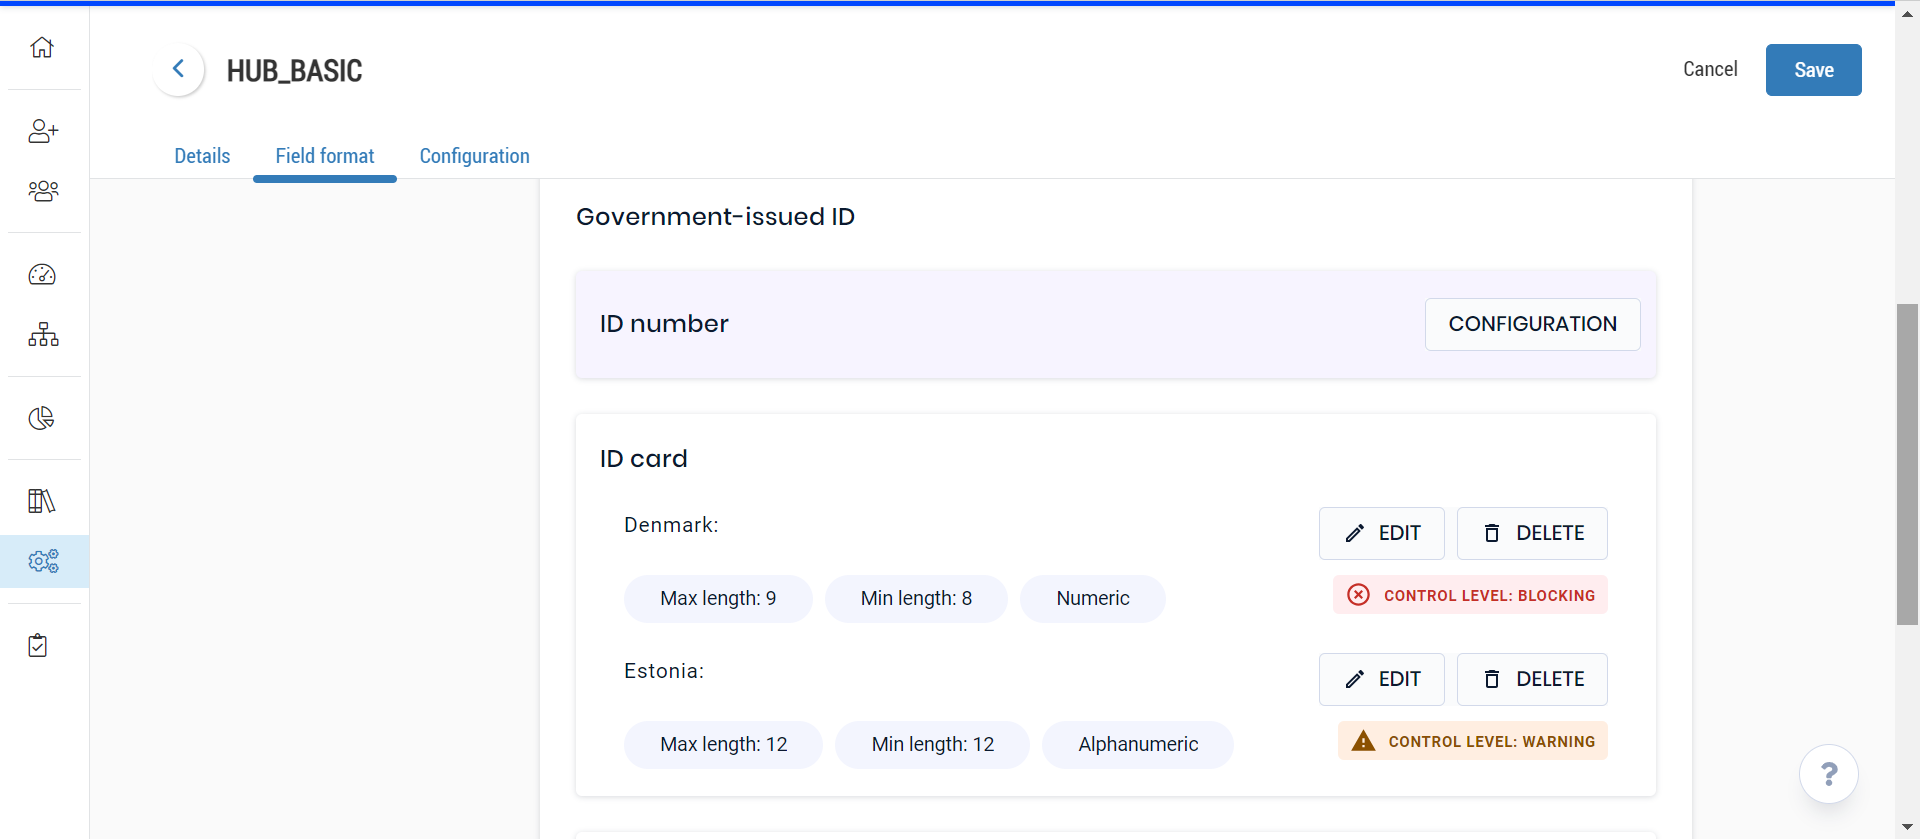
The ID number is entirely configurable by country and ID type, except for the National Insurance Number for France, as the format is specific.
To configure a format for an ID number, from the Core HR module:
Click on the menu
Settings on the left side panel.From the Template tab, click on Edit on the line of the Master template.
Click on the Field format tab.
On the Government-issued ID insert, click on the Configuration button.
Select the Country and the ID type to which you want to apply a specific format.
Define then the format by configuring:
The Minimum length.
The Maximum length: you can enter the same number for both fields if the format must be X characters precisely.
The Authorised field type: Alphabetical (letters from A to Z), Numeric (digits from 0 to 9) or Alphanumeric (combination of letters and digits).
The Control level.
Click on Save once the configuration is ready.
A summary of your configuration appears on the Government-issued ID insert.