The Employee file
All employee data is grouped together in data sets (a group of fields on the same theme). These data sets can include sub-sets, depending on the data type.
All data saved in a data set corresponds to a record.
Some data sets may contain several records: in this case, each record has a start date and an end date.
There are two types of data sets:
data set without sub-section
This type of section contains only one element per section.
Example: the Civil registration data set only has one type of data, which is the last name, first name and other employee information.
These sections have the
 icon when the employee file is displayed.

data set with subsection
This type of section can contain several elements per section.
Example: the Government issued-ID can have data for a passport, an identity card, a driver's licence, etc.
These sections have two icons when the employee file is displayed:
to unfold and view the information and  to add a new element of data.

Below is the list of data sets contained in the employee file with their specific features:
Data set name | Data set type | Description and specifics |
|---|---|---|
Bank details | No data sub-set | This data set groups the elements of the employee’s bank account(s). If the countries Denmark, Norway, or Sweden are selected, a new field appears, respectively named: Reg nr, Register number et Clearing number. The IBAN or ABA/Sort code field must respect the international format to be valid: country code (2 letters) + control key (2 digits) + bank account details (between 2 and 30 alphanumerical characters). If you select the values Canada or United States, the ABA/Sort Code must just respect the standard format: between 5 and 34 characters. |
Certification | With data sub-set | This data set groups the certifications obtained by the employee. The values from the list can be configured from the Training module. |
Civil registration | No data sub-set | This data set is mandatory. This data set groups the employee’s administrative identification elements. When entering the date of birth, the employee cannot be under 10 years old, and it is not possible to enter a date of death in the future. |
Compensation | No data sub-set | This data set groups the employee’s compensation information. This data set has a dedicated article: Managing the Compensation data set. |
Contact information | No data sub-set | This data set groups together the information for communicating with the employee. |
Contracts | With data sub-set | This data set groups the employment contracts and addendum of the employee. It is possible to have several contracts at the same time and have a Situation without a linked contract. It is not possible to delete a contract linked to one or more elements. |
Custom | With data sub-set | This section contains all the custom fields configured by your administrator. |
Disability | No data sub-set | This data set groups the information on the employee’s disabilities. |
Employee file status | No data sub-set | This data set is mandatory. This indicates whether the employee file is Active, Inactive, or Suspended. This data set is updated during the Hire event with the creation of a record and an Active status, and during the End of contract event, with an end date for the current record and the creation of a record the following day with the status Inactive. |
Employee IDs | No data sub-set | This data set is mandatory. This concerns the employee's employee number on Core HR. If Core HR is the master of the data (primary mode), it is when creating the employee that the Employee number is generated automatically: this is unique, does not change and is used to identify the employee in Core HR and the other Cegid HR modules. In this case, the Other ID field is a modifiable text field used to retain another external reference of the employee, for example their ID in the payroll system. However, if a third-party system has control of the data, the Employee number is completed by this third-party software: it is copied to the Other ID field and mirrored in the Administration module. The Initials field can be synchronised with other systems via an export, if necessary. |
Family status | No data sub-set | This data set concerns the employee’s family status: single, married, divorced, etc. |
Fitness to work | No data sub-set | This data set indicates whether the employee is fit to work. |
German regulation | No data sub-set | This data set is used to enter the different rules specific to Germany. |
Government-issued ID | With data sub-set | This data set groups the elements of the employee’s administrative documents. If the document requires an expiry date, this is mandatory. When selecting the country, if the value Canada is selected, in the ID type field, the National insurance number is not available, but the SIN (Social insurance number) value is available. When creating a work permit, if the expiry date is in less than one month (configurable deadline), the information appears in the Expiring administrative documents dashboard of the home page (Employee day-to-day tab). |
Internal probationary periods | With data sub-set | This data set must be linked to an existing contract, and is used to enter an internal probationary period attached to a contract and specify its duration. The specifics are the same as for the Probationary periods data set. |
Key dates | No data sub-set | This data set is mandatory. It concerns the employee’s start date and end date with the group. The Group start date is automatically filled in when the employee is created, with the start date from the hire form. This date can be changed in the employee's file. A second field, Current company start date, can have two behaviours:
Any change in behaviour must be requested from Cegid HR support. |
Leaves of absence | With data sub-set | This data set is used to enter a leave of absence attached to a contract and specify its duration. The specifics are the same as for the Probationary periods data set. |
Main address | No data sub-set | This data set concerns the main home address of the employee. The fields vary if you choose Germany or Canada as the country: the Street type field disappears for Germany, and the Province field replaces the Region/State/County field for Canada. |
Medical check-ups | With data sub-set | This data set groups the information concerning medical check-ups carried out or to come for the employee. The values of the Medical centre field are referenced depending on the country selected, and are to be configured in the library. |
Occupational diseases | With data sub-set | This data set groups the information concerning a disease due to the employee’s activity in the course of their work. The Date of first medical diagnosis and the Declared on date cannot be in the future, and the declared on date cannot be before the first diagnosis. |
Other address | No data sub-set | This data set groups the information on a secondary residence. The specifics are the same as for the Main address section. |
Personal details | No data sub-set | This data set is mandatory. This data set groups the elements defining the employee’s identity. It is not possible to enter a Nationality 2 without having entered Nationality 1. It is also not possible to enter the same nationality for both fields. |
Population type | No data sub-set | This data set is mandatory. It is used to specify if the employee is a regular company employee or an external provider. |
Private health insurance | No data sub-set | This data set groups the information on the employee’s private health insurance policy. The Private health insurance field is linked to the Private health insurance library. |
Probationary periods | With data sub-set | This data set must be linked to an existing contract and is used to enter a probationary period attached to a contract and specify its duration. A probationary period can be renewed once only. If the linked contract has an end date, the probationary period end date cannot be later than the contract end date. |
Public worker status | No data sub-set | This data set is used to add an additional level of detail in the public worker status of employees in the base. This data set is used more for employees from the public sector. |
Qualifications | With data sub-set | This data set groups the employee’s qualifications. The first record corresponds to the Main qualification, and subsequent records to so-called Secondary qualifications. All the time a Secondary qualification exists, the Main qualification cannot be deleted. |
Relatives | With data sub-set | This data set groups the elements concerning the identity of the people linked to the employee. Some specifics:
|
Representative | With data sub-set | This data set groups the information of the employee’s representative(s), such as the staff delegate or health and safety executive. The Type field is linked to the Representative types library. |
Situation | With data sub-set | This data set is mandatory. It groups the information on the employee’s professional situation in the company, in particular the information linked to their organisational, hierarchical or legal assignment. |
T&A Profile | With data sub-set | This data set is used to enter an employee T&A profile and to link a situation if necessary. |
Template | No data sub-set | This data set is mandatory. This data set is used to define which template is applied to the employee. It is possible to select another template: only the active templates of the library appear in the list. |
Workplace accidents | With data sub-set | The date of the accident cannot be in the future. The declaration date cannot be before the date of the accident. |
There are several types of fields, depending on the information to be filled in:
Text
Number
Date
Yes/No
File
List of values
Two types of lists exist:
System lists, for which you cannot change the values (examples: country, currency, etc.)
Lists from libraries, for which the values are set from the menu Libraries.
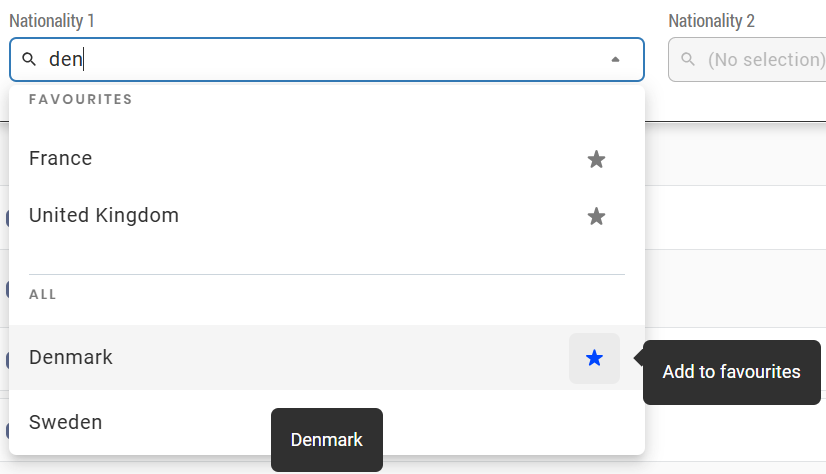
For “list of values” fields, you can bookmark values that are used regularly.
To bookmark a value from a list:
Open the list by clicking on its name.
When hovering over the desired value, click on the star icon on the right.
The value will appear at the top of the dropdown list, in the section Favourites.
To remove the favourite value, click on the star again.
Important: favourites are unique to each user and limited to five per dropdown list.
 |
Each record corresponds to a set of data for the employee.
In order to better manage the changes to the data over time, there are three record types:
Record type | Description |
|---|---|
Non-versioned record | The record is not associated with a period, the data is valid for the entire time the employee is with the company. Example: the data in the Civil registration set such as the date and place of birth do not change over time, but may be edited in the event of an error |
Continuous versioned record | The record is associated with a period continuously, there cannot be an empty period between two records. In this type, if a record is edited or added it takes priority, and the other records will be adapted accordingly. Example: the data in the Personal details set exists without interruption over time. An employee must have a surname and a first name. |
Discontinuous versioned record | The record is associated with a period which may be discontinuous, there may be an empty period between two records; Example: the data in the Other address set does not necessarily exist continuously. The employee may have a second home for X years, then no longer have it. |
Data set name | Record type |
|---|---|
Bank details | Discontinuous versioned |
Certification | Discontinuous versioned |
Civil registration | Non-versioned |
Compensation | Continuous versioned - specific case |
Contact information | Discontinuous versioned |
Contracts | Discontinuous versioned |
Custom | Discontinuous versioned |
Disability | Discontinuous versioned |
Employee file status | Discontinuous versioned |
Employee IDs | Non-versioned |
Family status | Continuous versioned |
Fitness to work | Continuous versioned |
German regulation | Continuous versioned |
Government-issued ID | Continuous versioned |
Internal probationary periods | Non-versioned |
Key dates | Non-versioned |
Leaves of absence | Discontinuous versioned |
Main address | Continuous versioned |
Medical check-ups | Discontinuous versioned |
Occupational diseases | Non-versioned |
Other address | Discontinuous versioned |
Personal details | Continuous versioned |
Population type | Continuous versioned |
Private health insurance | Discontinuous versioned |
Probationary periods | Non-versioned |
Public worker status | Continuous versioned |
Qualifications | Non-versioned |
Relatives | Continuous versioned |
Representative | Continuous versioned |
Situation | Discontinuous versioned |
T&A Profile | Continuous versioned |
Template | Continuous versioned |
Workplace accidents | Non-versioned |
In the case of a data set with a continuous versioned record, each record follows successively, and there cannot be an empty period.
In this case, when editing, the following message appears: Changing the start or end date may affect other records.
For a continuous versioned record, these are the expected behaviours for each action:
Requested action | Observed behaviour |
|---|---|
Add a record With creation of an empty period | Record C has been added: it takes priority. The start date for record A is therefore brought forward to the day after the end date of record C. 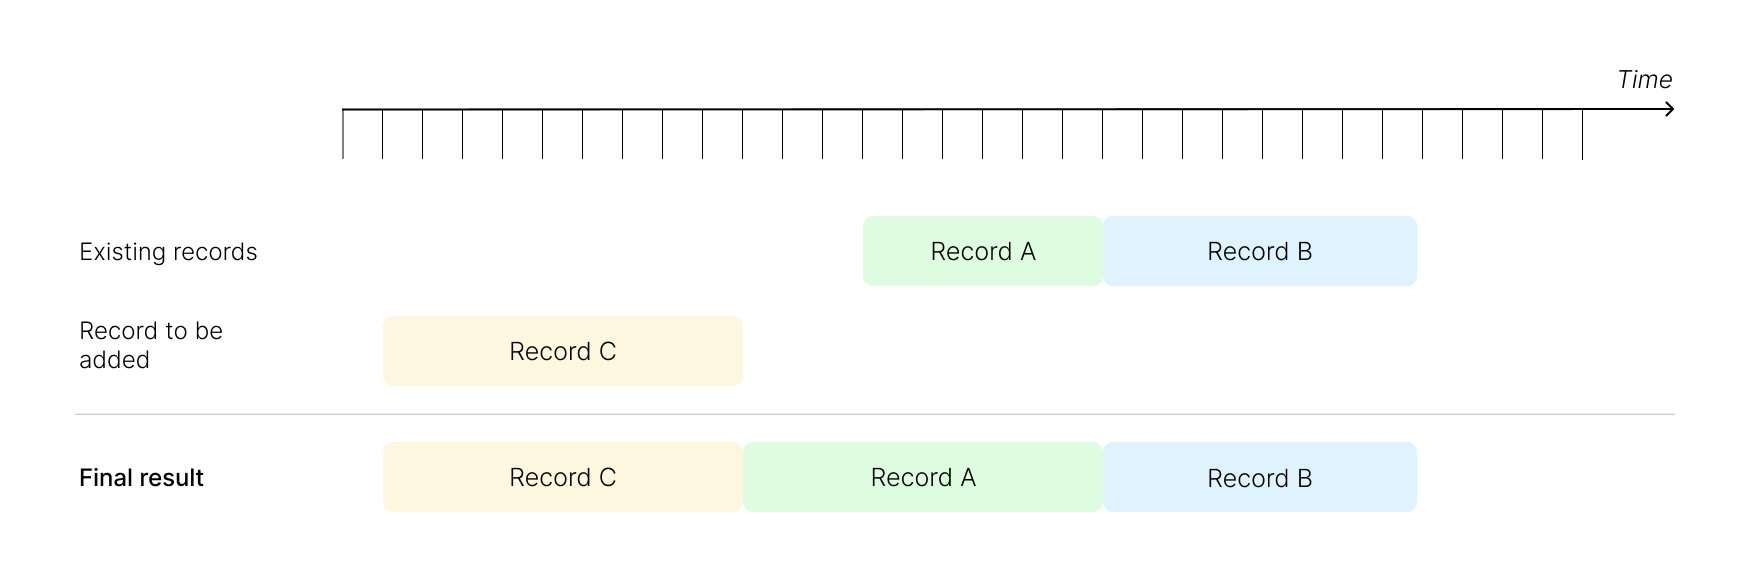 |
Add a record For a period already containing a record | Record B has been added: it takes priority. Record A is therefore broken down into two separate records, to coincide with the initial start and end dates.  |
Extend a record | Record A is extended: it takes priority. The start date for record B is therefore put back to the day after the end date of record A. 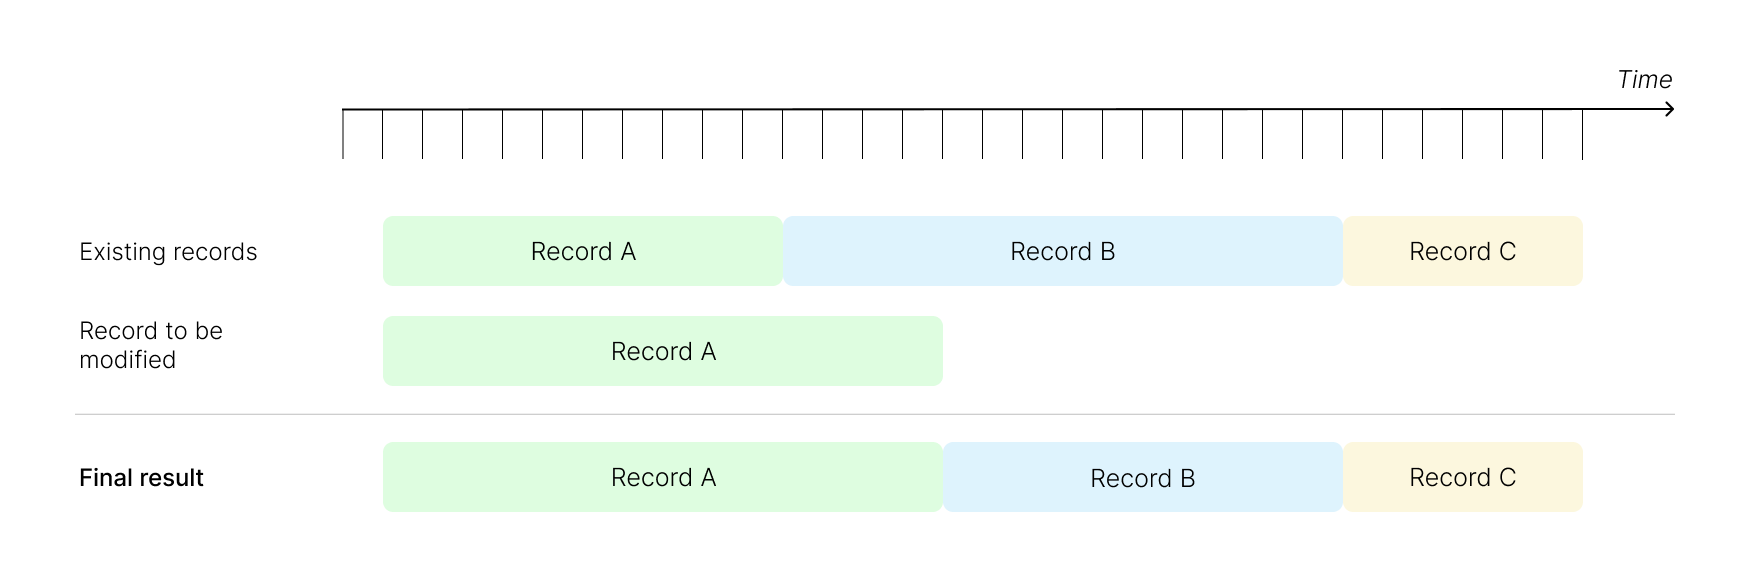 |
Shorten a record | Record A is shortened: it takes priority. The start date of record B is therefore brought forward to the day after the end date of record A. 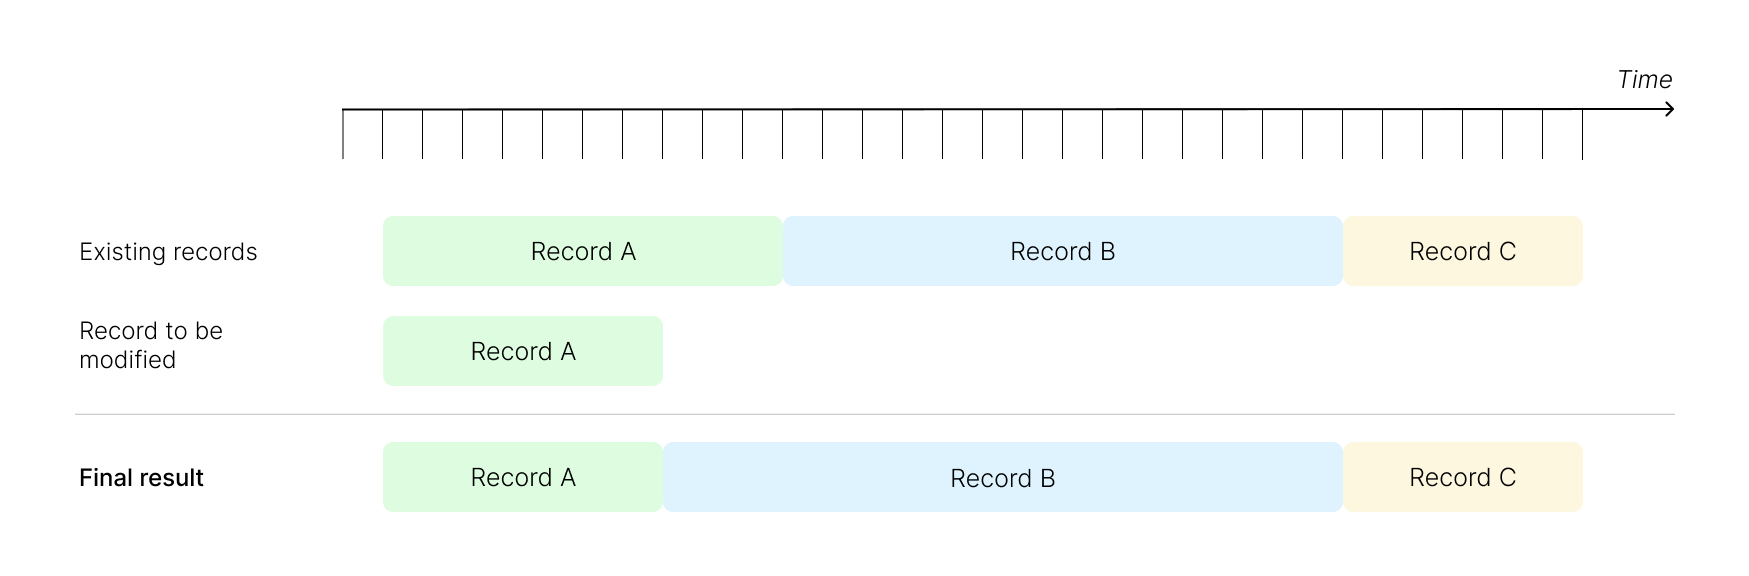 |
Move a record Without creating an empty period | Record A is moved: it takes priority. The start date for record A is the day after the end date of record C: there is no empty period, therefore record C does not move. 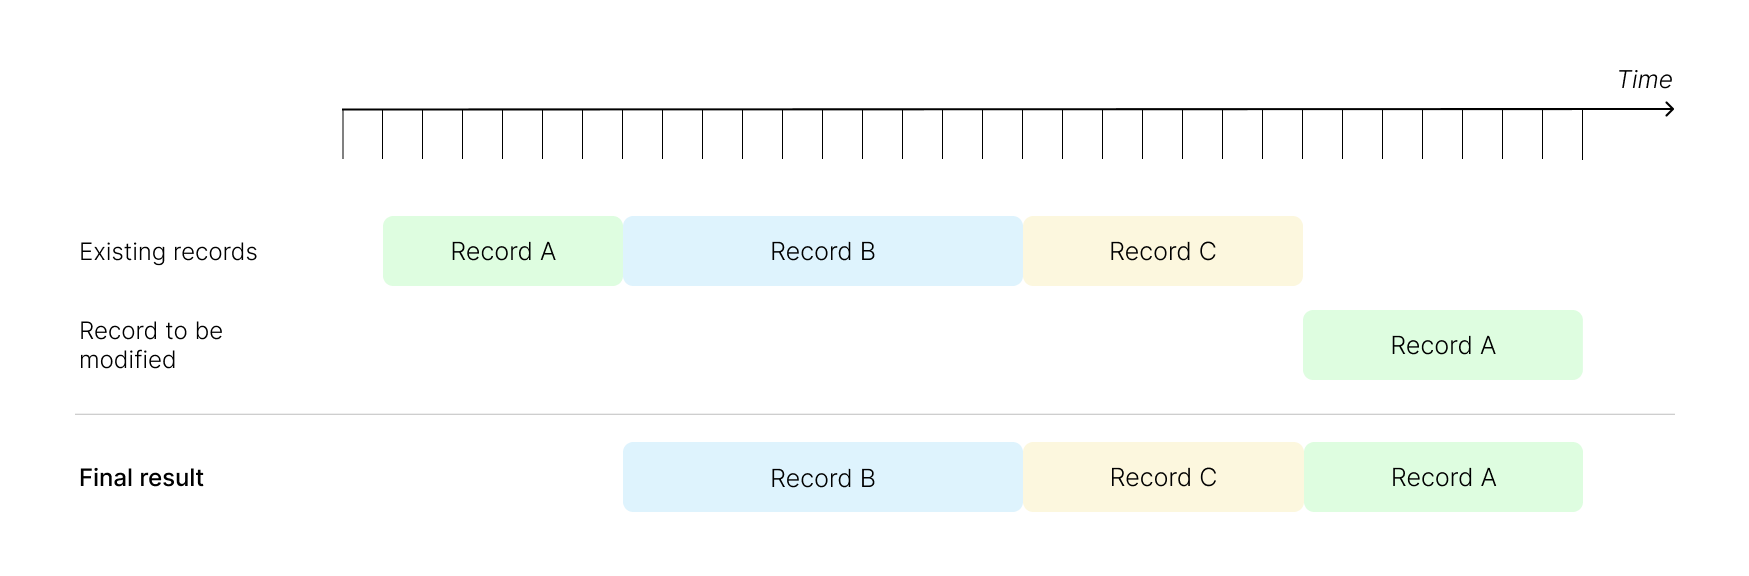 |
Move a record For a period already containing a record | Record B is moved: it takes priority. Record A is therefore broken down into two separate records, to coincide with the initial start and end dates. 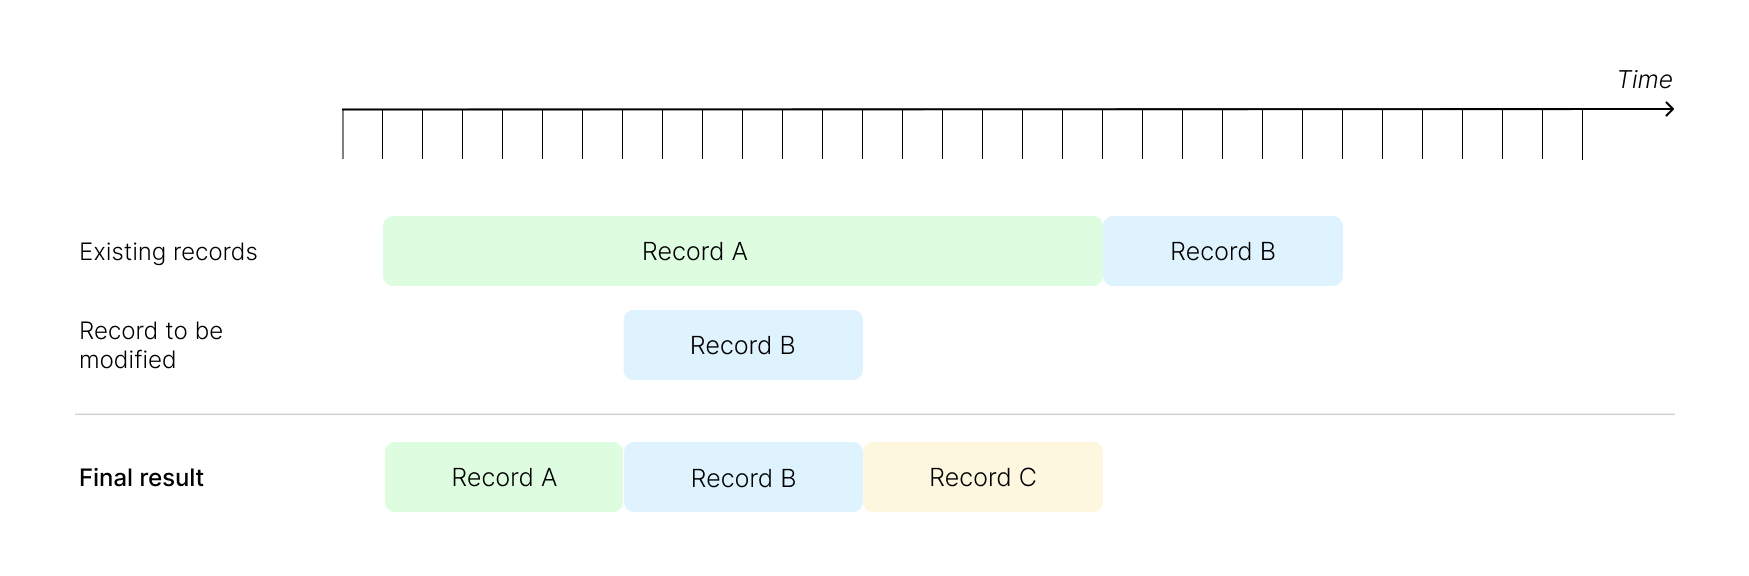 |
Move a record For the whole of an existing record | Record A is moved: it takes priority. The period of record A covers record C and the end of B: record C is therefore deleted. The end date of record B is brought forward to the day before the start date of record A. 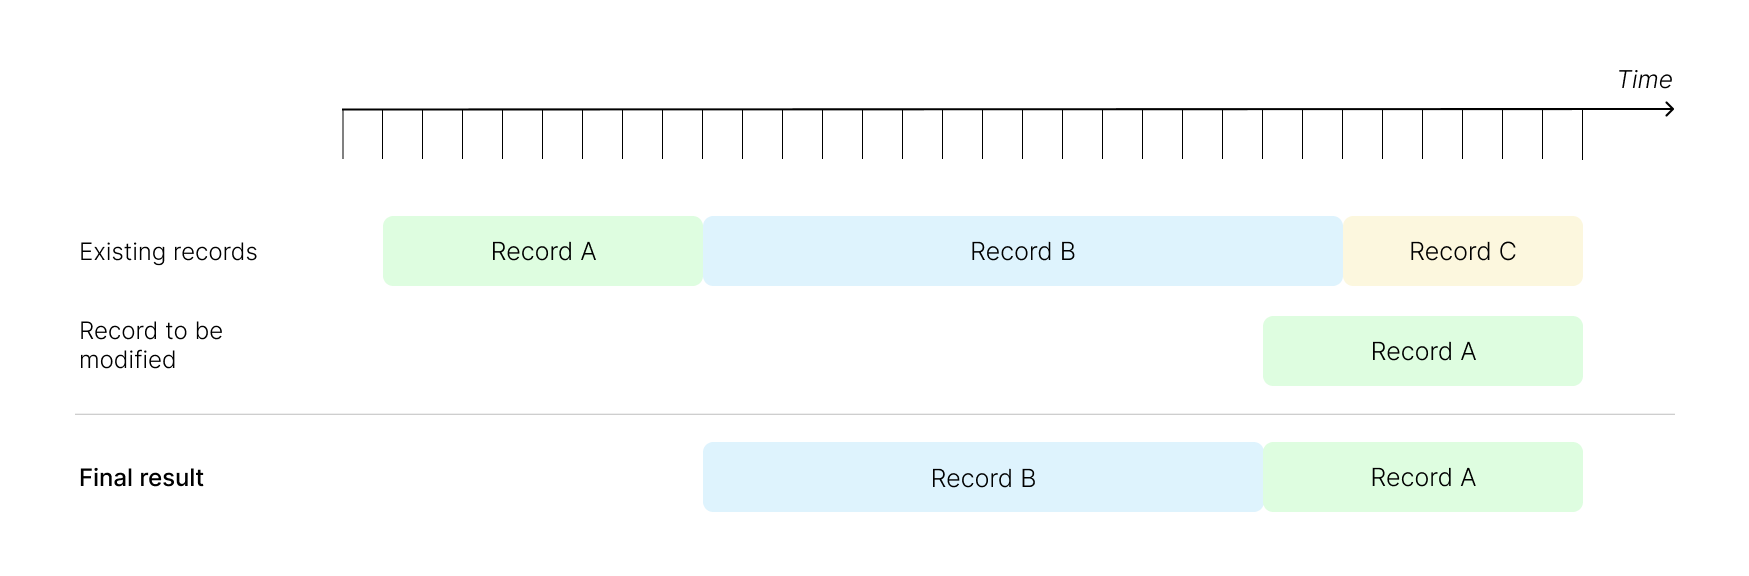 |
Move a record With creation of an empty period | Record B is moved: it takes priority. The start date of record C is therefore put back to the day before the start date of record B. 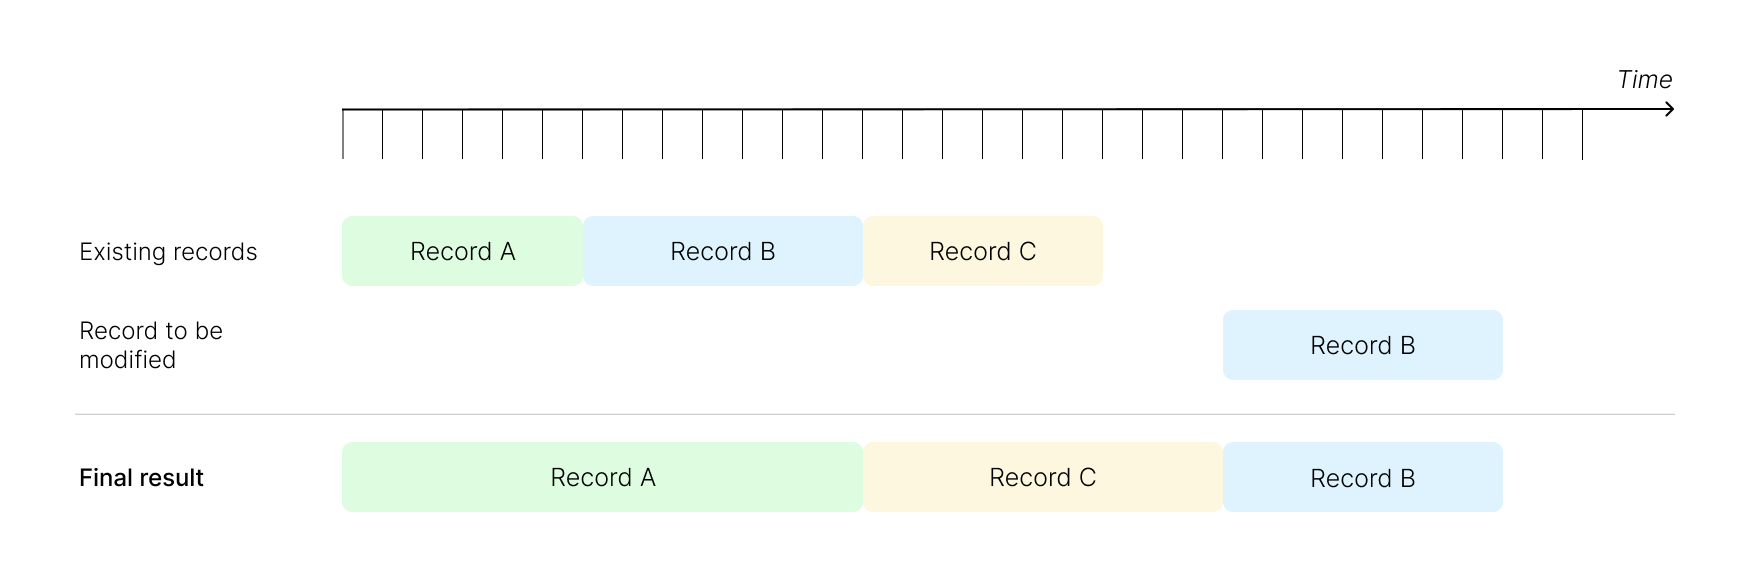 |
Delete an intermediate record | Record B is deleted. Since it is between two records, it is the end date of record A which is put back to the day before the start date of record C in order not to leave an empty period. 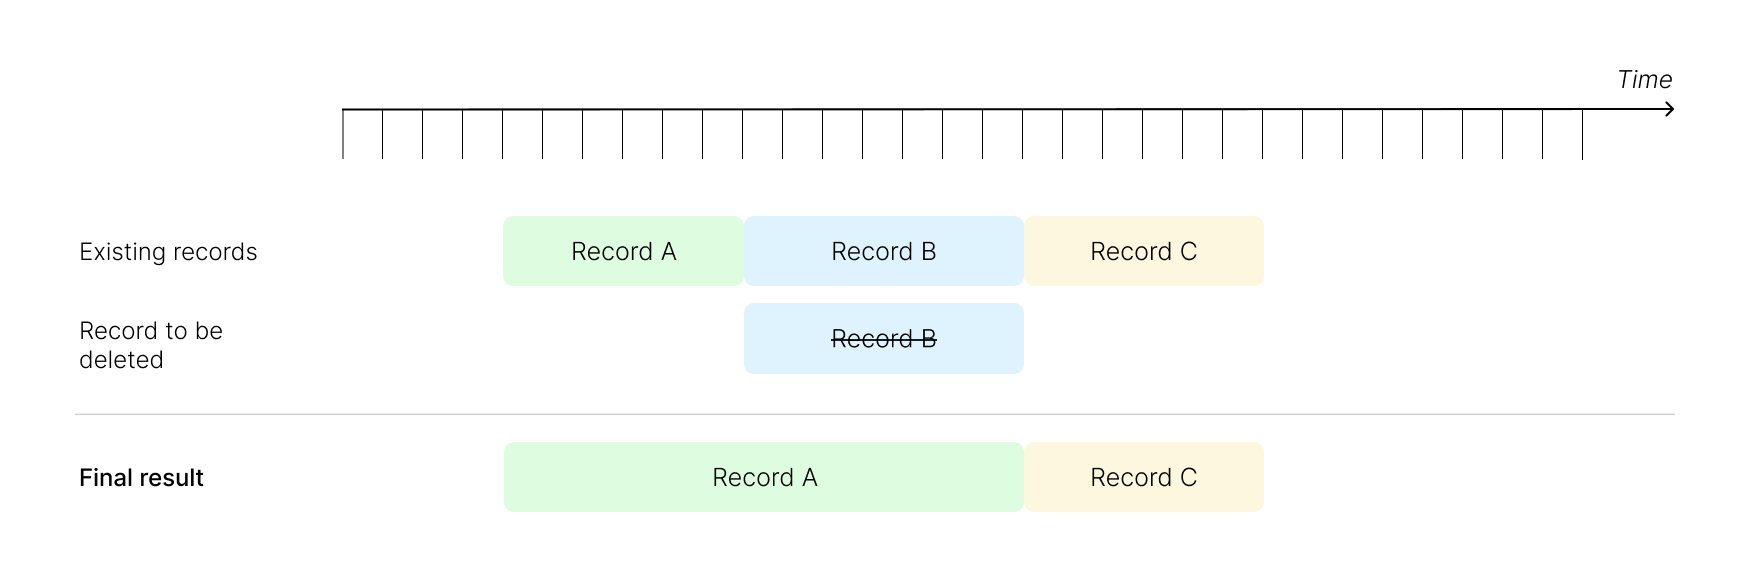 |
Delete the first or the last record | If the first or the last record is deleted, this has no impact on the other remaining records. 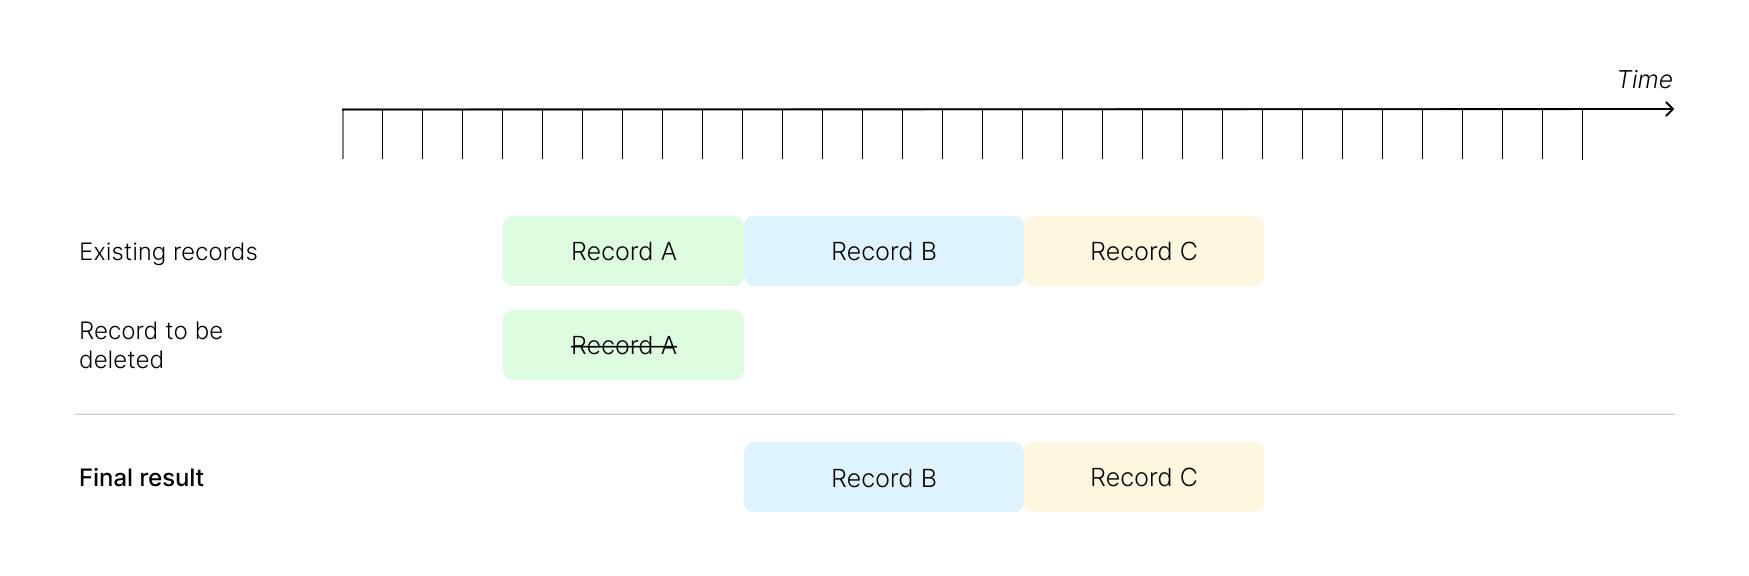 |
In the case of a data set with a discontinuous versioned record, empty periods may be present between the records.
However, two records cannot overlap. In edit mode, the same message as for the continuous versions appears to remind you of this: Changing the start or end date may affect other records.
If the record is a discontinuous versioned record, these are the expected behaviours for each action:
Requested action | Observed behaviour |
|---|---|
Add a record Before or after a record | Empty periods are possible: the records do not change. 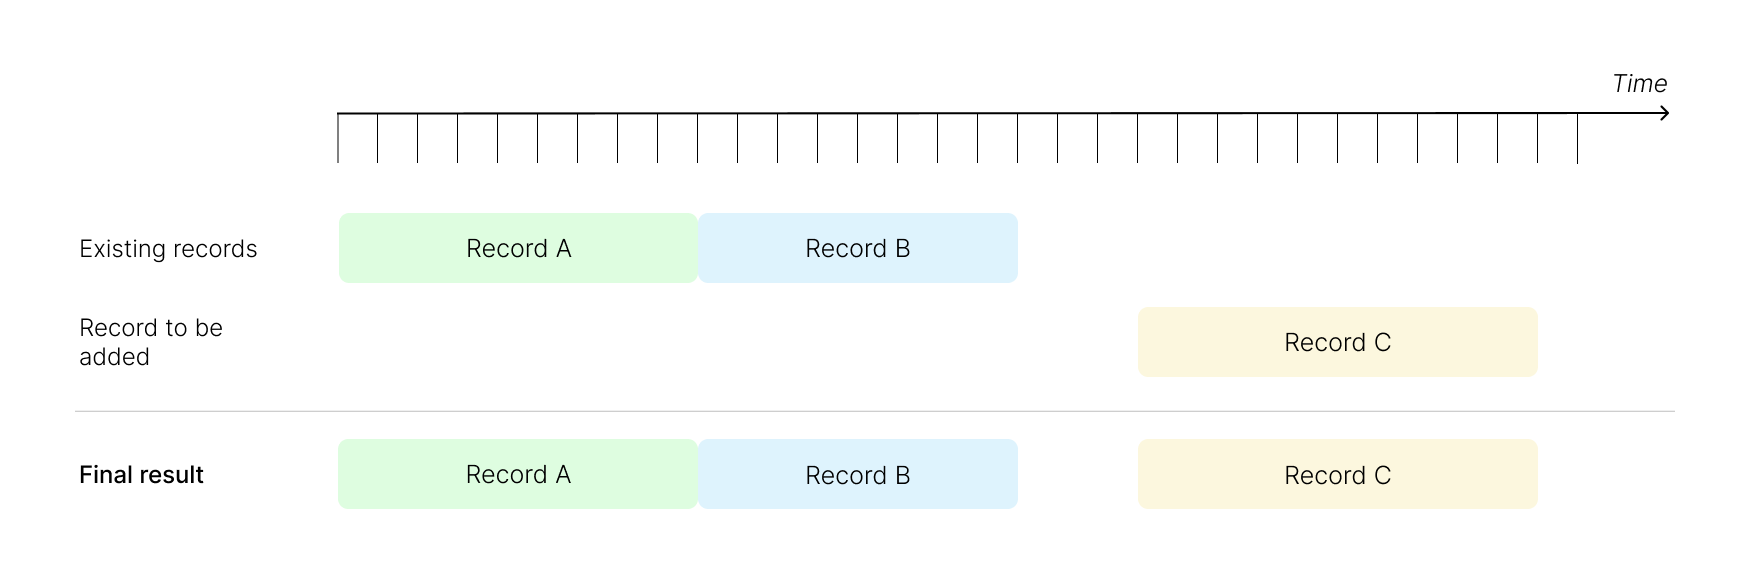 |
Add a record For a period already containing a record | Record C is added: it takes priority. The end date of record B is therefore put back to the day before the start date of record C. 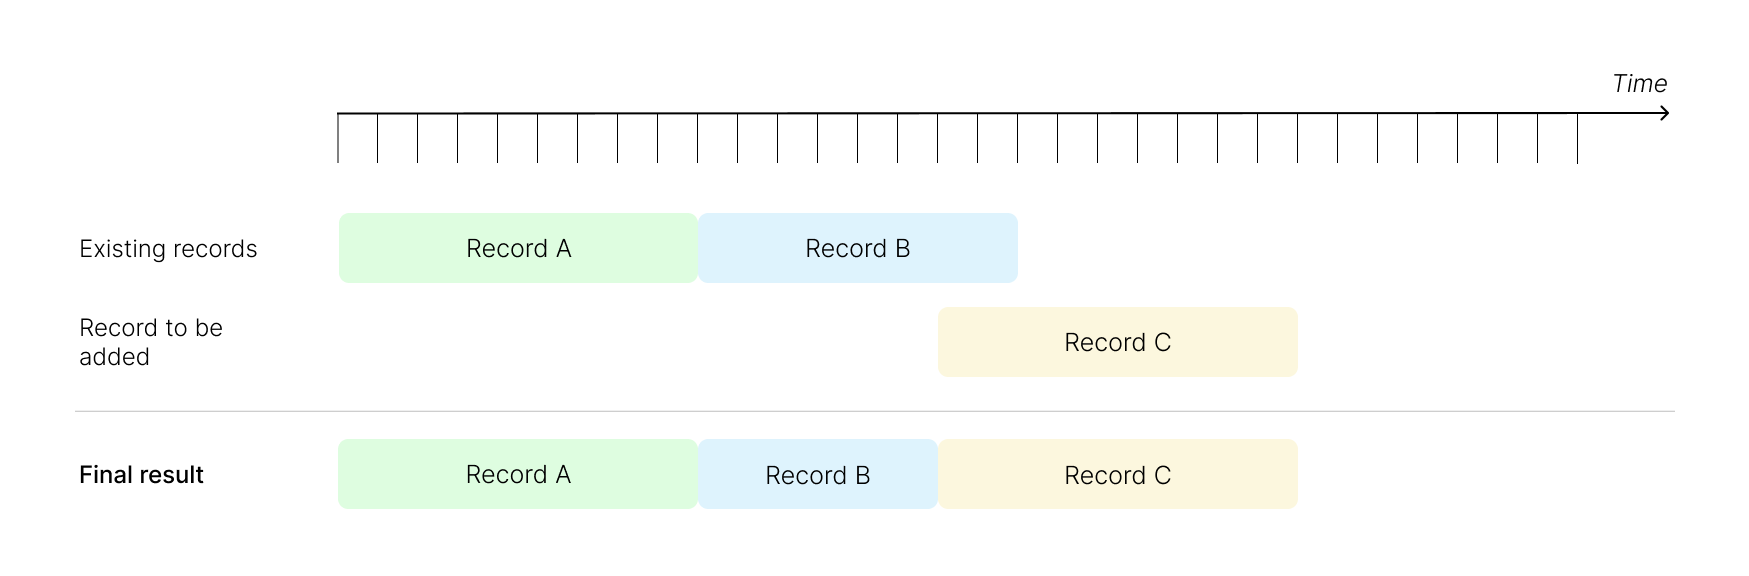 |
Edit a record | If a record is edited outside of the periods of existing records, the records do not change. 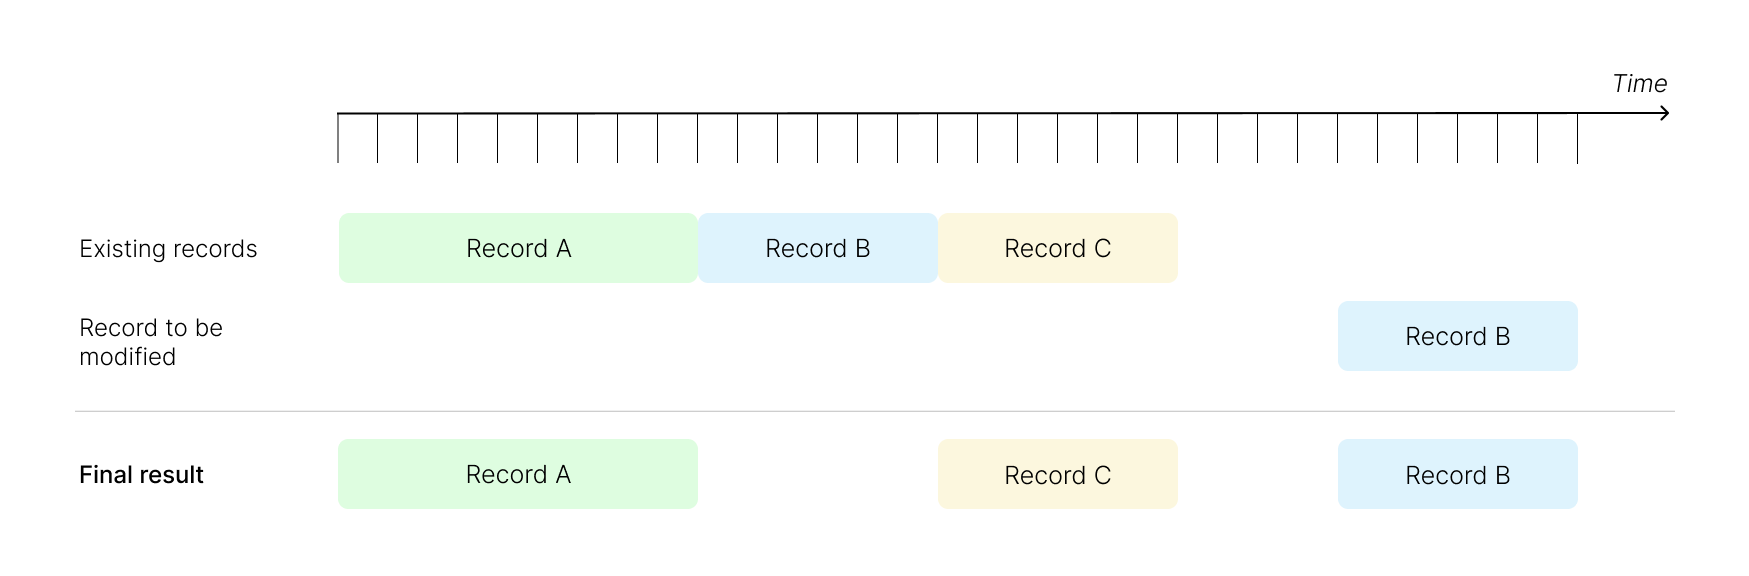 |
Delete a record | Empty periods are possible: the records do not change. 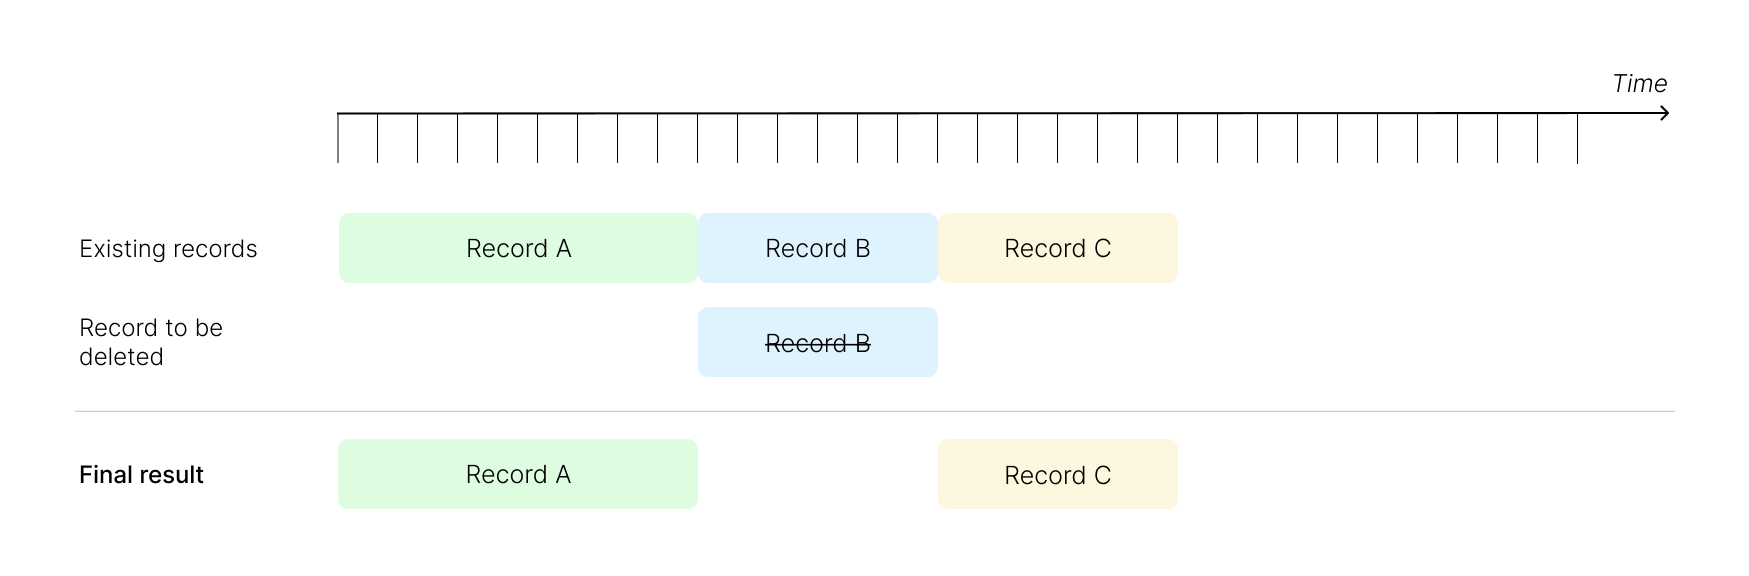 |
It is possible to add, edit or delete a record. All modifications are tracked by date and by user, and viewable by everyone, in the form of a record. A user can navigate from one record to another to view the changes to the data.
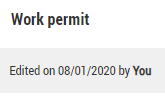
Under the record timeline, an indication specifies the date of the last modification on the data set.
Depending on the type of data set and the record type, the behaviour may vary slightly.
From the employee file, look for the data set to be edited (from the side panel or in the accordion list).
To open the window to add the new record:
For empty data sets and for multiple-record data sets with at least a first record, click directly on
.For single-record data sets, click on
to expand the set, then on  > Create a record.
Fill in the required fields.
By default, the Start date for the information in the data set is today's date. Edit this if necessary and enter an End date only if you are sure about this information.
The date fields have a DD/MM/YYYY format: you can also click on
 to display the calendar and select a date.
At the top of the data set, you can:
Click on Cancel to return to the data set without saving your changes.
Click on Save as new to save the information entered.
From the employee file, look for the data set to be edited (from the side panel or in the accordion list).
To open the record editing window:
For single-record data sets, click on
to expand the set, then on Edit.For multiple-record data sets, click on
to expand the set and the sub-set, then click on Edit.
Fill in the required fields.
By default, the Start date for the information in the data set is today's date. Edit this if necessary and enter an End date only if you are sure about this information.
The date fields have a DD/MM/YYYY format: you can also click on
to display the calendar and select a date.At the top of the data set, you can:
Click on Cancel to return to the data set without saving your changes.
Click on Save to save the information entered.
For single-record data sets, you can only delete a record if another record remains present, to ensure the set is not left empty.
From the employee file, look for the data set to be edited (from the side panel or in the accordion list).
Click on
to expand the set (and the sub-set if necessary), then click on > Delete record.Confirm your choice in the pop-up which appears by clicking on OK.
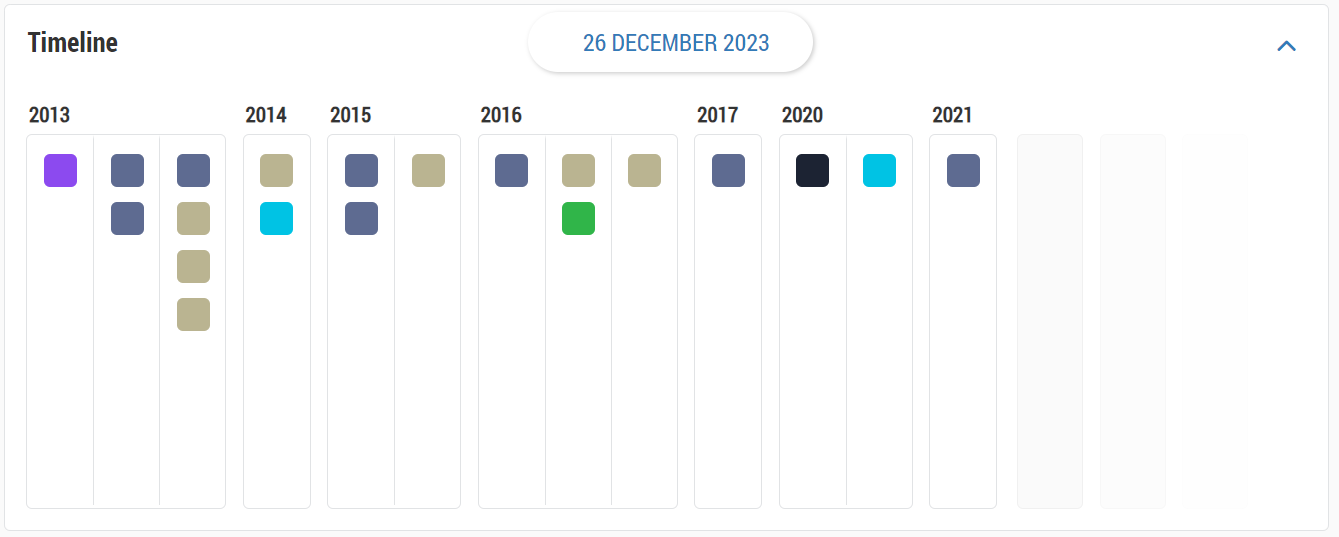
The record timeline allows a graphic display over time of each record in a data set.
It is displayed in data sets containing at least one record: it is only displayed in data sets with multiple records.
By clicking on it, you can see all the records of the data set with the start and end dates, and the duration of the record: each period has a specific colour, explained in the key in the bottom right.
You can skip from one record to another by clicking on the left and right arrows of the timeline, or by clicking on a record underneath. You can also enter a precise date in the top right by clicking on Go to, or on the calendar .
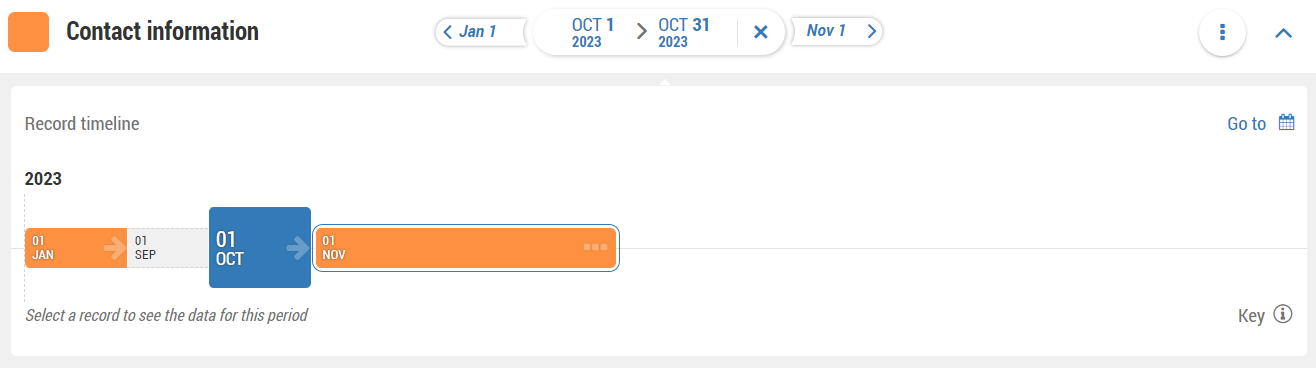
The dates displayed correspond to the dates of the records: if a record does not have an end date, the timeline displays  .
.
If there is an empty period in the data set, it is shown in grey in the timeline and cannot be clicked upon. However, if you enter a date which is in this empty period, a message appears: No records for ../../..... Please remove the filter or try a different date.
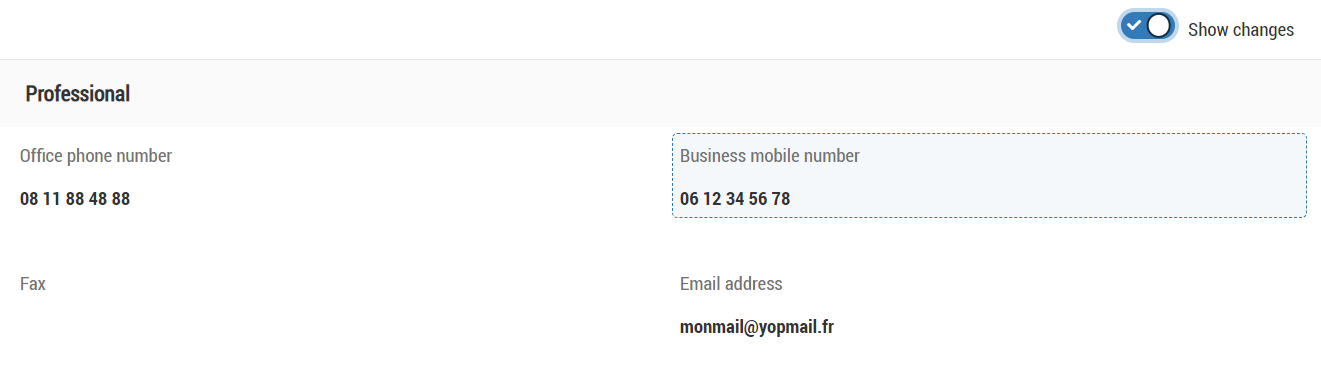
When you skip from one record to another, the data displayed underneath changes: you can highlight the edited data in a record by activating the option Show changes in the top right of the data.
A template is used to define which data sets to display and fields that are visible and/or mandatory per section.
It is applied to an employee file when the employee is created: this determines which data sets are displayed.
Then, the template applied will define data sets displayed for HR event of this employee.
In the same way, data sets that can be viewed and modified by an employee on the Employee Self-Service are defined by the template applied to the employee file.
Your company has already named and configured your templates according to your business needs: a master template called Master, which is used to define the minimum number of fields required to be displayed, and child templates, derived from the Master template, to display additional data sets and fields according to a specific need.
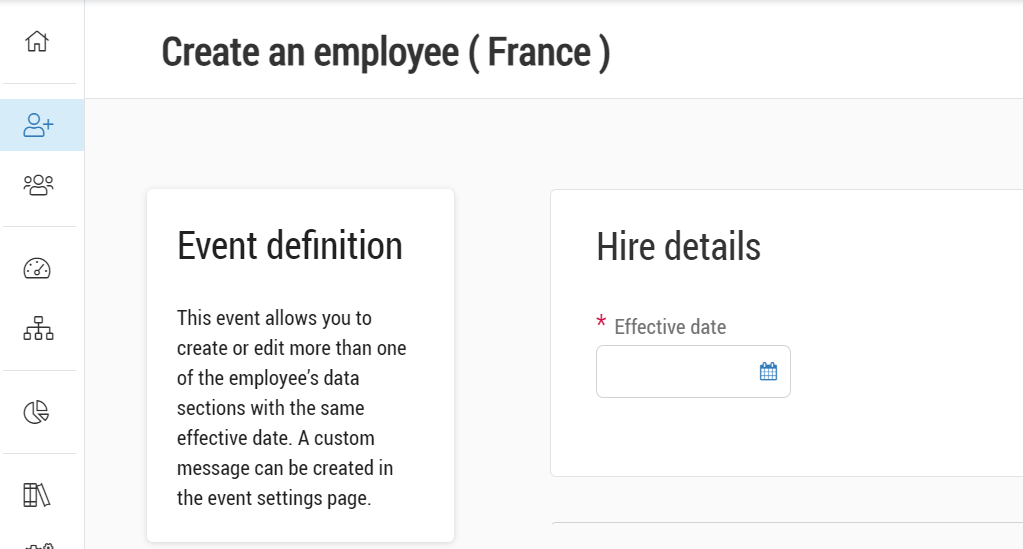
For the creation of an employee, you must choose the template to apply: this selection will define the displayed data sets in the Create an employee form that appears. The name of the template is shown in brackets.
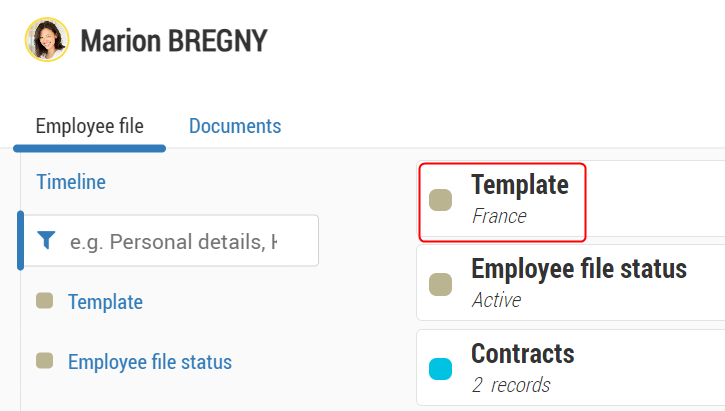
Once the employee is created, the Template data set displays the selected template. This data set works the same as other data sets, with a start date filled in by the field Effective date when the employee is created and an optional end date.
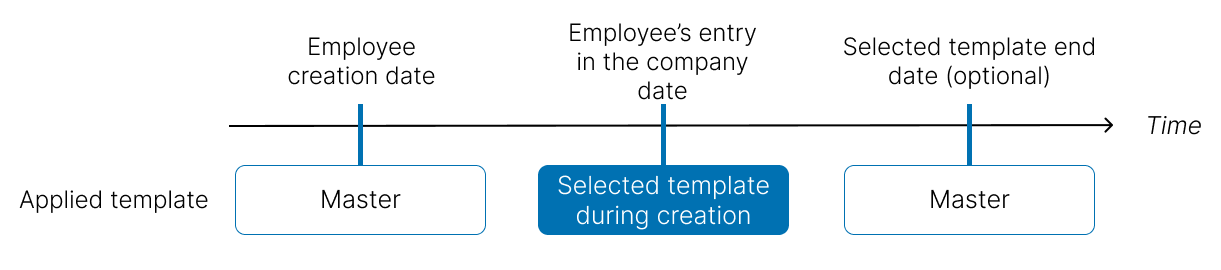
This means that the selected template at the time of the creation only applies from the entered Effective date, which is the company entry date of the employee.
So in both cases below, the selected template is not applied:
the employee has been created in advanced, the Template data set start date is in the future: in this case, the Master template is applied by default before the start date.
you have defined an end date for the Template data set: without indication, the Master template will be applied after the end date.
In both cases, when the Master template is applied, some information filled in during the employee creation might be hidden because the Master template does not have these data sets activated. Data will appear starting from the company entry date of the employee.
As for the other data sets, the template applied to the employee might be changed, by creating a new record.
The template applied to an employee will also define data sets activated for HR events.
Each event has been personalised by your administrator to get the right information.
A change of the template applied will potentially change the activated data sets for the same event.
In the example below, the same event is configured differently for two different templates.
An event is an administrative process carried out by HR staff in relation to an employee, which may have an impact on data in the employee file.
Some events are started depending on a date: end of a probationary period, planning of a medical check-up, etc.
On the opposite, other events are started manually, to modify the employee file: transfer, legal entity transfer.
Each event consists of the completion of an event form, set up by your administrator.
If the option has been activated by your administrator, you can also save the form in a draft mode, to finalise the event later.
There are eight types of event in Core HR: Hire, Medical check-up, Probationary period, Internal probationary period, Leaves of absence, End of contract, Transfer, Legal entity transfer.
Only End of contract, Transfer and Legal entity transfer events can be started from the employee file.
To end a contract from an employee file:
Click on
 Start an event on the top right.
Select End of contract and click Start.
Enter the end date of the contract in the Effective date field, and the page will reload to show the data up to date with this date.
Fill in all mandatory fields.
For data quality reasons, we advise you to fill in the Reason for end of contract field and all the other necessary fields.
At the top right of the page, click on End contract to save your changes.
You will automatically return to the employee file.
The End of contract event affects a number of employee data sections.
Ending the contract terminates the data section records:
linked to the contract: Contract, Situation (and GTA Profile), Probationary periods, Internal probationary periods, Leaves of absence;
linked to the employee: Template, Employee file status, Contact information, Key dates, Aptitude, Medical check-ups, Public worker status.
The Employee file status data set of the employee file contains a special feature: this section is not closed, the end date is entered on the current record and a new record is created the next day with an inactive technical status.
If the employee has several contracts, but the closure only concerns one contract, the event only terminates the existing records linked to the contract.
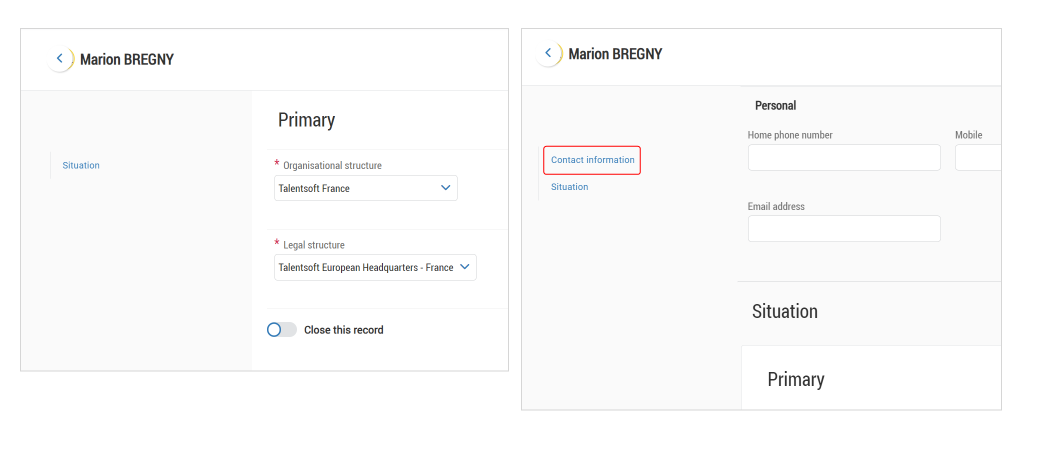
The Transfer event is used to manage the professional development of an employee within the same contract: change of job, working hours, organisational structure, etc.
In the case of a transfer, the Organisational Structure field in the Situation data set will be modified, creating a new record in the Situation data set.
If your administrator has added the Contract data set to this event, you can create an addendum to the employee's current contract.
To start a transfer, from an employee's file:
Click on
Start an event on the top right.Select Transfer and click Start.
Enter the date of the transfer in the Effective date field: the field is pre-filled with today's date by default. If you change this date, the page will reload with the updated data for this effective date.
Fill in all mandatory fields.
In the Situation data set, modify the Organisational structure only.
If you need to change the Legal Structure, it is preferable to use the Legal entity transfer event type, as this requires a new employment contract.
If the Contracts data set is displayed, all the information entered will be saved in the Addendum created.
In the top right-hand corner, click Confirm to save your changes.
A change of legal entity leads to a change in the employee's employment contract: the Contract and Situation data set therefore need to be modified.
This event is carried out in two stages: closure of the current contract with its attached status and then start of the event. The event is based on the closed contract and its main position.
To start a legal entity transfer, from an employee file:
Close the current contract using the End of contract event.
If at least one of the employee's contracts is closed, the event can be launched.
Click on
Start an event on the top right.Select Legal entity transfer and click Start.
Enter the date of the transfer in the Effective date field: the field is pre-filled with today's date by default. If you change this date, the page will reload with the updated data for this effective date.
Select the information for the new contract in the Contracts section and modify the Legal structure field in the Situation data set.
By default, the information displayed in these sections is inherited from previous records, but you can modify them.
Fill in all the other mandatory fields.
In the top right-hand corner, click Confirm to save your changes.
When the effective date is selected in one of the two events, the data sections display the data valid on that date.
Modifying these data sets means creating a new record: previous records are closed on the day before the effective date.
Please note that if the start date of a transfer is in the past, Core HR and the systems receiving information from Core HR will be heavily impacted, including the payroll, finance and accounting systems.
If your administrator has activated the corresponding right for your role, you can save an event form in draft mode.
This mode is available as soon as a certain number of mandatory fields have been filled in. Simply click on Save draft at the top right of the event form page.
If an event form is in draft mode, the employee file is locked and cannot be modified. In the same way, no other employee event can be started or ended from a dashboard until the draft is validated.
When an event form has been saved in draft mode, this is indicated at the top of the employee file.
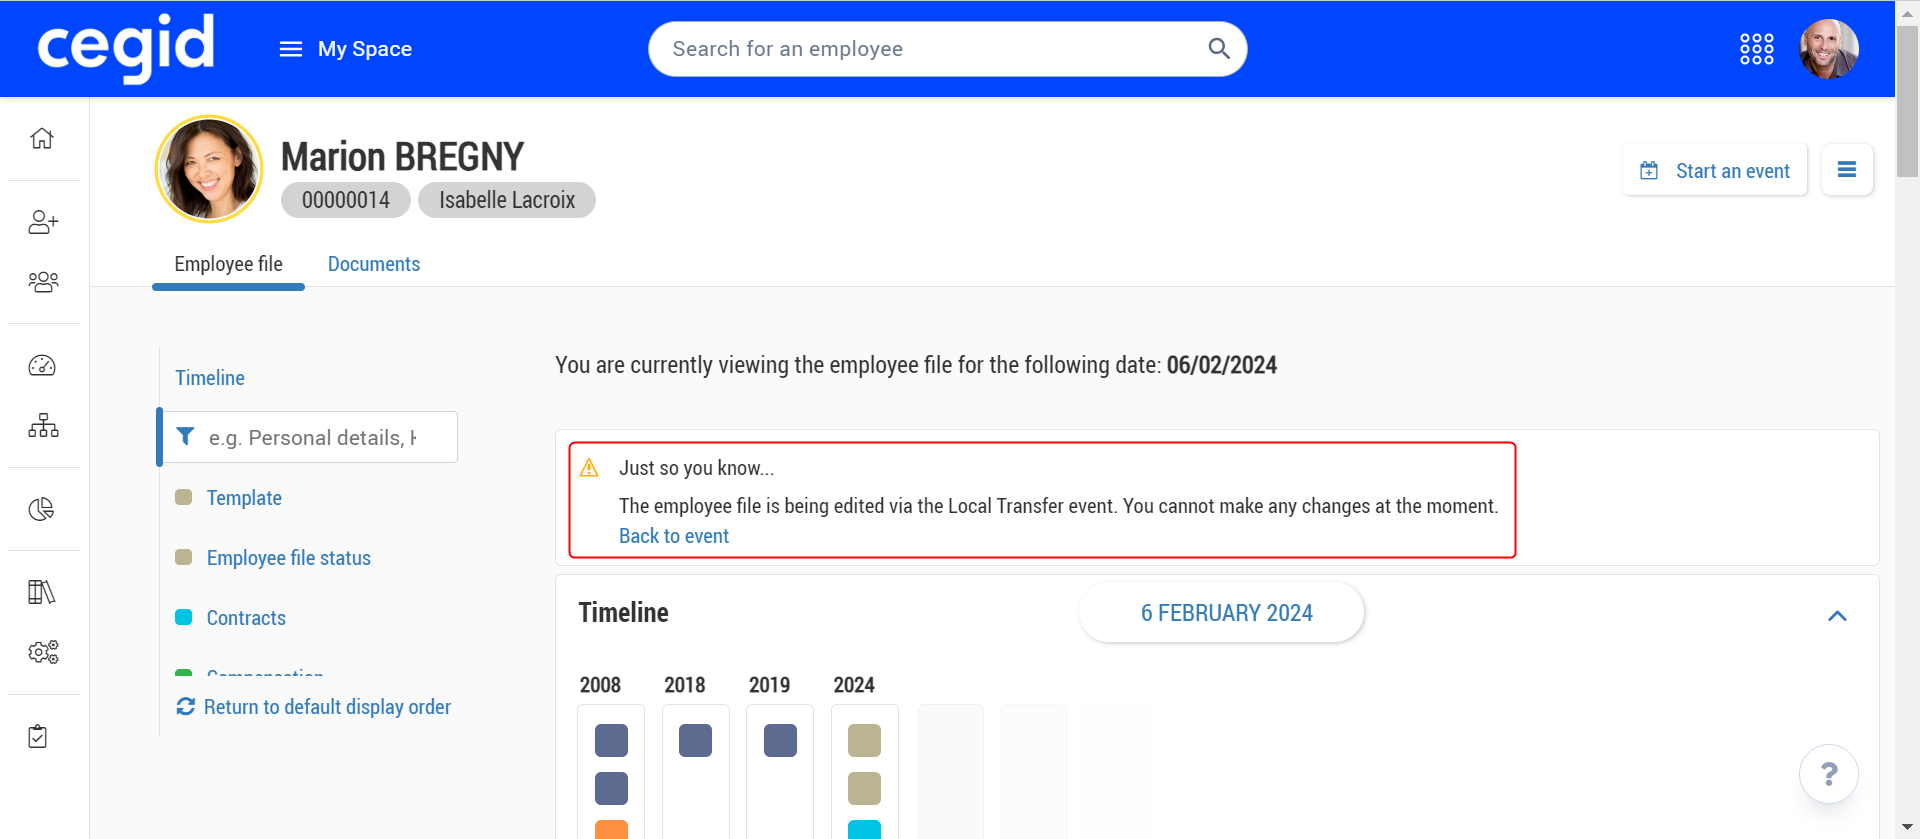
To unlock the employee file:
If you are responsible for the draft mode of an event form, the form must be re-saved in draft mode, validated or deleted.
If you are not responsible for draft mode, you must wait for the person responsible to take one of the three actions listed above.
In some cases, your administrator may assign you the right to override this block, in which case you can act as the person responsible for the draft.
When you click an employee name in either the Core HR search bar or in a follow-up table (except the Onboarding in progress and Onboarding groups dashboards), you access their employee file.
This file includes:
the header with the employee's general information and some actions;
the Employee file tab with the employee's information grouped in data sets;
the Documents tab with a dashboard listing all the employee's personal and professional documents.
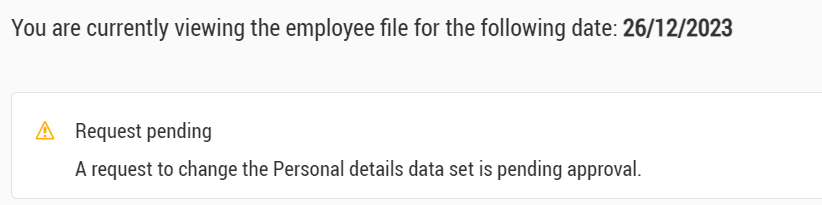
If the Employee Self-Service with validation is activated, a banner may be displayed on the top of the file when your employee has made a request for an update on their data, and it has not been checked yet.
 |
The top left part of the header displays:
the picture, the first name and the last name of the employee;
You can change the picture by clicking on it: it must be no larger than 110x110 pixels and weigh more than 100kb.
the employee ID : available from the Employee ID field in the data set Employee IDs;
the job: available from the Job field in the Primary situation data set;
This tag only appears from the employee's first day with the company.
It is clickable and gives access to the job library with a description of the job.
the manager: available from the Line manager field of the Primary situation data set or the Manager field of the same data set.
This tag only appears from the employee's first day with the company.
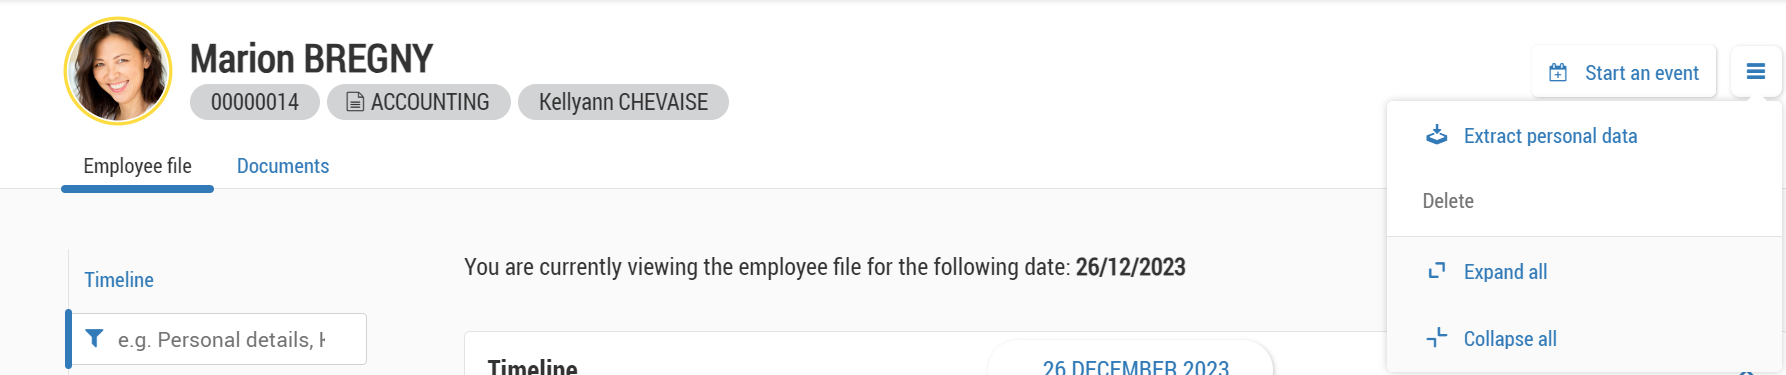
On the top right are:
the
Start an event button that enables you to:launch the events Transfer, Legal Entity Transfer and End of contract;
launch custom events.
the action button
 that enables you to:
extract the employee's personal data and delete the file;
access the employee's file in the Administration module via the Access the account management button;
expand or collapse all data sets.
This tab is in two parts:
the Timeline;
data sets, displayed on the left side panel or in the centre of the page, as accordions.
The Timeline presents visually all updates of the employee file, by types of data sets and date.
By passing over a coloured square, you can see which data set has been modified.
By clicking on the date selector on the top, you can visualise the employee file at a chosen date.
All employee data is grouped together in data sets (a group of fields on the same theme). These data sets can include sub-sets, depending on the data type.
These sections are accessible from the left side panel and in the centre of the page, as accordions:
from the left side panel, you can modify the order of data sets with a drag and drop or come back to the default order on the bottom of the panel;
from the accordions, by clicking on a coloured square, you can assign another colour to the data set.
Data sets layout modifications are applied to all employees' files, and visible only by the person who made them.
Active data sections depend on the template applied to the folder. If a section is not active in the template, the following message is displayed: This data set is not activated in the applied template.
The Addendum feature allows you to make changes to a contract without creating a new one.
The addendum appears as a new record in the Contracts data sets, so it is possible to compare data from one record to another. It is also possible to add several addendums to the same contract.
It is possible to store the documents generated or attached for each addendum (new contract versions or addendums): if your organisation has subscribed to the Document generation option, we recommend that you always generate a new contract version for each addendum
Please note:
The Addendum extends the end date of the original contract to the end date given in the last Addendum;
if your Transfer event is configured to include the Contracts data set, you need to complete the Addendum information when using the Transfer event.
There are two main steps to creating an addendum or amendment in an employee file: filling-out information in the contract Addendum record, and upload or generate the relevant document.
Prerequisites: a contract must already be created in the employee file.
From the employee file, search for the Contracts data set (from the side panel or in the accordion list).
From the contract if it's the first addendum or from the last addendum created, click on
> Create an addendum.For permanent contract, the start date is the day after the beginning of the contract.
For fixed term contract, the start date is the day after the end of the contract.
Fill in the required fields.
The date fields have a DD/MM/YYYY format: you can also click on
to display the calendar and select a date.Click on Save as new.
Your record is then named Type of contract - Addendum, and a new field appears on the addendum: Number of addendum.
From the employee file, search for the Contracts data set (from the side panel or in the accordion list).
From the addendum, click on
> Upload a document.Select a file from your computer and select Yes or No for the field Mark as signed.
Click on Upload to add this document to your data set.
The added document is visible in the Documents tab, with the information uploaded in the Other information column.
Prerequisites: you must have subscribed to the Document generation option.
From the employee file, search for the Contracts data set (from the side panel or in the accordion list).
From the addendum, click on
> Generate a document.Select the appropriate template from the list, the language, and the file type.
Click Generate.
The generated document is visible in the Documents tab, with the information generated in the Other information column.
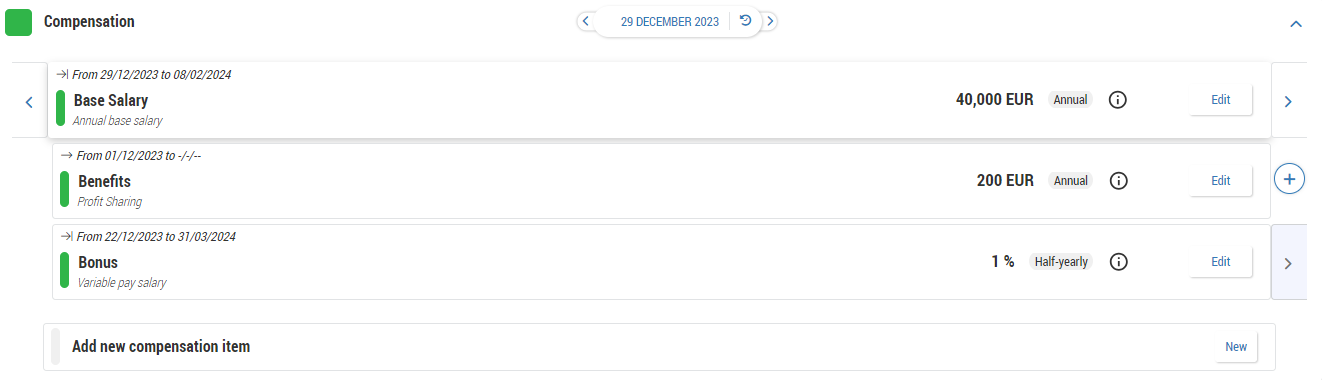
Information on employee compensation is added during the Hire event or directly in the Compensation data set on the employee file.
Data in this data set are added through Compensation items, divided in Categories. Each category is itself divided into Sections.
These categories are not customisable and there are four of them:
Base salary: regular payments made to an employee ;
Benefits: advantages provided by a company to an employee in supplement to their fixed pay, to improve working conditions ;
Allowances: remuneration supplementary to an employee's fixed pay, usually based on their living and working conditions ;
Bonus: ad-hoc payments based on the time period, linked to salary, performance, commissions etc.
Each compensation item:
has a start date, like any other record, and can have an end date if you know it;
can be linked to an employee's contract, because it is the only legal source that fix the compensation between the company and the employee, but this action is not mandatory;
is unique, a section can only be added once by employee. However, you can change it during time through records.
Like any other data sets, the Record timeline allows you to visualise the compensation history for this employee: arrows on the right and/or left of a compensation item helps you to pass from one record to another.
From the employee file, search for the Compensation data set (from the side panel or in the accordion list) .
If the data set is empty, click on
to add a first record. Otherwise, open the data set by clicking on , then on Add new compensation item or on the button New.Fill in the required fields.
The date fields have a DD/MM/YYYY format: you can also click on
to display the calendar and select a date.Click on Save on the top right to create your compensation item.
Your compensation item appears with the following information:
Dates, Category, and Section linked to on the left;
the amount and the currency, with the periodicity;
a button
 that indicate the parameters of this section, configured by your administrator.
You can only create one compensation item per section. If a section changes, for example the monthly base salary, a new record has to be created for this section.
From the employee file, search for the Compensation data set (from the side panel or in the accordion list) .
Open the data set by clicking on
then, on the right of the relevant item, click on .In the pop-up, enter the start date of the new record and click on Create.
By default, the previous record will be extended to the day before the new record: if you want to specify another date, activate the option Set an end date for the previous record and choose the new date.
Fill in the required fields.
As it is a new record of the same section, fields Category, Section, and Periodicity are in view only mode and cannot be modified.
Click on Save on the top right to create your compensation item.
You can now pass from a record to another with the arrows  or
or  or with the Record timeline.
From the employee file, search for the Compensation data set (from the side panel or in the accordion list) .
Open the data set by clicking on
then, on the right of the relevant item, click on Edit.If you want to modify the record, update the data and click on Save.
If you want to delete the record, click on Delete on the top right.
Managing documents in the employee file can be done in two ways: from data sets and from the Documents tab.
From the employee file, look for the data set to be edited (from the side panel or in the accordion list).
Open the data set and the sub-data set if needed by clicking on
, then select the relevant record with the Record timeline.Click on the button > Upload a document.
Select a document from your computer and click on Upload.
The added document is visible in the Documents tab, with the information uploaded in the Other information column.
The data sets compatible with this functionality are: Bank details, Certifications, Contracts, Fitness to work, Government-issued ID, Leaves of absence, Medical check-ups, Qualifications.
Prerequisites: you must have subscribed to the Document generation option.
From the employee file, search for the Contracts data set (from the side panel or in the accordion list).
Open the data set and the sub-data set if needed by clicking on
, then from the contract of the addendum, click > Generate document.Select the appropriate template from the list, the language, and the file type.
Click Generate.
The generated document is visible in the Documents tab, with the information generated in the Other information column.