Libraries - Company structure
A library is an element of Core HR, bringing together data used in the module's drop-down list fields. Libraries are used to classify data by type or subject. They can be configured to maintain logic and continuity in the information in employee files.
The libraries use the Core HR data version management strategy to provide a history and enable your organisation to build future versions of libraries to anticipate changes.
The libraries are divided into eight categories: Company structure, Contract management, Compensation & Benefits, Local regulation, Jobs and competencies, Documents, Others, Custom libraries.
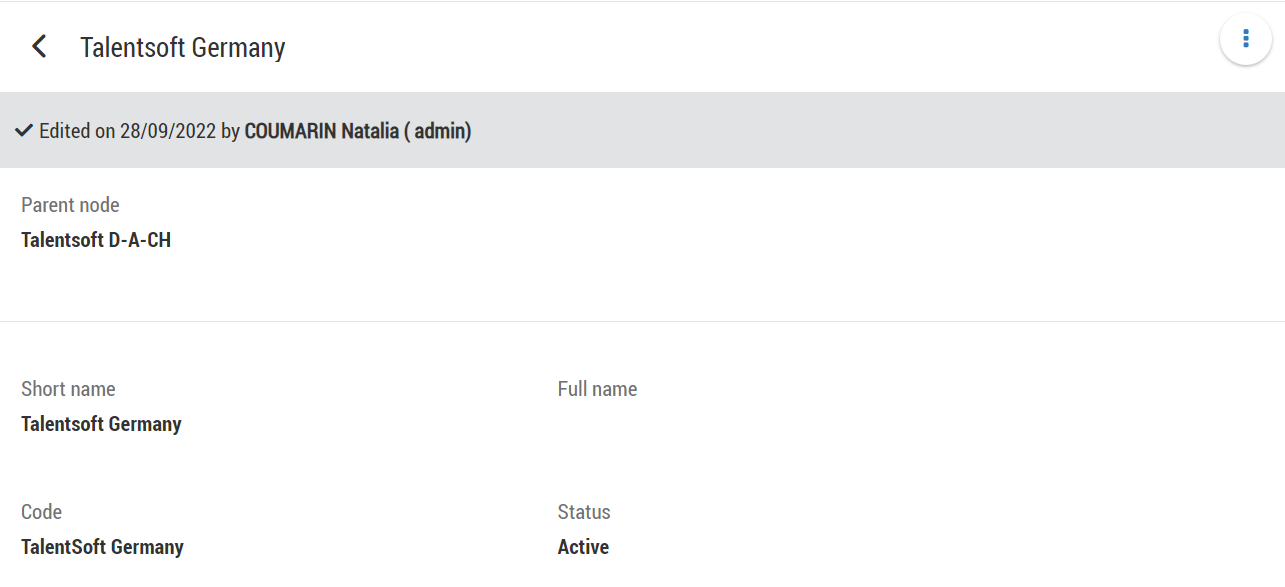
A library is a hierarchical or flat structure containing data elements, called nodes. Each node is a line when you open a library.
A node contains a certain amount of information, pre-configured by your company and Cegid HR.
In hierarchical libraries, nodes can have child nodes. But in flat libraries, all nodes are at the root level.
By clicking on a library:
if the library has not yet been created, the message This library has not yet been created is displayed, along with a button for creating the library;
if the library exists, the list of nodes on the first level is displayed.
If the node has a child node, a blue arrow can be clicked on the right
 to access it, and so on down to the last level. As long as the node does not have a child node, the arrow remains grey
It is worth noting that in the Types of Documents library (Documents category), the hierarchical depth is limited to a maximum of three levels.
A number of options and functions are also available depending on the library:
the linked key property in the Administration module;
the version selector
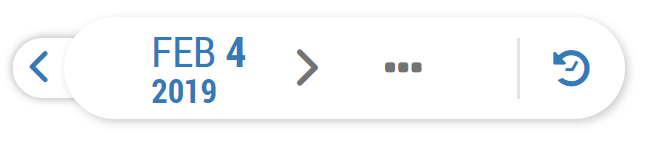 ;
;the node search icon
 and library options burger menu
  ;
;the option Show inactive nodes;
the node's options with the button
 ;
;the message Unchanged since DD/MM/YYYY if that node has never been edited in this version;
the message X node(s) at this level on the bottom of the page.

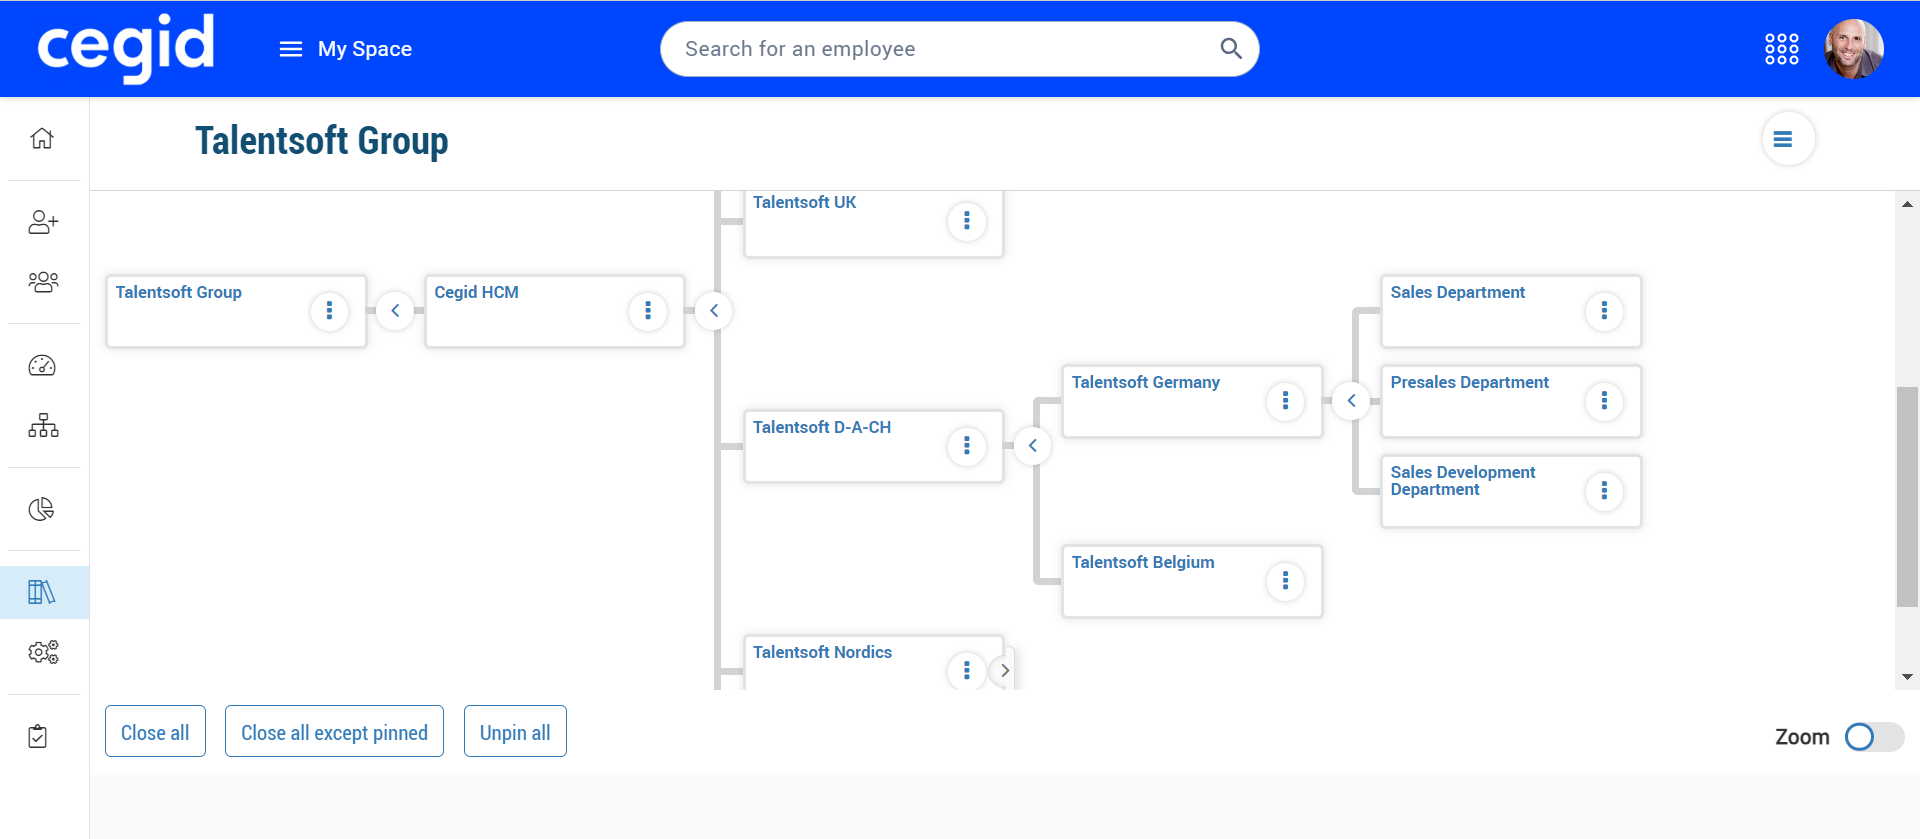
From the node view of a library, you can change the visual aspect to a graphical view.
To do so, click on the button Switch to chart view: please note that not all libraries have this option.
The view that appears gives you a better overview of the entire library, as you move from one node to another. Some options are also available:
Zoom by activating the option on the bottom right.
In the case of the Organisational structure library, this option allows the display of the manager attached to the node.
Pin a node by clicking on
> Pin node: this allows you, when using the Close all except pinned option, to display only the selected nodes.With the button
> Switch to vertical display, a new visualisation is available.For the Legal structure and the Organisational structure libraries only, one button Export is available if the following rights are activated: Export organisation chart of legal structure library and Export organisational structure library organisation chart.
As explained above, most libraries have an indication of the Key Property (KPP) to which they are linked in the Administration module.
Key Properties are the equivalent of Core HR libraries in the Administration module: they feed the drop-down lists of the Cegid HR suite modules.
In contrast, a Key Property is an unversioned library, with only the current version existing.
When, in Core HR, the indication of the linked KPP is displayed, this means that the current data in the Core HR library is copied to the corresponding KPP in the Administration module. In this case, the data is managed from Core HR.
By copying the information, other modules can retrieve the data and use it later.
When there is no indication of a linked KPP, the library can come from the Administration module's Reference data, such as Marital status. Reference data are flat libraries, unlike PPC.
Finally, some data comes from system libraries that are not accessible from the application, as they must comply with ISO standards, such as the list of countries.
To manage libraries and linked nodes, four rights need to be activated on the necessary roles, from the Administration module.
Module | Sub-module | Right | Description |
|---|---|---|---|
Administration | Libraries | Access: Library settings | Enables you to access the menu |
Administration | Libraries | Access: Libraries | Enables you to view the Libraries menu |
Administration | Libraries | Access: Library chart view | Enables you to access the menu |
Administration | Libraries | Access: Node history | Enables you to access, from a node, to the menu |
Administration | Libraries | Edit previous library versions | Enables you to create or update a node in a previous version of the library |
Administration | Libraries | View list : {library name} | Enables you to view the named library |
Administration | Libraries | Edit list : {library name} Edit list: Private health insurance policies | Enables you to edit the named library The Private health insurance policies library of the Others category require an additional right |
Administration | Libraries | Edit the custom libraries | Enables you to edit the custom libraries |
Administration | Libraries | View the custom libraries | Enables you to view the custom libraries |
A version corresponds to the entire tree structure of a library for a given period: parent and child nodes, as well as node records.
If a change needs to be made to a library, a new version needs to be created. In this case, the new version is identical to the previous version, and you modify it afterwards.
A version:
has a start date and may have an end date if a later version exists, or no end date if there are no later versions ;
cannot be overwritten by creating a new version with the same start date (the A version with this effective date already exists error message appears).
When creating a new version, you can:
add a new node;
Example: your company opens a new office, and you add a node to the Geographic structure library.
activate or deactivate a node;
Example: your company closed offices in France a few years ago (deactivating the node in the Geographical structure), and decided to open them again (activating the node in the Geographical structure).
create a new record for an existing node;
Example: your company restructures, and an entity in the Legal structure changes from parent entity A to parent entity B. You then need to create a new record to keep the attachment history.
A record has a start date and can have an end date if a later record exists.
It is repeated in all versions, until a new record is created on the node.
As long as a record has not been modified for a given version, the following message is displayed on the node line: Unchanged since DD/MM/YYYY.
modify an existing node, without a new record.
Example: you see a spelling mistake in the name of a node. Modifying a node without a new record does not keep the previous data, so this action must be carried out on a one-off basis.
Please note: the procedure below applies to the creation of a future version of the library as well as a previous version.
To add a new version to a library, from the Core HR module:
Click on the menu
 Libraries on the left side panel.
Select the desired category and library.
On the top right, click on
> Add a new library version.If the Show inactive nodes option is disabled, enable it: this allows you to check whether the nodes you want to add to the new version are already present, but defined as Inactive. In this case, you can create the new version and then activate the nodes concerned using the Activate node procedure.
In the Effective date field, enter the first day of this new version.
The end date of the current version will be extended to the day before the specified effective date.
If you enter the same effective date as the current version, the message A version already exists for this effective date will be displayed and the Validate option will be greyed out, preventing you from creating the version.
Click Confirm to create the new version.
The new version inherits all the nodes and node records from the current version.
Please note that:
if the KPP does not exist in the Administration module, it must be created at the same time as the library, from the Core HR module.
if the KPP already exists in the Administration module, simply select it when you create the library;
as soon as a KPP is linked to a library, control of the KPP is transferred to the Core HR module.
In this case, in the Administration module, the following message appears: This library can only be managed from the Talentsoft Hub module (“Hub” referring to the Core HR module).
To create a library and populate it with a Key Property (KPP), from the Core HR module:
Click on the menu
Libraries on the left side panel.Select the desired category and library.
The message This library has not yet been created is displayed.
Click on the Create a library button.
Select the KPP and the desired effective date for this library.
If the KPP already exists: select it from the Key property list.
If the KPP does not exist yet: keep the Create a new organisation option selected.
Click on Confirm.
If the KPP already exists, the information from it is automatically added as nodes to the library.
If the KPP did not exist, it is created at the same time as the library in the Administration module. However, it remains empty until you create a version and the associated nodes, which will then be copied to the Administration module.
Please note that the Configuration option is only available for tree-based library.
This is used to determine whether all the nodes in a tree library are available in the drop-down menus for data sections, or only the nodes at the lowest level.
If top-level nodes are only used to separate and classify lower-level nodes, you should only provide access to lower-level nodes.
For example:
In the Organisational structure library, each node corresponds to a job, so all nodes at all levels must be selectable;
In the Geographical structure library, if the top-level nodes are countries and the child nodes are cities, you can choose to display only cities in the drop-down lists.
To use the Configuration of a tree library option, from the Core HR module:
Click on the menu
Libraries on the left side panel.Select the desired category and library.
On the top right, click on
> Configuration.Yes is selected by default:
leave Yes selected if you want all nodes to be selectable in the drop-down lists;
select No if you want only the lowest level nodes to be selectable.
Click Validate to save your selection.
This procedure should be carried out when a version has been created accidentally, for example, with an incorrect start date, or when it is not being used.
Please note that:
you can only delete a version if no new node or node record has been created in that version.
In this case, all nodes have the message Unchanged since DD/MM/YYYY on their line.
if you try to delete a version that contains a new node or node registration, the following message is displayed:
Deletion not authorised
The requested deletion may cause inconsistencies or errors in the organisation.
To delete a version of a library, from the Core HR module:
Click on the menu
Libraries on the left side panel.Select the desired category and library.
Select the version of the library you wish to delete using the version selector.
On the top right, click on
> Delete version.Click Delete to confirm your choice.
In general, you only purge a library after you have created it in Core HR or via import, and you have found errors that justify purging and then recreating the library rather than trying to resolve these errors.
Please note that:
you can only purge a library if the values in that library have never been used;
if you try to purge a library that has already been used, the following message is displayed:
Deletion not authorised
Unable to purge this library because it is already in use.
To purge a library, from the Core HR module:
Click on the menu
Libraries on the left side panel.Select the desired category and library.
On the top right, click on
> Purge.Click Validate to confirm your choice.
Reminder:
It is essential to create a new version of the library before each effective change on a specific date. Each new version corresponds to all the changes made to a library on a given date.
If you create a new record for a node, make sure that the previous record is correct, so as not to propagate incorrect information.
If you create a new node, the node's effective date is the start date of the version in which the node is created, and this date cannot be changed when the node is created.
If the node's effective date needs to be different, create a new version with the correct start date, then create your node.
You may need to edit a library to reflect changes within your business: create a node, modify a node with a new record, activate or deactivate a node, etc.
Please note that if you wish to add many node records to the same version, it is possible to add them via import. Talentsoft recommends that you create a version in the Core HR module before importing the node records. This allows you to systematically apply the version start date as the start date of nodes and node records in your import file, reducing the risk of errors associated with manual entry.
Example of use case: opening a new office, resulting in the creation of a new node in the Geographic structure library.
To create a node, from the Core HR module:
Click on the menu
Libraries on the left side panel.Select the desired category and library.
Select the version of the library in which you want to add the node using the version selector.
On the top right, click on
> Create a node from this version.Fill in the node information.
The Parent node field is pre-filled with the parent node information based on the location you were in during step 4.
You can change the parent node if you want to place your new node in a different location in the library.
Click Save as new to create your node.
If you wish to create a child node after your actions, click on the arrows on the nodes until you reach the location of the child node and repeat the above procedure.
Example of a use case: changing the name of a brand, resulting in the modification of a node that already exists in the Organisational structure repository.
Warning: we recommend that you never modify the code of a node, as technical procedures may use this code. We advise you to deactivate the node in this case.
To create a new node record, from the Core HR module:
Click on the menu
Libraries on the left side panel.Select the desired category and library.
Select the version of the library in which you wish to create the new record using the version selector.
On the node's line, click on
> Create a new record.The effective date of this new record is the start date of the selected version, displayed at the top of the editing window.
Modify all the fields you wish.
Case of the Status field: if you change this field to Inactive, the node is deactivated on the effective date of the selected version and will no longer be selectable in the collaborator folder from that date onwards.
You can still access them by activating the Show inactive nodes option.
Click Save as new to create your new record.
In the particular case where you need to deactivate numerous nodes, we recommend that you start with the lowest child node and work your way up, changing the Status field to Inactive via a new record each time.
Example of use case: typing error in the name of one of the towns, resulting in the node being modified, without creating a new record, in the Geographic structure repository.
Warning: this function only modifies the information for the current version of the node.
To edit a node without creating a new record, from the Core HR module:
Click on the menu
Libraries on the left side panel.Select the desired category and library.
On the desired node, click on
> Edit all versions.Correct the node's errors.
Click Save.
You usually only delete a node after either:
creating it in the Core HR module or by importing and discovering errors in it;
the HR department asks you to delete the node because it has never been used.
You can only delete a node if it is not used in an employee file and does not have a child node.
If you try to delete a node in use, you will see the following message:
Deletion not authorised
Deleting this node would cause any linked nodes and node history to be deleted.
To delete a node from the Core HR module:
Click on the menu
Libraries on the left side panel.Select the desired category and library.
On the desired node, click on
> Delete node.Click on Validate.
Libraries use the same copying process (mirroring) as data sets. However, because most libraries are individually mirrored into KPP in the Administration module, the mirroring behaviour is different.
The copy function makes all the data in the Core HR libraries available in the other modules of the Cegid HR suite.
However, only data from the current version is copied, as the Administration module does not use the version management strategy.
There are two types of copy:
instant copy: this copy is launched as soon as you modify the node record of the current version of a library.
For example: changing the label or deactivating the node in the current version.
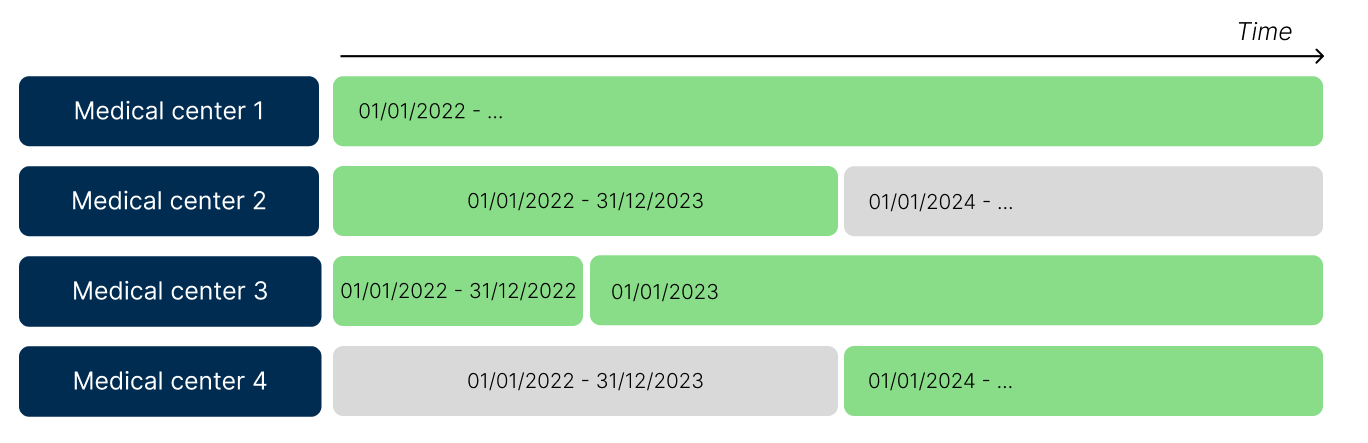
scheduled recopy: this takes place every 24 hours, usually in the early morning. It only takes place when Core HR detects a new version of a library on the current date.
In the example below, on 01/01/2024, the planned copy will deactivate medical centre 2 (nodes and structure) and activate medical centre 4 (nodes and structure) in the Administration module, but it will not affect the other two medical centres, which have not changed by this date.
The Legal structure inheritance feature allows you to link an organisational structure to one or more legal structures: on the user side, the values of the legal structures will therefore be pre-filled according to the choice of organisational structure.
This feature impacts:
The employee file
The Hiring event
The Mutation events type
Important: you cannot use this feature if you have activated the Position management feature.
Prerequisites:
Activation of the feature must be requested via a support ticket.
Make sure you have the necessary rights, listed in the article Core HR libraries.
Once the functionality and the rights are activated, from the Core HR module:
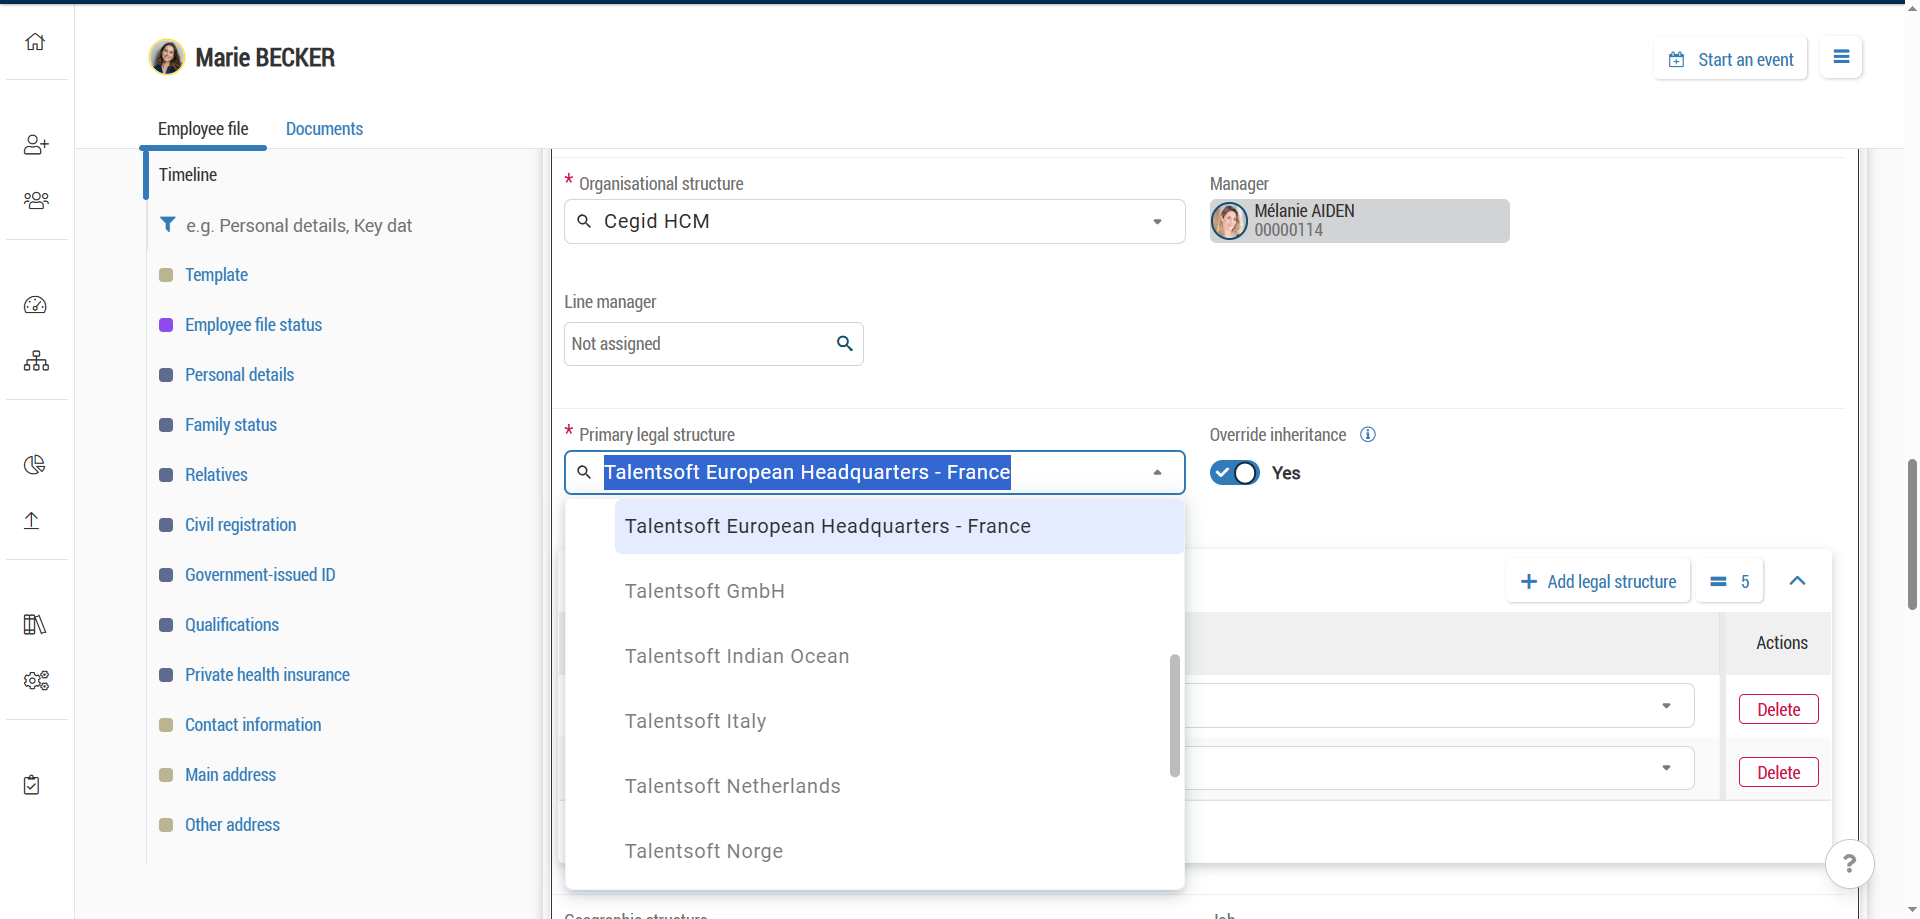
Go to the menu Libraries > Company structure > Organisational structure.
Edit the desired node by clicking on
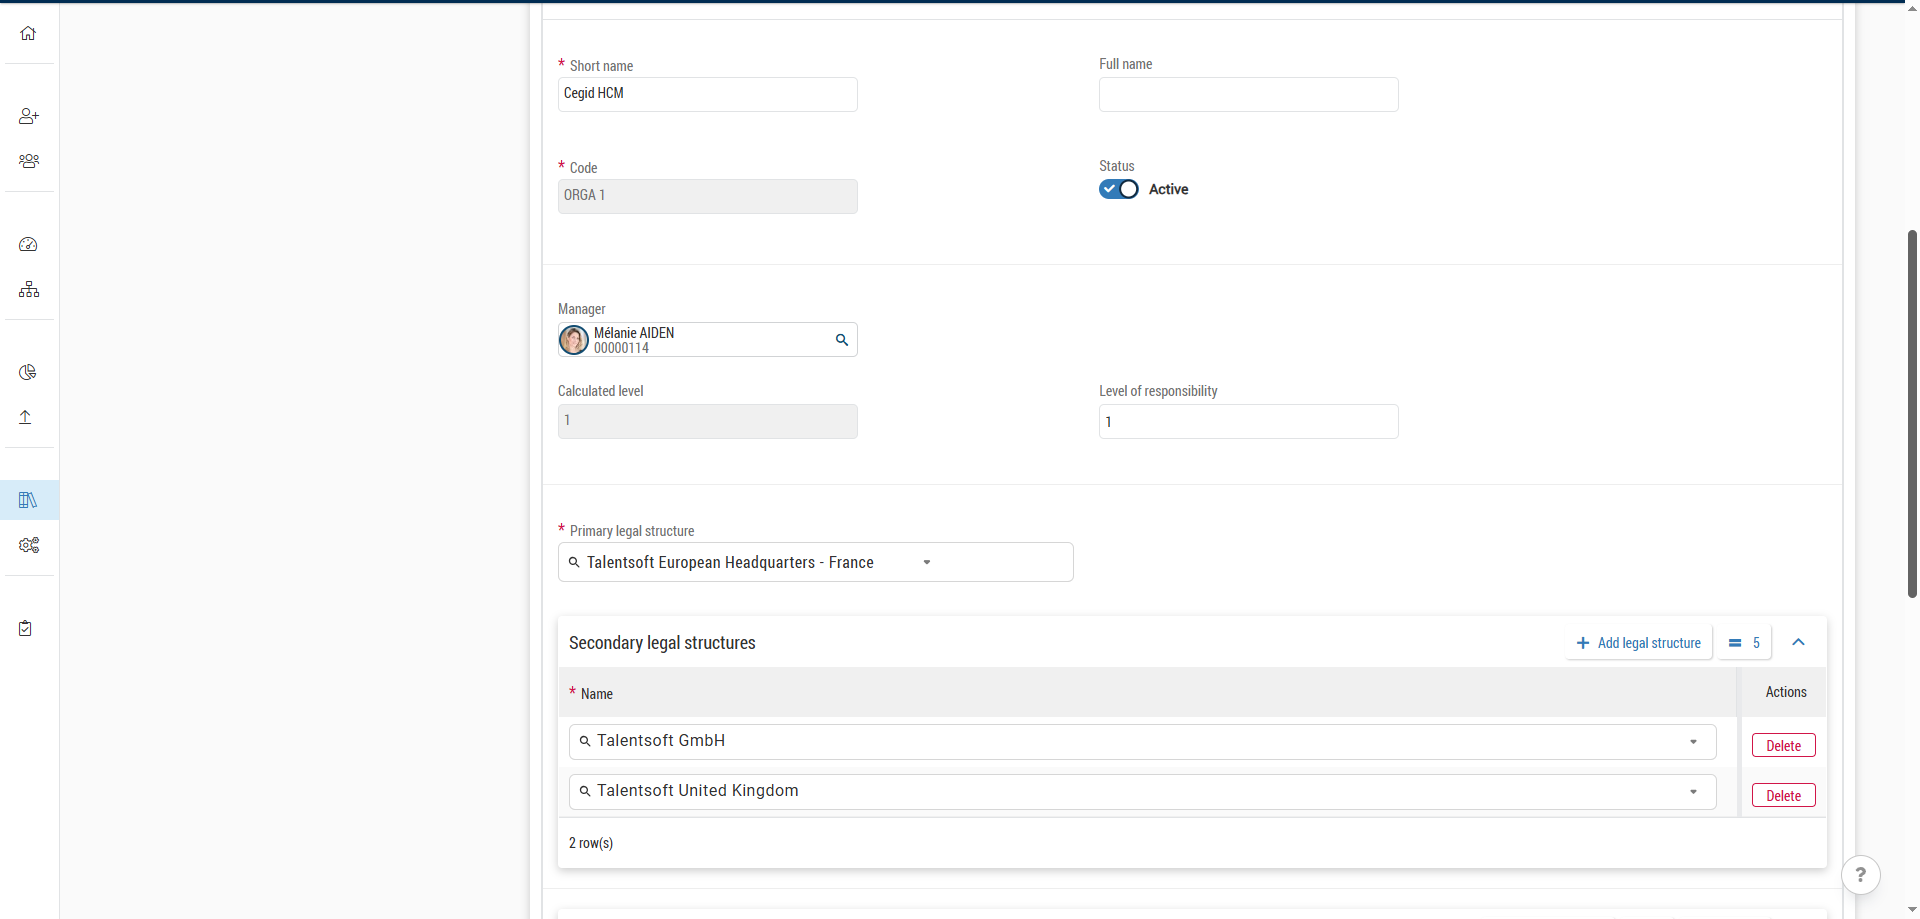
> Edit all versions.Fill in the field Primary legal structure by clicking on the desired value in the dropdown list.
If you want to add another value, from the table Secondary legal structures:
Click on
 Add legal structure.
Click on the value you want from the dropdown list.
You cannot choose the same value as for the field Primary legal structure, otherwise you will have an error when saving.
Click on Save at the top right to save your changes.
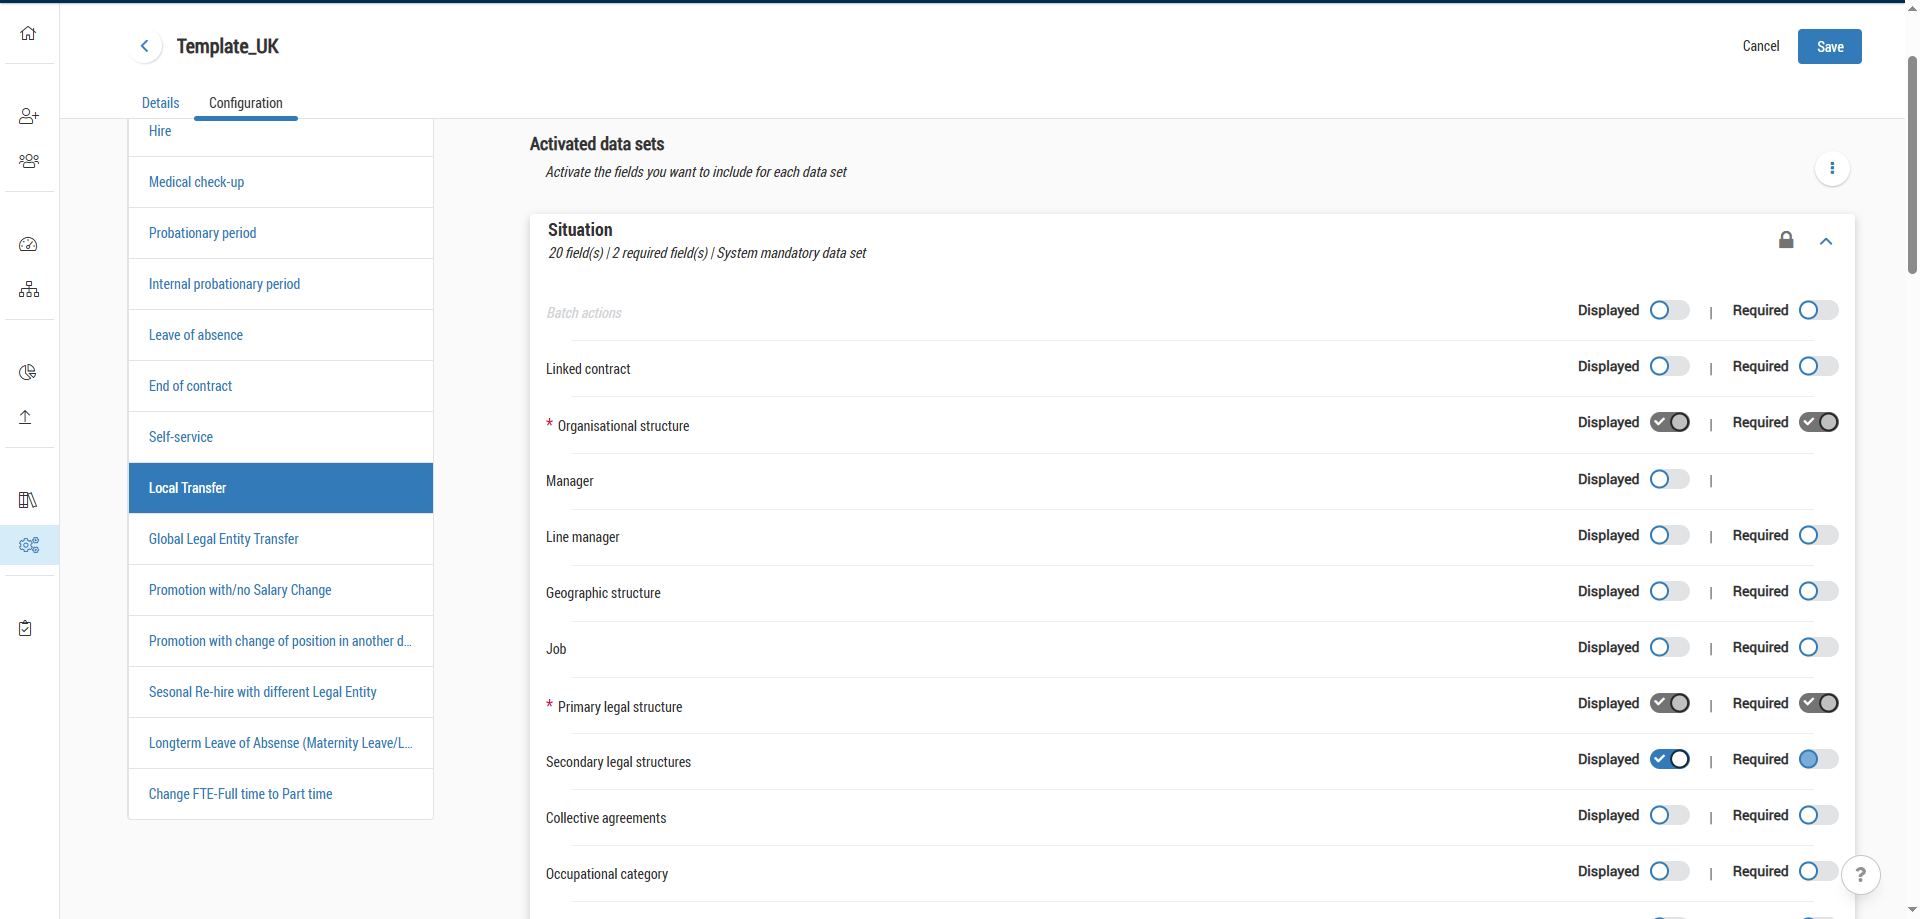
As soon as the feature is activated, both fields Primary legal structure and Secondary legal structures are available, within the Situation data set, in the template edition:
The field Primary legal structure is visible and mandatory: this behaviour cannot be changed.
The field Secondary legal structures may be visible and/or mandatory.
Attention: the configuration of your template should be consistent with the configuration of your libraries.
You must enter a value for the field Primary legal structure in the libraries.
If you set up the field Secondary legal structures as mandatory, you must have entered values in the libraries.
In both cases above, if the conditions are not met, your users will get an error message when saving the Situation data set.
When selecting the organisational structure in the data set Situation, the user will have the values selected automatically read-only for the fields Primary legal structure and Secondary legal structures.
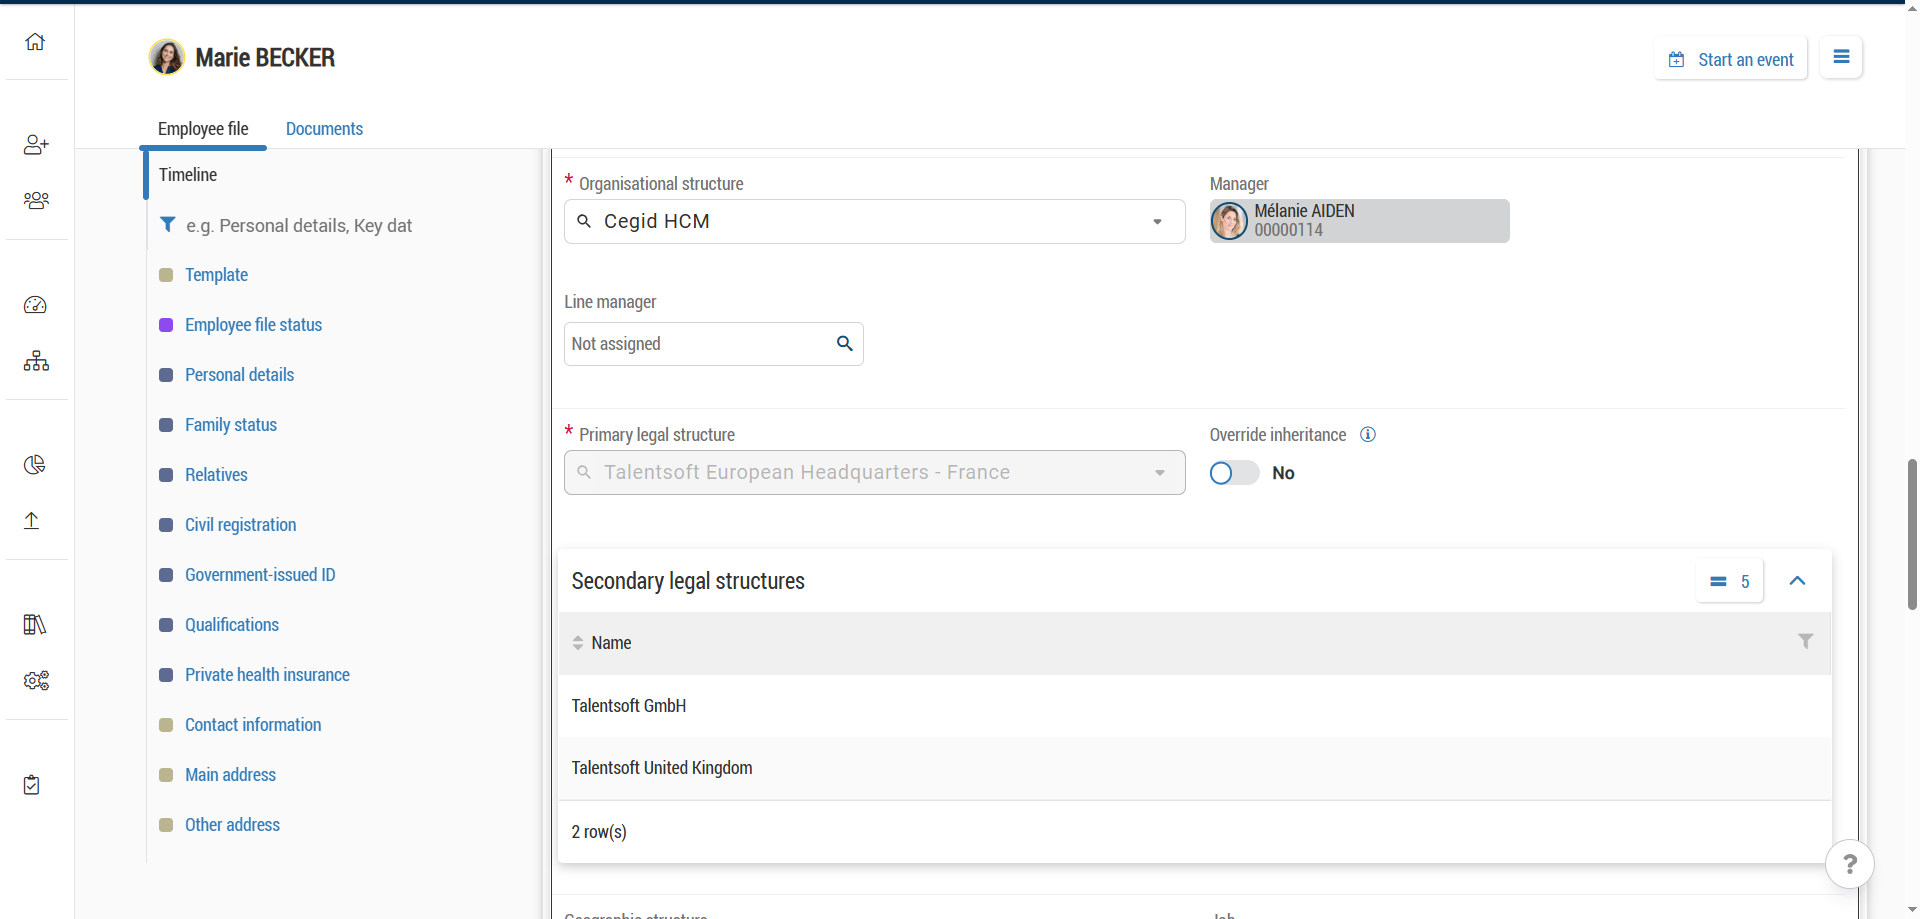
An option Override inheritance can be checked: this option makes it possible to make both fields editable and to modify the values if necessary.
As long as the option is checked, any changes made in the library will not be reflected in the Situation data set of the employee: as soon as the option is unchecked, overloads are lost and library inheritance takes over again.
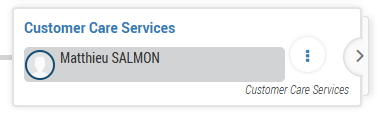
This library can be used to enrich the list of managers available to a given employee. It can be used to create different types of cross-functional contact, such as HR, administration, payroll, accounting, finance, etc.
This library is not hierarchical and not versioned.
There are two types of Administrative points of contact:
HR Manager: there can only be one administrative point of contact of this type;
Customised: all other types of administrative points of contact that you create. There is no limit to how many you can create.
This reference system works in a specific way and is used in stages:
First, you need to create the library nodes (either manually or via an import), which correspond to the different types of referent possible.
These nodes are automatically copied into the Administration module, Performance > Organisation chart menu.
As soon as an employee is attached to a referrer, the latter is automatically copied into the organisation chart in the Performance > Organisation chart menu. A referrer can be added via an employee file or an event (Hire, Transfer, Global legal entity transfer and End of contract).
The library Administrative points of contact is available in the Company Structure Category.
A number of rights are required for full use of this library.
Module | Sub-Module | Right | Function |
|---|---|---|---|
Administration | Libraries | Edit List: Administrative Points of Contact | Allows you to modify the library and migrate organisations from the Performance menu. |
Administration | Libraries | View list: Administrative Points of Contact | Allows you to see the library. |
Administration | Administrative Management | View data set: Administrative points of contact | Allows you to see the Administrative points of contact data set. |
Administration | Administrative Management | Edit data set: Administrative points of contact | Allows you to see and edit the Administrative points of contact data set. |
Administration | Self-service | Edit data set: Administrative points of contact | Enables you to view and edit the Administrative points of contact data section via the Employee Self-Service. Please note that activating this right is not recommended. |
Administration | Self-service | View data set: Administrative points of contact | Allows you to view the Administrative points of contact data section via Employee Self-Service. |
TS Performance | Organisation Chart | Edit organisation charts (add, edit, delete) | Right needed to edit the organisation charts of the Performance > Organisation Chart menu, required to import administrative points of contact into Core HR. This right is cumulative with the previous one. |
General | Management of main menu | Display Administration menu | Right needed to access the Administration module. This module must be accessed to set up administrative points of contact. |
General | Authorisations | Bypass the authorisation list on all organization charts | Right needed to override a user's authorisation so that they can view all the organisation charts from the Cegid HR home page. |
General | Authorisations | Bypass the authorisation list on reference organization chart | Necessary to override a user's authorisation so that they can view the reference organisation chart (marked with a star) in the Administration module. |
The Administrative Points of Contact library can be populated in two ways:
by creating nodes directly in Core HR, as for other libraries;
with an import of one or several organisations from the Performance > Organisation chart menu.
In this case, Core HR has total control over the data: changes or deletions must be made from Core HR.
Please note that the import of organisations should remain a punctual operation.
Please note that you can only delete an administrative point of contact if it its not used in an employee file.
To create a node in the Administrative points of contact library, from the Core HR module:
Click on the menu
Libraries on the left side panel.You are now in the Company structure category, click on the Administrative points of contact library.
If the library has not been created, click on the Create a node button in the centre of the page.
If the library has been created, click on
> Create a node.Fill in all mandatory fields.
Click Save as new to save your node.
The node information is saved and will be copied to the Performance > Organisation chart menu.
Any changes to this library must now be made in Core HR.
To import an organisation into the Administrative points of contact library from the Core HR module:
Click on the menu
Libraries on the left side panel.You are now in the Company structure category, click on the Administrative points of contact library.
If the library has not been created, click on the Organisation import button in the centre of the page.
If the library has been created, click on
> Organisation import.Select the Employee assignment start date: this date is the same for all employees, all links will be migrated to this date in Core HR.
The Check the organisations page button takes you to the Performance > Organisation chart menu to check the organisations listed, as the import is definitive and irreversible.
This button depends on some rights listed above.
Select the organisations to be imported by ticking them in the table displayed.
Click on Organisation import to start the import.
Any changes to this library must now be made in Core HR.
All organisation charts imported into Core HR can no longer be updated in the previous Organisations import.