The Contracts tab
Each tab is composed the same way: the list of tables on the left and the tables on the right.
Follow-up tables have common characteristics:
their display can be customised;
they display employees depending on the authorisations and role of the user, as long as the setting made by your administrator;
some tables display data depending on specific criteria: hover the
 icon below a follow-up table to see these criteria;
the majority of tables have an Actions column, allowing you to do one or more actions.
In each table, the number of rows per page in the follow-up table, and the order and appearance of columns are modifiable to create a custom view for the logged-in user.
To choose the number of lines of each table:
Click on the
 icon on the top of the table.
Select the number of line per page.
The table update is immediate and is saved for your next log-in.
To configure displayed columns, click on Columns on the top of a table:
Click
 to pin a column to the left side of the follow-up table.
Click
 , or the name of a column, to select it for repositioning it in the list by drag and drop.
Click
 to hide a column from the follow-up table.
The icon displays with a strike through bar
 and the column name moves to the bottom of the list.
Also, a
 means that the column is locked in display mode by either your Administrator or Cegid HR and cannot be hidden.
Click Apply to save your new configuration.
On all follow-up tables, a button Export is available at the top right.
This button allows you to export table data in CSV format according to the following rules:
The exported data is that displayed in the follow-up table: the user's authorizations and rights are taken into account.
The column display settings (visibility and order) are retained.
The export format respects the culture parameters of the user who starts the export (separator in comma or semicolon format and language of the column headers).
The name of the exported file is in a default format: Export_[Followuptablename]_[YYYYMMDD][hhmmss].
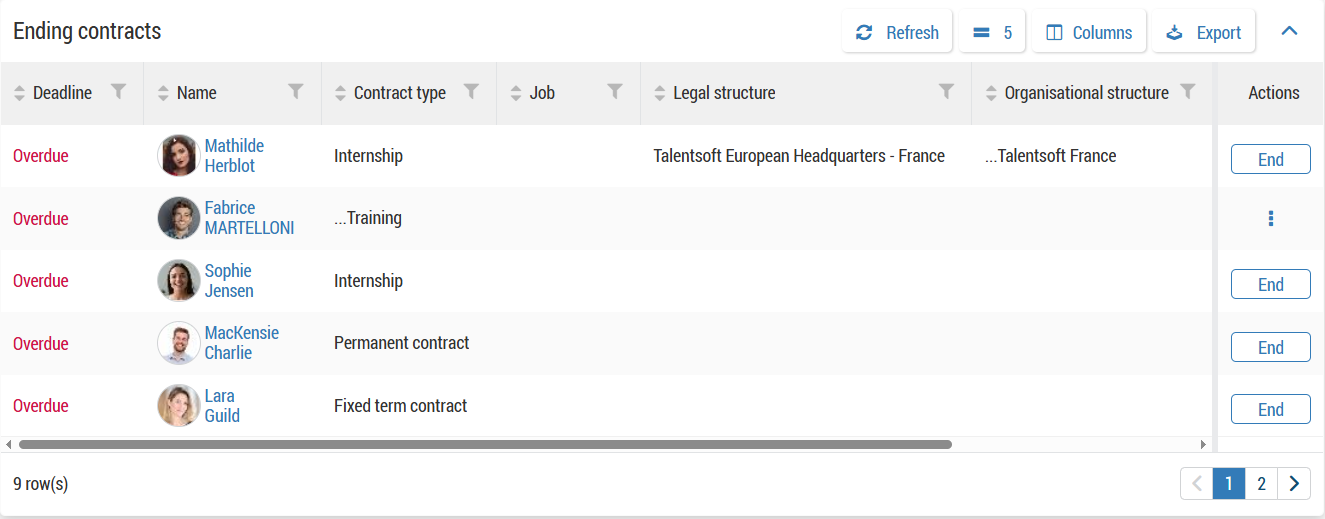
This tab contains the follow-up tables you use to take actions on employee contracts.
This table displays employees:
for whom the contract end date is in less than two months;
for whom the contract end date is overdue, but the contract has not been closed.
From this table, you have the name of the employee and information about his contract, as long as the end date of the contract: if this date is overdue and the contract has not been closed, the indication Overdue is displayed.
If an employee has several contracts coming to an end, his name appears several times.
From this table, you can click on End in the Actions column to start the event End of contract and end the contract of the employee.
When an employee is transferred and changes contract, has two contracts and you have to close one, or leaves the company, you must terminate the contract concerned.
When you end a contract for an employee:
if they have only one contract, the status of their file changes to Inactive;
if he has several contracts, the status of his file remains Active.
To end a contract from the dashboard:
In the Actions column, click on End in the row for the employee concerned.
By default, the Effective date field displays the initial contract end date entered in the employee file.
Fill in all mandatory fields.
For data quality reasons, we advise you to fill in the Reason for end of contract field and all the other necessary fields.
At the top right of the page, click on End contract to save your changes.
You will automatically return to the employee file.
The End of contract event affects a number of employee data sections.
Ending the contract terminates the data section records:
linked to the contract: Contract, Situation (and GTA Profile), Probationary periods, Internal probationary periods, Leaves of absence;
linked to the employee: Template, Employee file status, Contact information, Key dates, Aptitude, Medical check-ups, Public worker status.
The Employee file status data set of the employee file contains a special feature: this section is not closed, the end date is entered on the current record and a new record is created the next day with an inactive technical status.
If the employee has several contracts, but the closure only concerns one contract, the event only terminates the existing records linked to the contract.
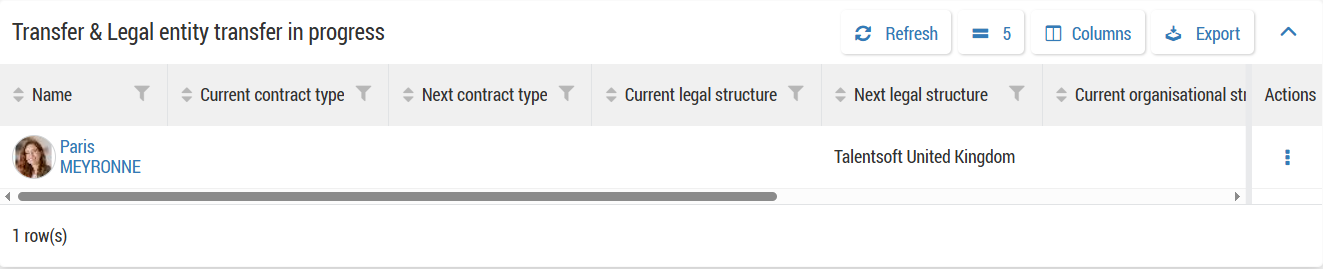
This table displays:
employees for whom an event Transfer or Legal entity transfer has been started but not finished, the user has clicked on Save as draft to save his modifications.
with the Manager Self-Service, the event could have been started by a manager or an administrator.
From this table, you have the name of the employee and information on his current situation and his future one, as long as the type of transfer started.
From this table, you can:
Click on
 > Update to finalise the event;
Click on
> Delete to delete the started event.
The Transfer event is used to manage the professional development of an employee within the same contract: change of job, working hours, organisational structure, etc.
In the case of a transfer, the Organisational Structure field in the Situation data set will be modified, creating a new record in the Situation data set.
If your administrator has added the Contract data set to this event, you can create an addendum to the employee's current contract.
To start a transfer, from an employee's file:
Click on
 Start an event on the top right.
Select Transfer and click Start.
Enter the date of the transfer in the Effective date field: the field is pre-filled with today's date by default. If you change this date, the page will reload with the updated data for this effective date.
Fill in all mandatory fields.
In the Situation data set, modify the Organisational structure only.
If you need to change the Legal Structure, it is preferable to use the Legal entity transfer event type, as this requires a new employment contract.
If the Contracts data set is displayed, all the information entered will be saved in the Addendum created.
In the top right-hand corner, click Confirm to save your changes.
A change of legal entity leads to a change in the employee's employment contract: the Contract and Situation data set therefore need to be modified.
This event is carried out in two stages: closure of the current contract with its attached status and then start of the event. The event is based on the closed contract and its main position.
To start a legal entity transfer, from an employee file:
Close the current contract using the End of contract event.
If at least one of the employee's contracts is closed, the event can be launched.
Click on
Start an event on the top right.Select Legal entity transfer and click Start.
Enter the date of the transfer in the Effective date field: the field is pre-filled with today's date by default. If you change this date, the page will reload with the updated data for this effective date.
Select the information for the new contract in the Contracts section and modify the Legal structure field in the Situation data set.
By default, the information displayed in these sections is inherited from previous records, but you can modify them.
Fill in all the other mandatory fields.
In the top right-hand corner, click Confirm to save your changes.
When the effective date is selected in one of the two events, the data sections display the data valid on that date.
Modifying these data sets means creating a new record: previous records are closed on the day before the effective date.
Please note that if the start date of a transfer is in the past, Core HR and the systems receiving information from Core HR will be heavily impacted, including the payroll, finance and accounting systems.
Prerequisite: your company must have subscribed to the Electronic signature option with the partner Connective.
This table displays employees:
who have a document with the status Pending signature;
who have a document with the status Electronically signed;
who have a document with the status Signature rejected.
From this table, you have the name of the employee and information about the relevant document.
You can click on the name of an employee to access his file.
