The Position Management tab
Each tab is composed the same way: the list of tables on the left and the tables on the right.
Follow-up tables have common characteristics:
their display can be customised;
they display employees depending on the authorisations and role of the user, as long as the setting made by your administrator;
some tables display data depending on specific criteria: hover the
 icon below a follow-up table to see these criteria;
the majority of tables have an Actions column, allowing you to do one or more actions.
In each table, the number of rows per page in the follow-up table, and the order and appearance of columns are modifiable to create a custom view for the logged-in user.
To choose the number of lines of each table:
Click on the
 icon on the top of the table.
Select the number of line per page.
The table update is immediate and is saved for your next log-in.
To configure displayed columns, click on Columns on the top of a table:
Click
 to pin a column to the left side of the follow-up table.
Click
 , or the name of a column, to select it for repositioning it in the list by drag and drop.
Click
 to hide a column from the follow-up table.
The icon displays with a strike through bar
 and the column name moves to the bottom of the list.
Also, a
 means that the column is locked in display mode by either your Administrator or Cegid HR and cannot be hidden.
Click Apply to save your new configuration.
On all follow-up tables, a button Export is available at the top right.
This button allows you to export table data in CSV format according to the following rules:
The exported data is that displayed in the follow-up table: the user's authorizations and rights are taken into account.
The column display settings (visibility and order) are retained.
The export format respects the culture parameters of the user who starts the export (separator in comma or semicolon format and language of the column headers).
The name of the exported file is in a default format: Export_[Followuptablename]_[YYYYMMDD][hhmmss].
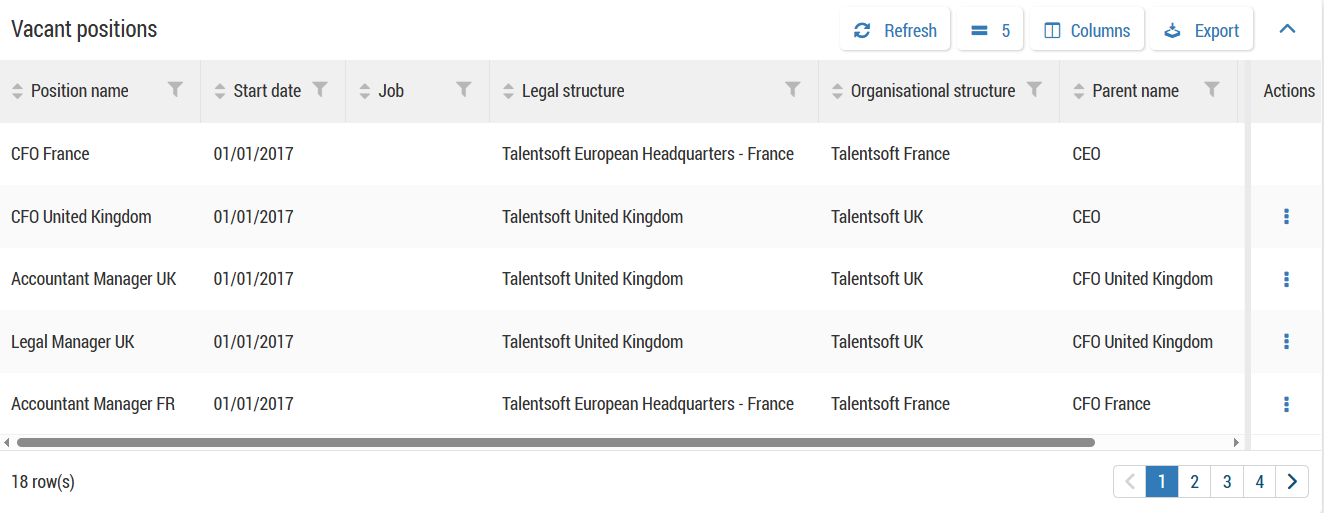
Prerequisite: your company must have the Position management option to display this tab.
This tab allows you to manage vacant positions or overstaffed ones in your company.
This table displays the list of existing position but unoccupied at least a day during the next two months.
From this table, you have the name of the position and its information.
You can:
Click on
 > Create an offer to create a non-published offer with a link to the selected position: this option is only available if Core HR is linked to the Recruiting module.
Click on
> Dismiss to not display this position for the next two months.
This table displays the list of positions for which there are more employees than necessary over a given period.
From this table, you have the name of the position and its information, including the occupancy rate.
You can click on > Employee list to visualise the list of employees on a position.
