Libraries - Custom libraries
A library is an element of Core HR, bringing together data used in the module's drop-down list fields. Libraries are used to classify data by type or subject. They can be configured to maintain logic and continuity in the information in employee files.
The libraries use the Core HR data version management strategy to provide a history and enable your organisation to build future versions of libraries to anticipate changes.
The libraries are divided into eight categories: Company structure, Contract management, Compensation & Benefits, Local regulation, Jobs and competencies, Documents, Others, Custom libraries.
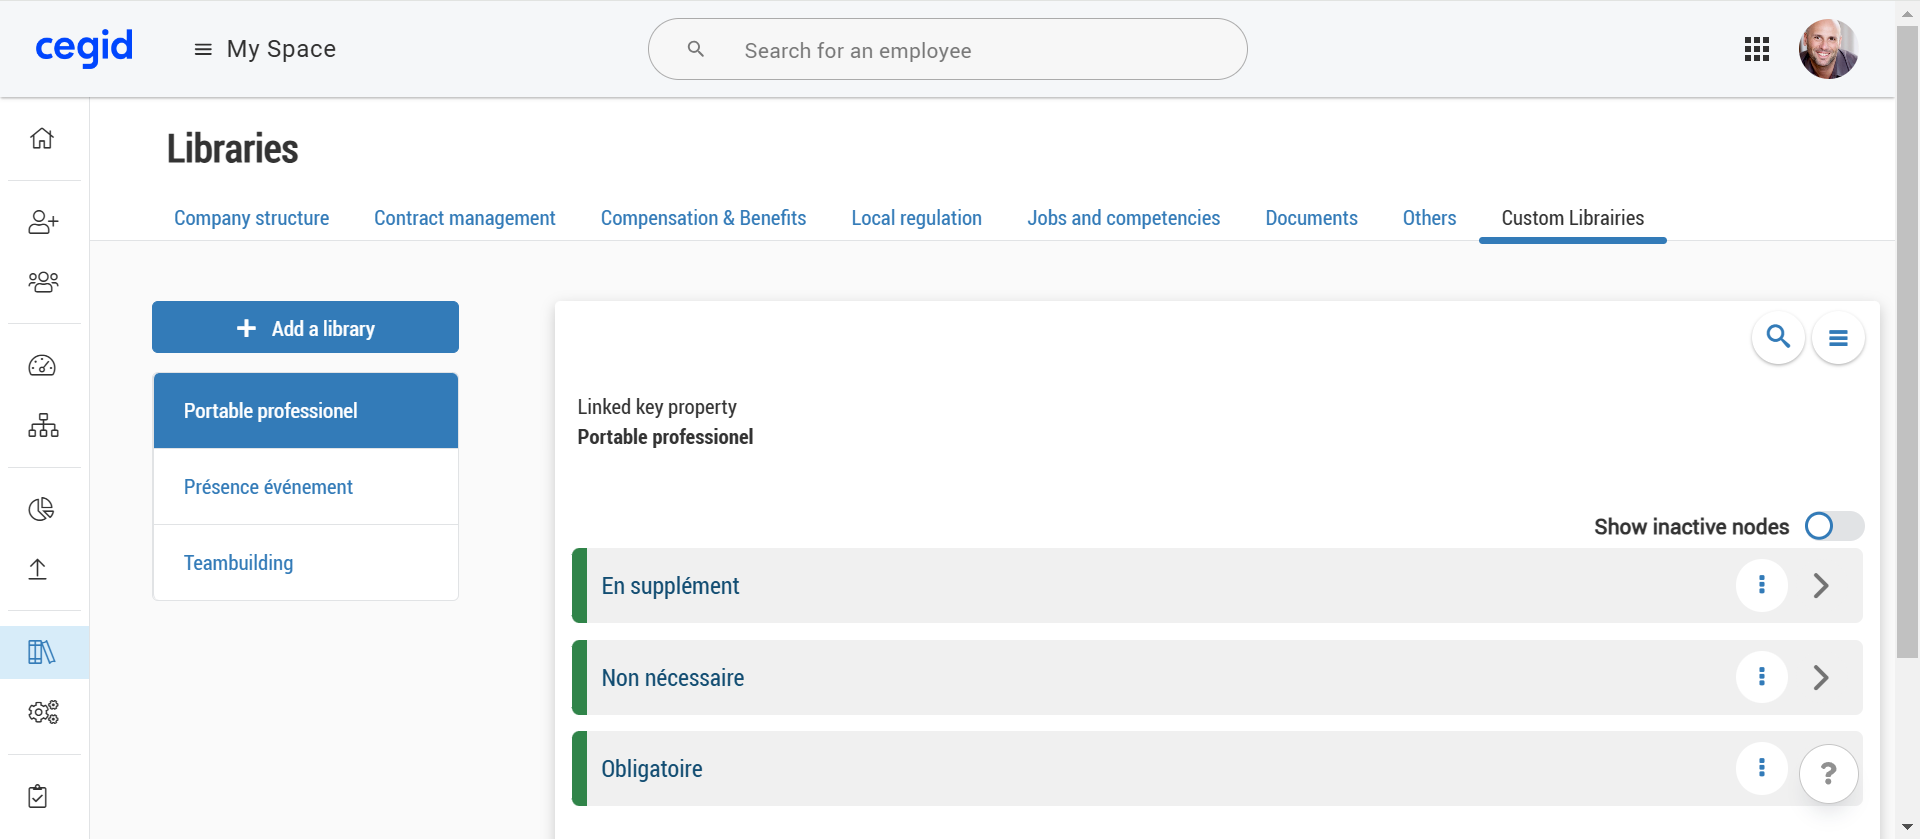
A library is a hierarchical or flat structure containing data elements, called nodes. Each node is a line when you open a library.
A node contains a certain amount of information, pre-configured by your company and Cegid HR.
In hierarchical libraries, nodes can have child nodes. But in flat libraries, all nodes are at the root level.
By clicking on a library:
if the library has not yet been created, the message This library has not yet been created is displayed, along with a button for creating the library;
if the library exists, the list of nodes on the first level is displayed.
If the node has a child node, a blue arrow can be clicked on the right
 to access it, and so on down to the last level. As long as the node does not have a child node, the arrow remains grey
It is worth noting that in the Types of Documents library (Documents category), the hierarchical depth is limited to a maximum of three levels.
A number of options and functions are also available depending on the library:
the linked key property in the Administration module;
the version selector
 ;
;the node search icon
 and library options burger menu
  ;
;the option Show inactive nodes;
the node's options with the button
 ;
;the message Unchanged since DD/MM/YYYY if that node has never been edited in this version;
the message X node(s) at this level on the bottom of the page.

As explained above, most libraries have an indication of the Key Property (KPP) to which they are linked in the Administration module.
Key Properties are the equivalent of Core HR libraries in the Administration module: they feed the drop-down lists of the Cegid HR suite modules.
In contrast, a Key Property is an unversioned library, with only the current version existing.
When, in Core HR, the indication of the linked KPP is displayed, this means that the current data in the Core HR library is copied to the corresponding KPP in the Administration module. In this case, the data is managed from Core HR.
By copying the information, other modules can retrieve the data and use it later.
When there is no indication of a linked KPP, the library can come from the Administration module's Reference data, such as Marital status. Reference data are flat libraries, unlike PPC.
Finally, some data comes from system libraries that are not accessible from the application, as they must comply with ISO standards, such as the list of countries.
To manage libraries and linked nodes, four rights need to be activated on the necessary roles, from the Administration module.
Module | Sub-module | Right | Description |
|---|---|---|---|
Administration | Libraries | Access: Library settings | Enables you to access the menu |
Administration | Libraries | Access: Libraries | Enables you to view the Libraries menu |
Administration | Libraries | Access: Library chart view | Enables you to access the menu |
Administration | Libraries | Access: Node history | Enables you to access, from a node, to the menu |
Administration | Libraries | Edit previous library versions | Enables you to create or update a node in a previous version of the library |
Administration | Libraries | View list : {library name} | Enables you to view the named library |
Administration | Libraries | Edit list : {library name} Edit list: Private health insurance policies | Enables you to edit the named library The Private health insurance policies library of the Others category require an additional right |
Administration | Libraries | Edit the custom libraries | Enables you to edit the custom libraries |
Administration | Libraries | View the custom libraries | Enables you to view the custom libraries |
To create a custom library, from the Core HR module:
Click on the menu
 Libraries > Custom libraries.
Click on
 Add a library.
Enter the name of the library, its code and choose a KPP to link to or keep the option Create a new organization to create a KPP with the same library name.
Then create the nodes for your library by following the procedure in the section Create a node of the next article.
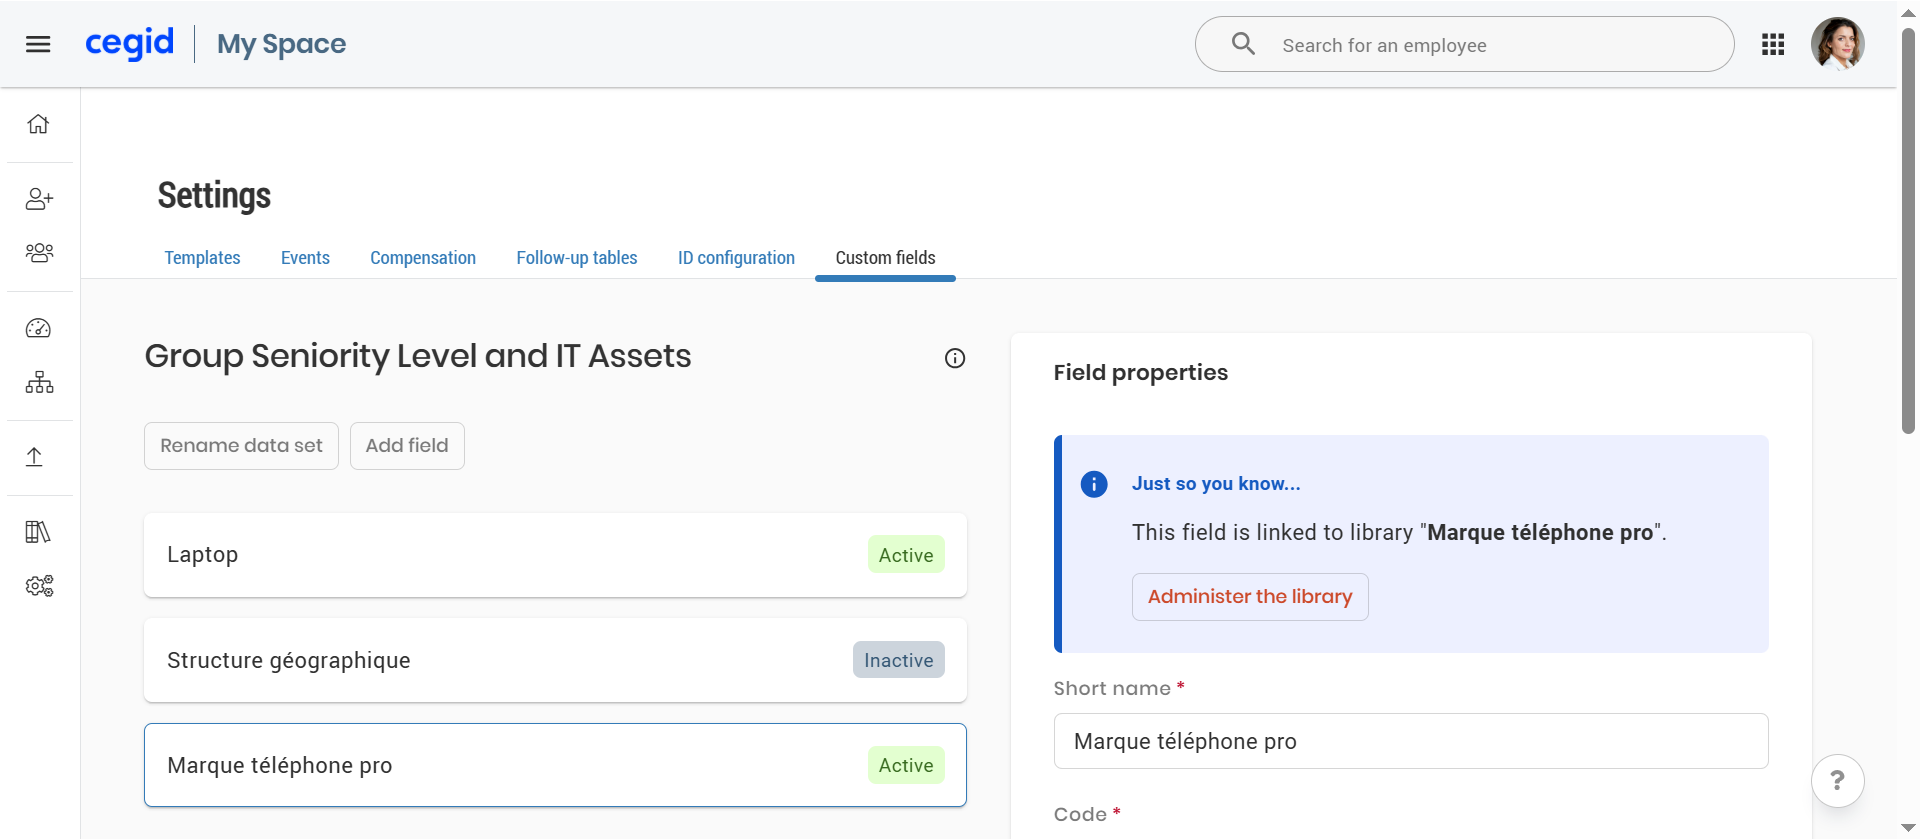
As soon as you create a custom library, a custom field linked to the status Inactive is created automatically: this field is of type List and its values correspond to the nodes of the created library.
The configuration of the values of the library is done from the menu Libraries, while the custom field configuration remains in the menu  Configurations: a button allows you to switch from the custom field to the linked custom library.
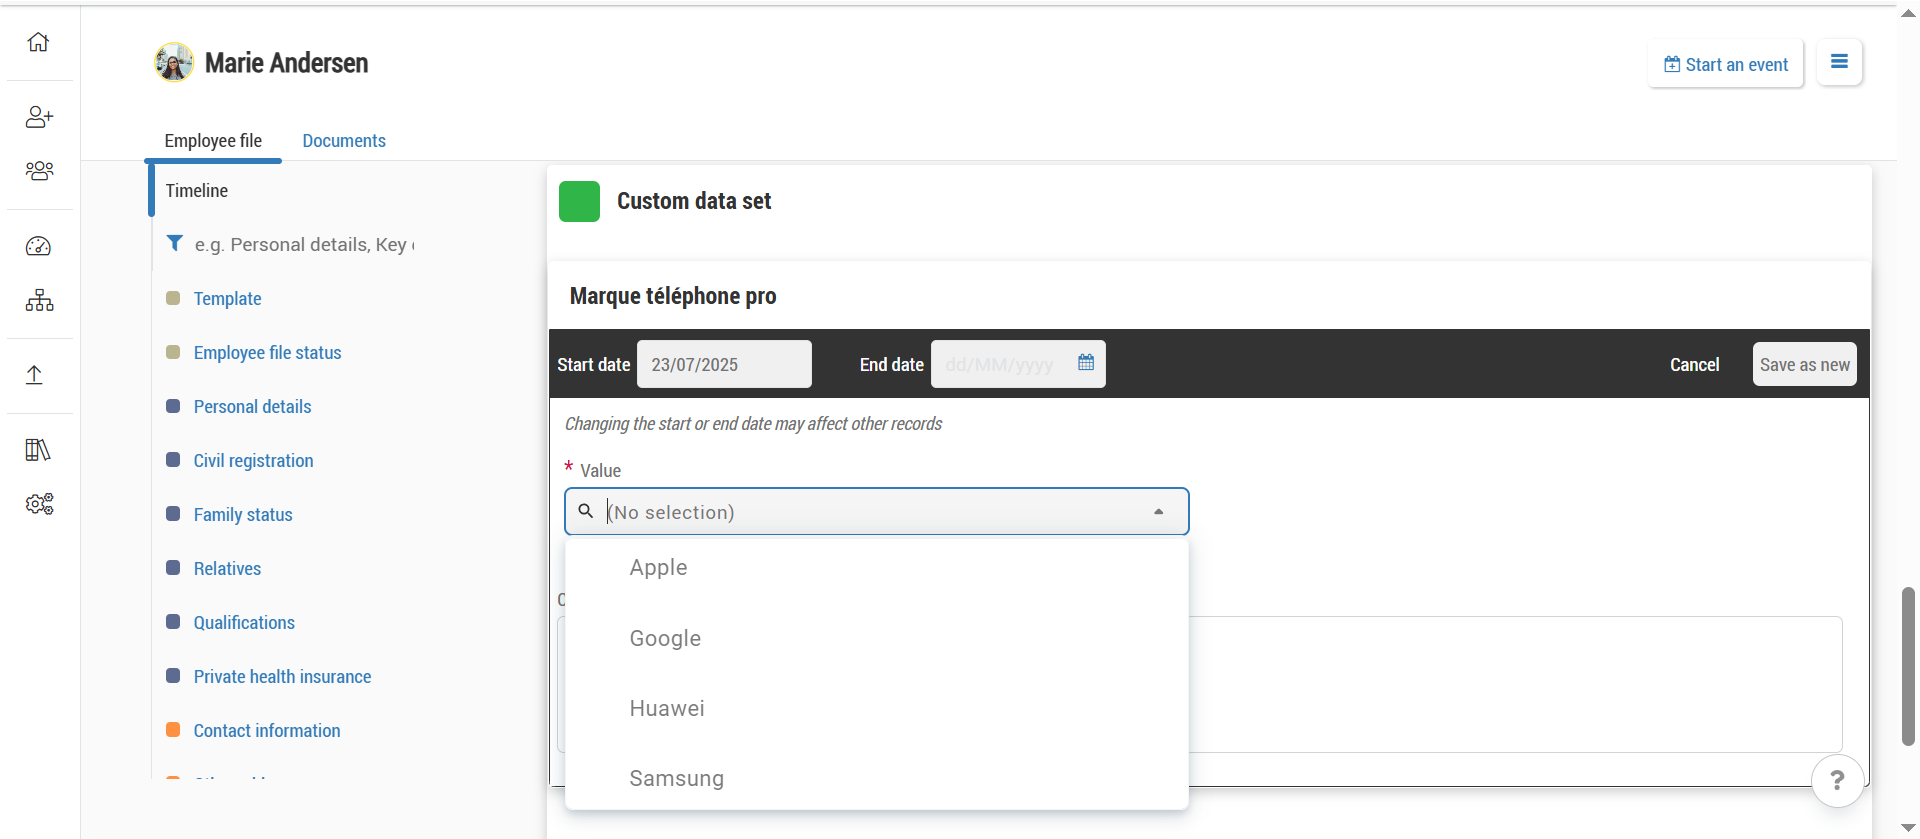
Once the library and the linked custom field are created, to use the values in an employee file:
Make sure that the library nodes as well as the custom field are in the status Active.
From the tab Templates, edit the desired template.
Add the data set Custom fields.
Check the option Displayed for the linked custom field and click Save.
From an employee file, at the level of the data set Custom fields, click on the icon
 to add a record.
Select the linked custom field.
The values in the dropdown list correspond to the values of the nodes in the custom library.
Please note that the Configuration option is only available for tree-based library.
This is used to determine whether all the nodes in a tree library are available in the drop-down menus for data sections, or only the nodes at the lowest level.
If top-level nodes are only used to separate and classify lower-level nodes, you should only provide access to lower-level nodes.
For example:
In the Organisational structure library, each node corresponds to a job, so all nodes at all levels must be selectable;
In the Geographical structure library, if the top-level nodes are countries and the child nodes are cities, you can choose to display only cities in the drop-down lists.
To use the Configuration of a tree library option, from the Core HR module:
Click on the menu
Libraries on the left side panel.Select the desired category and library.
On the top right, click on
> Configuration.Yes is selected by default:
leave Yes selected if you want all nodes to be selectable in the drop-down lists;
select No if you want only the lowest level nodes to be selectable.
Click Validate to save your selection.
This procedure should be carried out when a version has been created accidentally, for example, with an incorrect start date, or when it is not being used.
Please note that:
you can only delete a version if no new node or node record has been created in that version.
In this case, all nodes have the message Unchanged since DD/MM/YYYY on their line.
if you try to delete a version that contains a new node or node registration, the following message is displayed:
Deletion not authorised
The requested deletion may cause inconsistencies or errors in the organisation.
To delete a version of a library, from the Core HR module:
Click on the menu
Libraries on the left side panel.Select the desired category and library.
Select the version of the library you wish to delete using the version selector.
On the top right, click on
> Delete version.Click Delete to confirm your choice.
In general, you only purge a library after you have created it in Core HR or via import, and you have found errors that justify purging and then recreating the library rather than trying to resolve these errors.
Please note that:
you can only purge a library if the values in that library have never been used;
if you try to purge a library that has already been used, the following message is displayed:
Deletion not authorised
Unable to purge this library because it is already in use.
To purge a library, from the Core HR module:
Click on the menu
Libraries on the left side panel.Select the desired category and library.
On the top right, click on
> Purge.Click Validate to confirm your choice.
You may need to edit a library to reflect changes within your business: create a node, modify a node with a new record, activate or deactivate a node, etc.
Please note that if you wish to add many node records to the same version, it is possible to add them via import. Talentsoft recommends that you create a version in the Core HR module before importing the node records. This allows you to systematically apply the version start date as the start date of nodes and node records in your import file, reducing the risk of errors associated with manual entry.
Example of use case: opening a new office, resulting in the creation of a new node in the Geographic structure library.
To create a node, from the Core HR module:
Click on the menu
Libraries on the left side panel.Select the desired category and library.
On the top right, click on
> Create a node, or, from an existing node, click on > Create a child node.Fill in the node information.
The Parent node field is pre-filled with the parent node information based on the location you were in during step 3.
You can change the parent node if you want to place your new node in a different location in the library.
Click Save as new to create your node.
If you wish to create a child node after your actions, click on the arrows on the nodes until you reach the location of the child node and repeat the above procedure.
You usually only delete a node after either:
creating it in the Core HR module or by importing and discovering errors in it;
the HR department asks you to delete the node because it has never been used.
You can only delete a node if it is not used in an employee file and does not have a child node.
If you try to delete a node in use, you will see the following message:
Deletion not authorised
Deleting this node would cause any linked nodes and node history to be deleted.
To delete a node from the Core HR module:
Click on the menu
Libraries on the left side panel.Select the desired category and library.
On the desired node, click on
> Delete node.Click on Validate.
Libraries use the same copying process (mirroring) as data sets. However, because most libraries are individually mirrored into KPP in the Administration module, the mirroring behaviour is different.
The copy function makes all the data in the Core HR libraries available in the other modules of the Cegid HR suite.
However, only data from the current version is copied, as the Administration module does not use the version management strategy.
There are two types of copy:
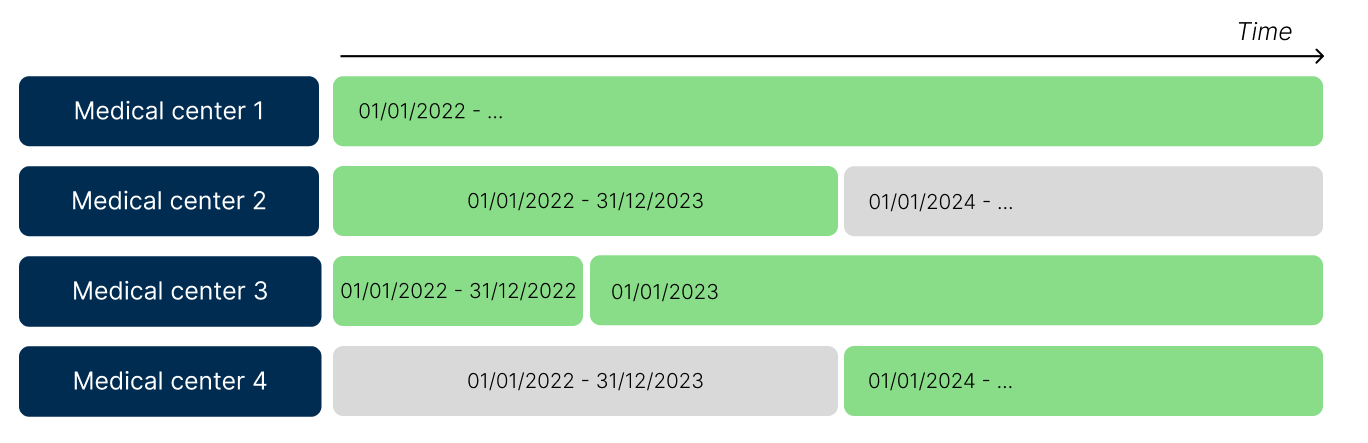
instant copy: this copy is launched as soon as you modify the node record of the current version of a library.
For example: changing the label or deactivating the node in the current version.
scheduled recopy: this takes place every 24 hours, usually in the early morning. It only takes place when Core HR detects a new version of a library on the current date.
In the example below, on 01/01/2024, the planned copy will deactivate medical centre 2 (nodes and structure) and activate medical centre 4 (nodes and structure) in the Administration module, but it will not affect the other two medical centres, which have not changed by this date.